Tag: AI product images

  • How to Preserve Product Accuracy in AI-Generated Images

    Human reviewer comparing a fictional terracotta reference product with an AI-assisted contextual image using a blank accuracy checklist
    AI-generated editorial illustration using a fictional, unbranded product reference. It is not a merchant result, physical-SKU test or product-accuracy benchmark.

    Reviewed and updated: 12 August 2026

    Editorial test status: this page publishes a blank, repeatable same-SKU audit protocol. GPTWala has not claimed observed defects or tool accuracy rates because a controlled exact-SKU test was not completed for this article. The category examples are clearly labelled illustrative.

    The safest way to preserve product accuracy in an AI image is to make the exact SKU the source of truth, protect rather than regenerate its pixels, and compare every output against several verified real views. Reject any change to identity, variant, quantity, included parts, label, material or other buyer-relevant detail. Photorealism, a strong prompt and even platform acceptance do not prove that the pictured product is correct.

    Table of contents

    1. Why a realistic AI product image can still be wrong
    2. Build the source-of-truth pack
    3. Classify the edit before choosing the method
    4. Prevent errors at input, edit and export
    5. Use a four-level defect severity system
    6. Run the four-pass product-accuracy audit
    7. Category-specific stop-ship fields
    8. Decide whether to fix, recapture, change method or stop
    9. Use the same-SKU truth-audit protocol
    10. Set tolerances, ownership and records
    11. Separate truth, disclosure, provenance and compliance
    12. Estimate time, cost and resources
    13. Run a five-SKU pilot
    14. Frequently asked questions

    Why a realistic AI product image can still be wrong

    Photorealism is appearance, not evidence

    An image can have convincing light, shadows and materials while depicting the wrong sale item. A generative system may reconstruct a clipped edge, unreadable label, reflection, weave, stone setting or hidden side with a plausible detail. Plausible is not the same as verified.

    This distinction matters commercially. A Jaipur jewellery seller does not deliver “a photorealistic necklace”; the seller delivers a particular necklace with a particular chain, clasp and stone setting. A Surat wholesaler does not deliver “a realistic printed kurti”; the buyer expects the sampled print, border, cut and colourway. Product truth belongs to the SKU and offer—not to the visual style of the output.

    Even a tool provider may warn that generative results can be unexpected. Google’s current Product Studio guidance describes the feature as experimental, says it may create unexpected images or videos, and notes that it works better for some product types than others. That is a reason to review outputs, not a claim that every result will be inaccurate.

    Prompts describe intent; controls and comparison enforce it

    “Keep the product exactly the same” is a useful instruction, but it is not an approval record. Stronger protection comes from a chain of controls:

    1. supply verified views of the exact variant;
    2. list the attributes that cannot change;
    3. make the editable region as narrow as the job allows;
    4. change one thing at a time;
    5. compare at product-relevant zoom; and
    6. record a human decision against clear stop rules.

    A prompt can reduce ambiguity. A mask or protected layer can reduce the edit area. Neither guarantees that an output is faithful. The comparison against the real item closes the loop.

    Platform acceptance and product truth are separate

    Platform rules give sellers a destination-specific floor; they do not replace product review. Google Merchant Center’s current main-image guidance tells merchants to show the actual product accurately and to use the correct variant, colour, pattern and material. An Amazon India moderator’s product-image guidance similarly says all images must accurately represent the product for sale.

    An upload can still be wrong for your SKU even if an automated check does not reject it. Conversely, an accurate image can fail a channel rule because of its crop, background or overlay. Run product-truth approval first, then the current platform and category check.

    The practical reason is also straightforward: the Consumer Protection (E-Commerce) Rules, 2020 apply to goods sold over digital or electronic networks and require relevant product information that helps the buyer make an informed pre-purchase decision. The ASCI Code says advertising descriptions, claims and visual presentations should be truthful and not mislead by implication, omission, ambiguity or exaggeration. This is practical content, not legal advice; obtain professional advice for your category and claims.

    Build the source-of-truth pack before editing

    The input image is not automatically the whole truth. A front photo cannot prove the clasp, underside, rear label, included accessories or exact depth. Build a small evidence pack that can answer the reviewer’s questions without asking the model—or a team member—to guess.

    Capture multiple verified views

    For each exact SKU and variant, keep the views needed to verify its buyer-relevant details:

    • front and back;
    • left and right sides;
    • top and bottom where construction matters;
    • close-ups of label, logo, fastening, texture, seams, ports, settings or joints;
    • current packaging and every included part;
    • a measured scale reference when size affects the scene; and
    • an untouched overview that shows quantity and the whole offer.

    You do not need a ritualistic number of photos. You need enough evidence to answer what the buyer will receive. If a critical surface or component is not visible, recapture it. Do not prompt around missing proof.

    Complete a locked-attribute sheet

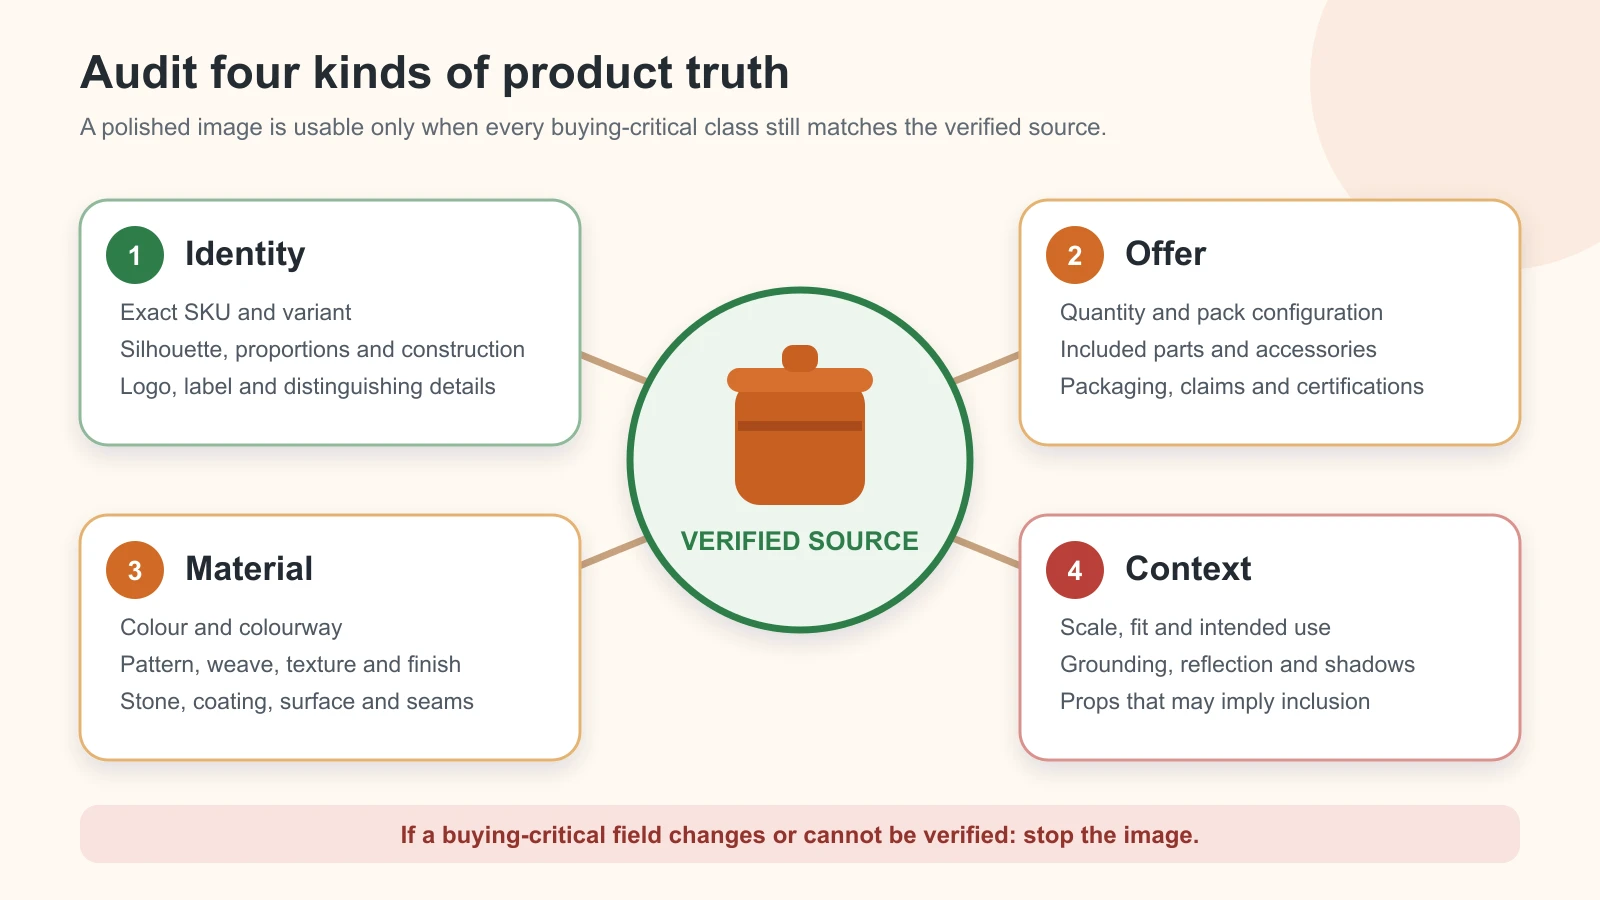
    Use four truth classes so small teams do not review only the most obvious feature, such as colour.

    Truth class What must match the exact SKU and offer Typical stop-ship examples
    Identity truth SKU, model, variant, silhouette, distinctive design, current version Wrong colourway, altered shape, another model’s feature
    Offer truth Quantity, included parts, packaging, label, claims and what the buyer receives Extra unit, missing accessory, changed net quantity, invented label claim
    Material truth Colour, pattern, weave, texture, finish, transparency, stone or setting, construction Gloss becomes matte, motif shifts, metal tone changes, port or seam appears
    Context truth Scale, grounding, use, fit/drape, surrounding props and buyer implication Product looks larger, prop appears included, impossible use, misleading fit

    Four product-truth classes—identity, offer, material and context—connected to one verified source product

    Original GPTWala product-truth diagram. A candidate must match every buying-critical class that applies to the exact SKU and offer.

    Copy this record for each SKU:

    Field Verified value Evidence Owner Stop-ship if changed?
    SKU and exact variant [enter] [stock/ERP record + item] [name/role] Yes
    Shape and proportions [enter] [front/side filenames] [name/role] Yes
    Colour and colourway [enter] [physical check + controlled photo] [name/role] Yes
    Material, texture and finish [enter] [detail filename/spec] [name/role] Yes
    Label/logo/visible text [enter] [current artwork/label close-up] [name/role] Yes
    Quantity and included parts [enter] [offer record + complete pack photo] [name/role] Yes
    Dimensions or scale cue [enter] [measured record] [name/role] Yes
    Permitted edit [enter] [approved image brief] [name/role]
    Destination and image role [enter] [approved image brief] [name/role]

    Physically verify high-risk fields

    The product owner or someone who knows the stock should inspect the real item when possible. Measure dimensions; count components or stones; operate the clasp, cap or fastener; read the actual label; and confirm the current packaging version. Do not copy a value from memory or assume the reference photo shows the latest variant.

    For products whose exact colour drives purchase, compare the output with the physical sample under a consistent review setup. A photograph, phone display and buyer’s screen introduce their own capture and display variables, so avoid claims such as “perfect colour match” unless you have a defined colour-managed method. The safer approval language is specific: “no material colour drift detected under the documented review conditions.”

    Classify the edit before choosing the method

    Risk depends less on whether a tool is marketed as “product photography” and more on how much of the sale item it is allowed to reconstruct.

    Preserve lane: lowest reconstruction risk

    Use the photographed product as a protected layer and change only what sits outside it: canvas, background, supporting surface or surrounding light. This is the preferred lane for a catalogue master, proof image or high-risk SKU.

    Inspect masks around fine chains, glass, chrome, fabric fibres, handles, shadows and transparent packaging. If the tool cannot separate the boundary reliably, use a manual cutout, conservative retouching or a new photograph.

    Contextualise lane: controlled creative risk

    Place the verified product into a new setting while keeping the product layer, view and scale stable. This can be useful for an additional or lifestyle image, but it adds questions about contact shadow, reflections, props, intended use and scale.

    Context is not harmless decoration. A spoon beside a jar can look included. A model can change the perceived size of a handbag. A reflection can imply a finish that is not present. Review the whole buyer implication, not only the product outline.

    Concept-only lane: not product proof

    Use text-to-image or strongly generative exploration for moodboards and campaign ideas. Do not use it as evidence of an exact sale SKU unless the final commercial asset is rebuilt with verified product content and passes the truth audit.

    Stay out of a generative sale-image workflow when:

    • the product’s reverse side or construction is unknown;
    • precise apparel fit or drape is the claim;
    • a reflective, transparent or very fine object cannot be isolated reliably;
    • a label carries regulated, safety, health, capacity or performance information;
    • a technical cutaway would reveal unseen internal parts; or
    • the generated image itself would be the buyer’s only proof of an expensive or highly variable item.

    Prevent errors at input, edit and export

    Input controls

    • Clean the product and photograph the exact current variant.
    • Keep unclipped edges and enough resolution for the reviewer to inspect critical detail.
    • Separate variants into different folders and briefs; never mix “similar” colourways as references.
    • Correct obvious exposure or white-balance problems conservatively without beautifying the product.
    • Record real dimensions and included parts outside the image.
    • Keep the untouched originals read-only or in a protected source folder.

    Edit controls

    • Prefer a mask or layer that excludes the product from generation.
    • Make the editable region smaller than the product whenever the job permits.
    • Ask for one controlled change per iteration.
    • Use the same crop and product scale across candidates so comparison is easier.
    • Keep scene complexity low until a simple result passes.
    • Record tool, model or feature, date, prompt, reference files and important settings.
    • Save every reviewed candidate, not only the final attractive one.

    If a product detail changes repeatedly, do not keep adding adjectives to the prompt. Narrow the edit, restore the real layer, change the method or stop.

    Export controls

    • Export from the approved master, not from a messaging-app preview or screenshot.
    • Do not overwrite the untouched source or the approved master.
    • Check that resizing, sharpening, background removal, auto-enhancement or compression has not altered a critical edge, label or texture.
    • Inspect the exact crop shown in the live destination; a safe full image can become misleading after an automated crop.
    • Preserve required origin metadata and inspect the delivered file after optimisation.
    • Record filename, version, destination, status and reviewer so an old variant cannot return later.

    Use a four-level defect severity system

    A beautiful image should not win an argument against a critical defect. Classify the most serious buyer-relevant problem first.

    Severity Definition Required action
    Stop-ship Wrong identity or variant; changed quantity, essential component, label/claim, material, safety/use implication; or materially altered geometry Reject. Do not publish. Return to source or a product-preserving method.
    Major Likely to change buyer understanding of colour, scale, texture, fit, finish, context or included items Reject or rework. Require a second review before approval.
    Minor Edge, shadow or crop defect that does not change product understanding under a written product-specific tolerance Correct if practical; approve only with the recorded tolerance and reviewer.
    Creative preference Scene or style choice with no product-truth effect Optional revision. Do not report it as an accuracy defect.

    “Close enough” is never acceptable for identity or offer truth. A necklace with the wrong stone count is not a minor defect because the stones are small. A carton showing an invented net quantity is not rescued by a good background. A machine part with one generated port is a different product depiction.

    There is no responsible universal pixel, percentage or colour-difference tolerance for all products. A harmless one-pixel fringe on a large opaque carton is not equivalent to a clipped prong on jewellery. The owner sets tolerances for the category and exact SKU; the reviewer applies them consistently.

    Run the four-pass product-accuracy audit

    Review the source and candidate side by side at the same scale. Include an overall view and identical crops of critical regions. Use the real item when a photograph cannot resolve the question.

    Each pass ends with one decision: APPROVE, REVISE or REJECT. Record the precise field and defect; do not write only “looks off.”
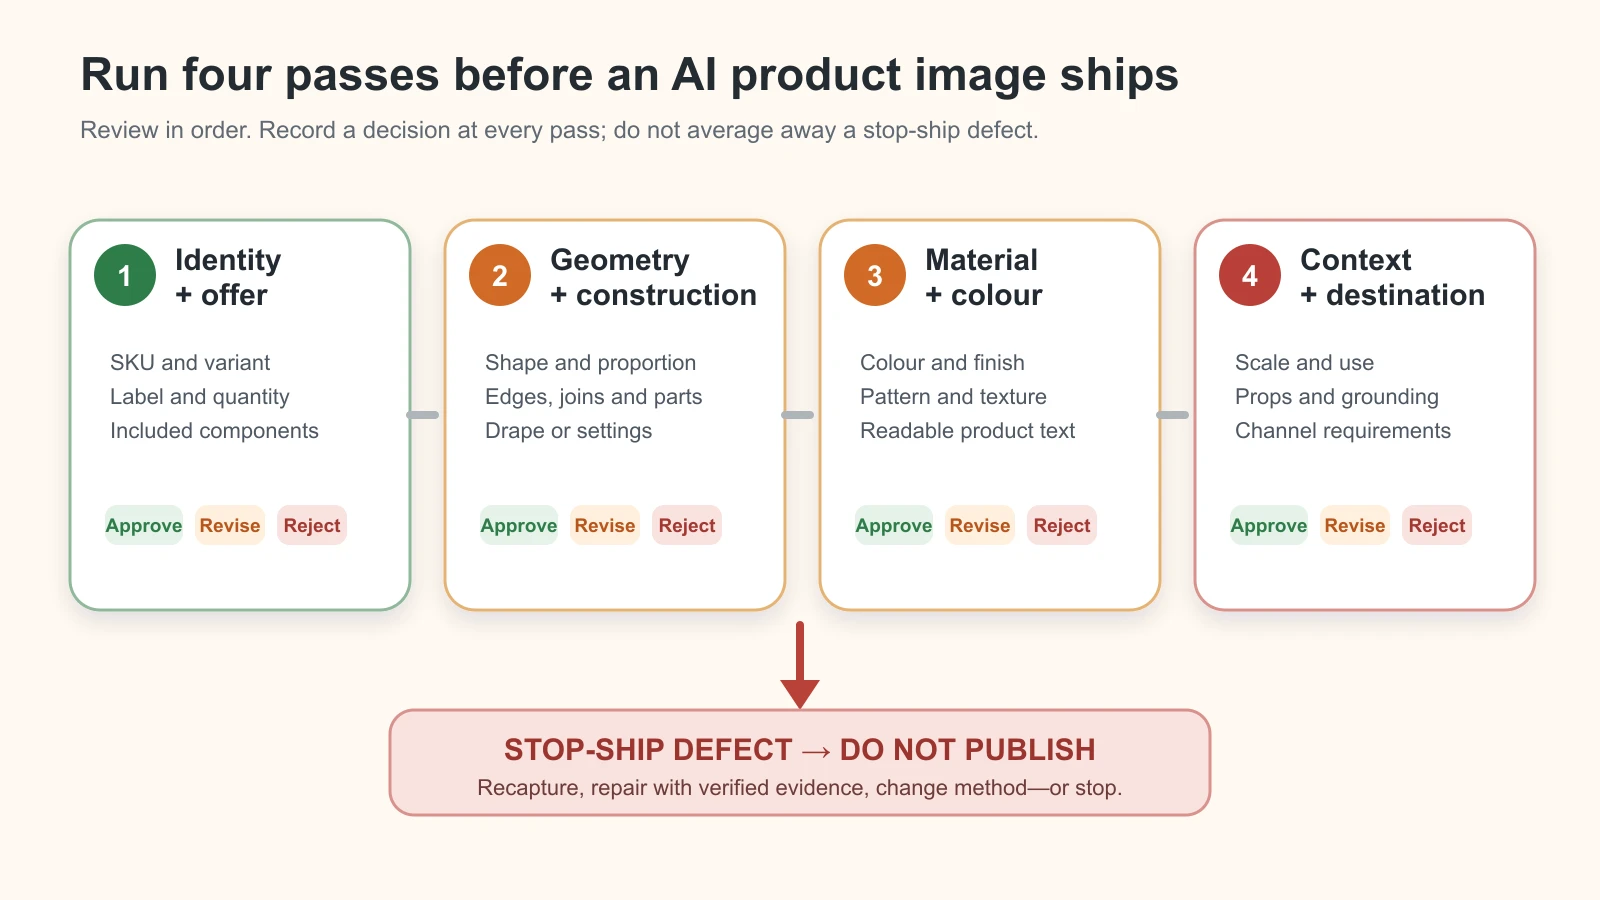
    Four-pass product-accuracy audit from identity and offer through geometry, material, and context, with approve, revise or reject at every pass

    Original GPTWala audit-flow diagram. Any stop-ship defect exits to “do not publish”; there is no averaged fidelity score.

    Pass 1: identity and offer

    Check:

    • exact SKU, model and variant;
    • sale quantity and pack count;
    • every included component and accessory;
    • current packaging version;
    • label, logo, visible text and claim;
    • customisation, size or colourway shown; and
    • whether any nearby prop could be mistaken as included.

    Any wrong identity or offer element is stop-ship. Do not repair an invented label by trying another full-frame generation. Restore the real label or product layer from approved artwork or recapture it.

    Pass 2: geometry and construction

    Compare the silhouette, proportions and product-specific construction:

    • edge profile and openings;
    • symmetry where the real item is symmetric—and real asymmetry where it is not;
    • handles, caps, pumps, clasps and fasteners;
    • seams, stitching, borders and joins;
    • holes, ports, threads, prongs and settings;
    • outsole, underside or reverse details when visible; and
    • orientation of repeated features.

    Use several source views. A front-only candidate can hide an error revealed by the side reference. If the required view was never captured, the action is RECAPTURE, not INFER.

    Pass 3: material and colour

    Check:

    • colour cast and variant colour;
    • motif, print or weave placement;
    • texture and surface grain;
    • gloss, matte, brushed or polished finish;
    • transparency and edge transmission;
    • metal and stone tone;
    • reflections that imply a false material; and
    • artificial smoothing that erases real construction detail.

    Review under documented conditions and state the limit. A normal buyer screen cannot be treated as a calibrated physical sample. For high-return-risk colours, keep a real, controlled reference image and consider a clear website note about normal screen variation without using that note to excuse a materially wrong asset.

    Pass 4: context, scale and destination

    Check:

    • believable contact and shadow;
    • consistent reflection and light direction;
    • product size against a verified scale cue;
    • credible installation, handling or use;
    • apparel fit, drape and transparency without unsupported promises;
    • props that do not imply inclusion or performance;
    • crop, occlusion and overlays in the actual destination; and
    • current channel-specific image and origin-metadata requirements.

    Google’s current main-image rules, for example, distinguish actual product imagery from generic illustrations and require the correct variant. They also say generative-AI images must retain specified IPTC DigitalSourceType metadata. That metadata is a destination and provenance check; it is not evidence that the SKU itself passed Passes 1–3.

    Category-specific stop-ship fields

    Use one shared control system, then add the details that carry risk in your category.

    Category Stop-ship fields to verify Safer proof assets
    Jewellery Stone count and setting, prongs, clasp, chain proportions, metal colour; any visible hallmark, weight or purity claim; reflection and scale Real front/back/detail images; measured scale; controlled secondary context only
    Apparel Exact print and border, embroidery, weave, colour, cut, length, stitching, transparency; fit or drape that implies another construction Real flat, front/back and detail proof; model image only after garment-specific review
    Packaging/cosmetics Container, cap/pump, net quantity, pack count, ingredients or claim text, colour/finish, current artwork version Preserve real pack and label layers; approved artwork comparison
    Footwear Last and silhouette, upper material, stitching, eyelets/laces/fasteners, outsole, pair/quantity, colour, grounding Real pair and outsole views; contextual image as secondary proof
    Manufactured/multi-part goods Ports, holes, threads, fasteners, dimensions, components, capacity/performance label, included accessories Real dimension/detail views, dealer sheet and measured record

    These are not separate thin workflows. The same source pack, severity model and audit applies. A specialist apparel or jewellery guide should add category expertise without weakening the stop rule.

    Decide whether to fix, recapture, change method or stop

    Use this decision path instead of generating endless variants:

    1. Is identity or offer wrong? Reject immediately. Return to the exact source and a protected-product method.
    2. Is evidence missing or unreadable? Recapture the real item. Do not ask AI to invent the reverse, label or component.
    3. Did the tool edit too much of the frame? Narrow the mask or restore the product as a separate real layer.
    4. Is the same material or geometry defect recurring? Change workflow or tool. More adjectives are not a control.
    5. Can a conservative manual repair restore the verified source without invention? Repair, save a new version and rerun all four passes.
    6. Is exact product proof essential and still uncertain? Stop using the generated candidate. Use real or hybrid photography.

    The fastest safe fix is often to make the edit less generative. If only the background needs to change, there is no reason to ask a model to rebuild the cap, chain, print, pump or port.
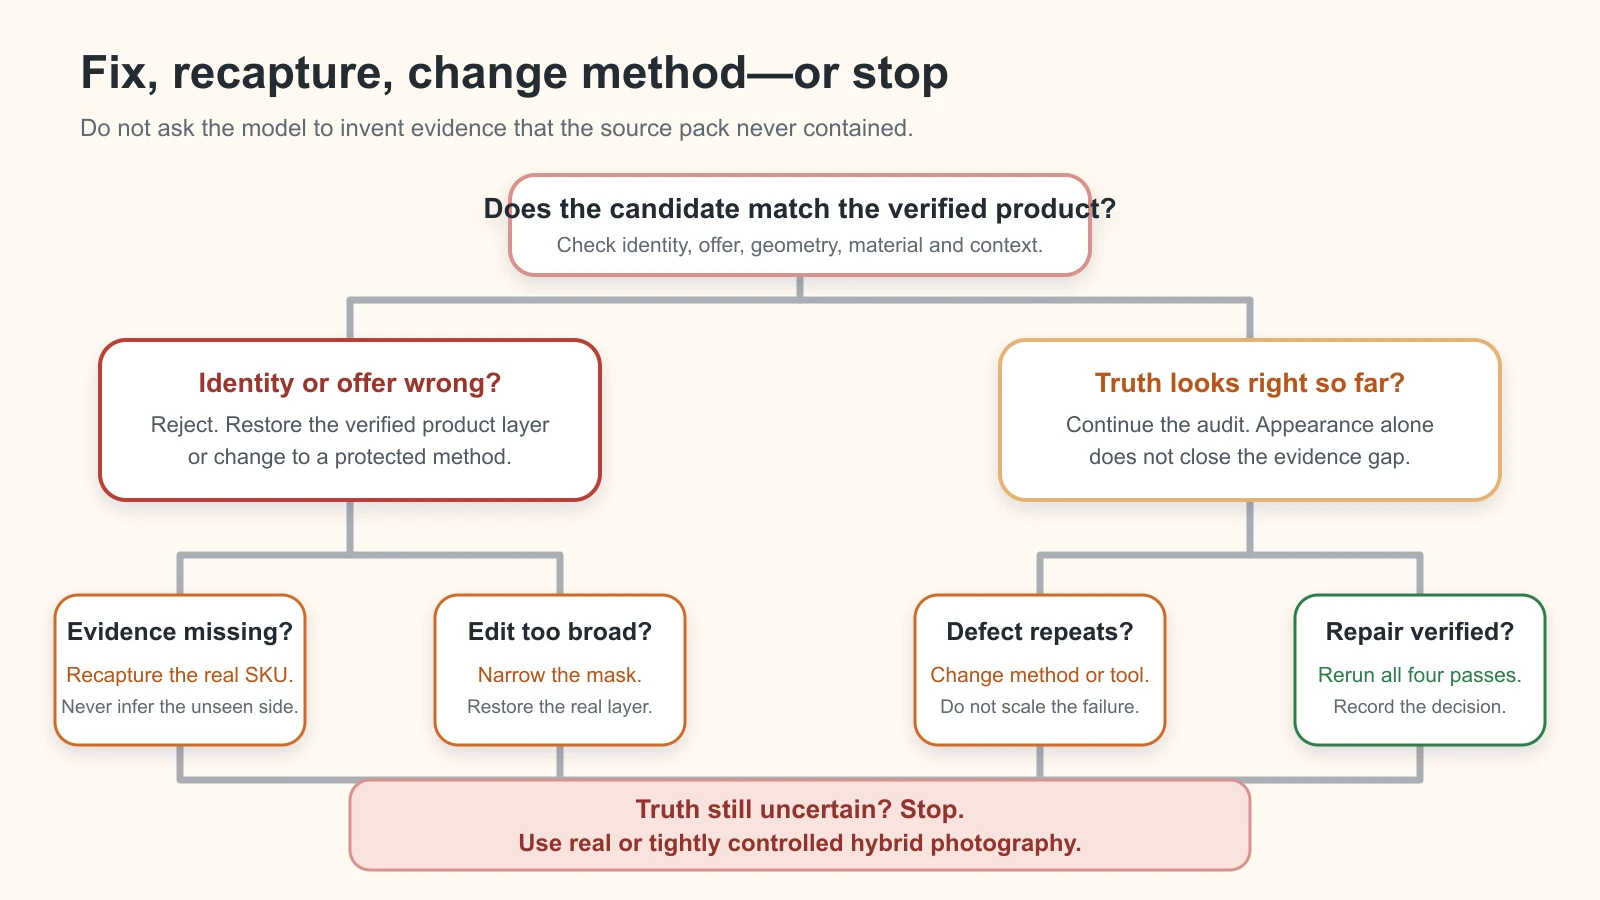
    Decision tree routing product-image defects to verified repair, recapture, a narrower edit, a different method or a stop

    Original GPTWala decision tree. Missing evidence routes to recapture, never invention; unresolved truth routes to real or tightly controlled hybrid photography.

    Use this same-SKU truth-audit protocol

    No same-SKU test was run for this article, so the following is a blank protocol, not a results table. Do not replace its placeholders with imagined defect counts or an AI-created “before/after” graphic.

    Choose one owned or clearly fictional reference SKU. Use the same source pack for three jobs:

    • Candidate P: protected-background edit;
    • Candidate C: restrained lifestyle context around the protected product; and
    • Candidate G: deliberately more generative, high-risk version for internal diagnosis only—not a sale image.

    Fix the attempt budget in advance and save every attempt. Compare identical crops and record only defects that are visible in the saved files or verified against the physical product.

    Field Reference Candidate P Candidate C Candidate G
    Tool/feature, version and date [enter] [enter] [enter]
    Prompt and editable region [link/file] [link/file] [link/file]
    Identity/offer decision Authoritative [approve/revise/reject + evidence] [enter] [enter]
    Geometry decision Authoritative [enter] [enter] [enter]
    Material/colour decision Authoritative [enter] [enter] [enter]
    Context/destination decision N/A [enter] [enter] [enter]
    Highest severity [enter] [enter] [enter]
    Final action [approve/repair/recapture/change method/stop] [enter] Internal test only
    Reviewer and date [owner] [enter] [enter] [enter]

    When reporting the test, separate observation (“the saved output shows six stones; the verified source has five”) from cause hypothesis (“the broader edit may have reconstructed the setting”). A one-SKU test can expose failure modes in that run; it cannot establish a universal error rate for a tool or model.

    Set tolerances, approval ownership and recordkeeping

    The operator should know what they may approve without escalating.

    Role Responsibility Must not do
    Product/SKU owner Defines locked fields, current offer, evidence and product-specific tolerances Approve from memory when current stock can be checked
    Image operator Uses approved source and brief; logs versions and self-checks all four passes Quietly accept or “repair” a stop-ship field
    Reviewer Compares against the source pack and records approve/revise/reject Judge only the scene’s attractiveness
    Publisher/catalogue owner Checks final file, destination crop, metadata, current rules and approved version Publish an unreviewed candidate or old variant

    For high-risk products, use a second reviewer when feasible. The person who generated the image may miss the same product change twice because they are focused on scene quality. The second reviewer should know the SKU or have access to the item and verified specification.

    Use a simple approval log:

    Asset ID | SKU/variant | image role | source version | candidate version | highest defect | decision | required action | operator | reviewer | review date | destination | published version

    Keep the source pack, prompt, controls, reviewed candidates, difference crops and final file together. If packaging or the product changes, create a new source version and retire old approved assets. Do not silently overwrite the history; a rollback path prevents an old but attractive image from returning to the catalogue.

    Product truth, disclosure, provenance and compliance are different checks

    An asset can pass one check and fail another:

    • Product truth: does it accurately depict the exact SKU and offer?
    • Disclosure/provenance: does it record or communicate how the image was created or edited where required or useful?
    • Rights and privacy: are the product design, logo, model, location and uploaded materials authorised for this use?
    • Destination compliance: does the final file meet the current platform, country and category rules?

    The current IPTC Photo Metadata User Guide defines source-type values for AI-created and AI-edited media and fields that can record the system, version and prompt information. Google Merchant Center separately requires specified AI-origin metadata in generative-AI product images. Preserve the required metadata through editing, compression and upload.

    But provenance is not a product certificate. The C2PA explainer states that provenance can support understanding of an asset’s origin and history, but by itself cannot tell whether the content is true, accurate or factual. A valid creation record can describe the history of a necklace image without proving the necklace’s stone setting matches the sale item.

    Do not claim that Indian law requires a visible “AI-generated” badge on every product image. Follow the specific destination and advertising rules that apply, avoid misleading visual implications, preserve required metadata, and seek category-specific legal advice where needed.

    Estimate time, cost and resources per approved image

    Cheap generation is not the same as cheap approval. Track the work that creates an approved asset:

    Cost per approved image = (tool charges + capture labour + operator time + review time + repair/recapture time + allocated overhead) ÷ number of approved images

    Also track:

    • attempts generated per approved image;
    • first-pass approval rate;
    • stop-ship and major defects caught;
    • rework and recapture time;
    • approvals per operator hour;
    • review disagreements;
    • rejected tool credits; and
    • destination failures after product approval.

    Do not borrow a generic “five-minute image” claim. Make a time budget for your pilot, then replace it with observed numbers. A small team minimally needs the physical SKU, a phone or camera, simple repeatable lighting, a measurement tool, an organised source folder, the editing tool, a reviewer who knows the product and a spreadsheet or database for decisions. High-risk colour, reflective products, models or regulated claims may justify specialist photography or retouching.

    The comparison that matters is not AI fee versus photographer day rate. Compare the total cost and time of an approved usable image, including failed generations, supervision and return-risk from a misleading asset.

    Four illustrative Indian business scenarios

    These are control examples, not reported merchant case studies.

    Jaipur jewellery seller

    A lifestyle candidate adds an extra prong and changes the stone arrangement. The reflection is attractive, but the construction differs. Classification: identity/material truth, stop-ship. Action: reject; keep real jewellery pixels and create only the surroundings, or use controlled real photography.

    Surat apparel wholesaler

    A model image moves the printed border and creates a narrower cut. Classification: material and context truth, stop-ship or major depending the exact offer implication. Action: reject the candidate; retain real flat/front/back/detail proof and move any model image through a garment-specific review.

    Packaged-goods retailer

    Background generation redraws the front panel and substitutes readable-looking net-quantity text. Classification: offer truth, stop-ship. Action: restore the photographed pack and label as a protected layer; never manually guess missing regulatory or quantity text.

    Small industrial manufacturer

    A dealer creative shows an additional connector that is absent from the physical part. Classification: identity and construction truth, stop-ship. Action: return to the real part image and measured detail views. Do not publish the candidate as a technical or compatibility illustration.

    Run a five-SKU accuracy pilot before catalogue rollout

    Choose five SKUs with different risks, not five easy products:

    1. opaque product with a simple edge;
    2. transparent, reflective or fine-detail product;
    3. product with important label text;
    4. product with variants or a precise pattern; and
    5. multi-part, wearable or scale-sensitive product.

    For each one, define the image job, fix the attempt budget, run the source pack and four-pass audit, and record approval, severity, rework, operator time and reviewer time. Include failures in the review.

    Pause the rollout if an identity or offer defect escapes the review stage, if reviewers cannot resolve a material question from the source, or if cost per approved asset is worse than a real or hybrid alternative. The pilot tests the control system—not sales impact. Do not promise higher conversion, fewer returns or revenue without a separate, credible measurement design.

    Accurate product images are one part of taking an offline business online. They still need a useful digital presence, consistent content distribution and a clear path from interest to enquiry and follow-up. In GPTWala’s DAA framework, that connects Digital Presence, AI Content Creation and a ₹100/day WhatsApp ads system.

    Join the GPTWala workshop to see how product assets fit into that wider system. The ₹100/day figure is a taught starting-budget setup, not a guarantee of reach, leads, sales or profitability.

    Frequently asked questions

    Why does AI change my product’s colour, label or shape?

    Generative editing can reconstruct pixels instead of copying them exactly, particularly where a source is unclear, an edit selection is broad or the scene requires new reflections and geometry. Use verified multi-view references, protect the product layer, narrow the edit and reject material drift. Do not treat a more detailed prompt as a guarantee.

    What is the best way to keep a product unchanged in an AI image?

    Use a real photograph of the exact SKU as a protected product layer and generate only outside its boundary. Lock identity, offer, material and context fields in writing, then compare the candidate against multiple real views. For uncertain edges, text, reflections or fine detail, use manual masking or real/hybrid photography.

    Is one reference photo enough?

    Only when that one view contains every detail needed for the specific low-risk job—which is uncommon for commercial approval. A front image cannot verify a back label, clasp, underside, included part or depth. Capture the missing evidence instead of asking the tool to infer it.

    Does masking guarantee the product will not change?

    No. A mask or selected area reduces the permitted edit, but boundaries can be imperfect and downstream resizing or enhancement can still alter the result. Inspect difficult edges, compare the full candidate and audit the final exported file.

    Can an AI product image be perfectly colour accurate?

    Do not promise perfect physical colour from a normal phone-to-screen workflow. Capture, white balance, file profiles, display settings and ambient light can all affect appearance. Document the review conditions, compare with the physical item and reject material drift. Use a defined colour-managed workflow when exact colour is commercially critical.

    Are AI images safe for jewellery and apparel?

    They can be useful as controlled secondary assets, but both categories have high-risk fields. Jewellery requires checks for settings, prongs, stone count, clasp, metal tone, reflection and scale. Apparel requires checks for print, border, weave, stitching, cut, fit, drape and transparency. Keep strong real proof and use specialist review.

    Does AI metadata prove that the product is accurate?

    No. Metadata or Content Credentials can describe origin, edits and tools, and a platform may require particular tags. C2PA explicitly separates provenance from factual truth. Product accuracy still requires comparison with the exact SKU, verified specifications and current offer.

    If Amazon or Google accepts the image, is it safe to publish elsewhere?

    No. Platform acceptance is not a universal product-truth certificate, and each channel has different image roles and rules. First approve the SKU and offer; then check the current destination, country and category requirements. Recheck after any crop, compression or automated improvement.

    When should I stop using AI and hire a photographer or retoucher?

    Stop when critical evidence is missing, product pixels cannot be protected, the same material defect recurs, precise fit or technical proof is required, a high-value reflective/transparent item cannot be verified, or review costs exceed a real or hybrid alternative. The goal is an approved truthful asset—not maximum AI use.

    Sources and review method

    This article was researched and reviewed on 11 August 2026 using current official or first-party sources for platform, Indian advertising and provenance claims. Tool behaviour, marketplace rules and metadata guidance can change. Recheck named sources within 24 hours of publication, recheck destination rules on upload day and after major platform updates, and keep the non-legal-advice caveat.

  • AI Jewellery Photography: Reflections, Stone Settings and Product-Truth Checks

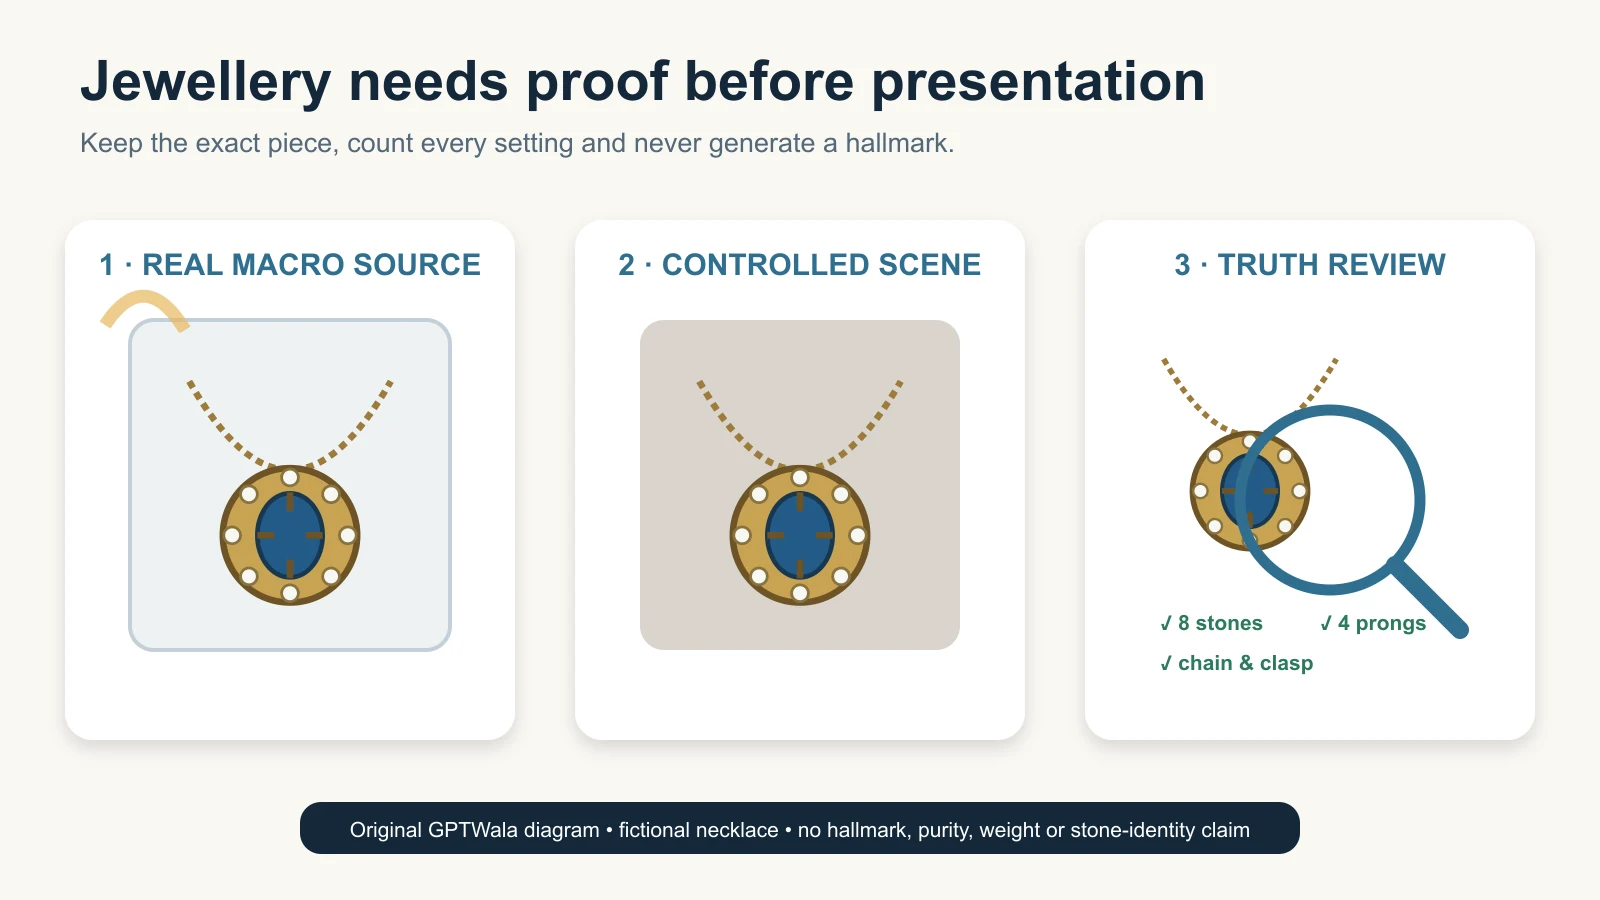
    Real macro capture, controlled AI background and product-truth inspection of the same fictional jewellery piece
    Editorial illustration of a reference-first jewellery image workflow. The necklace is fictional, unbranded and not hallmarked; it is not a merchant result, a purity claim or proof of AI fidelity.

    Reviewed and updated: 12 August 2026

    Editorial disclosure: no jewellery shoot, AI edit, marketplace submission or product result was run for this article. The workflow and checklists are GPTWala editorial guidance built from current official sources. Any generated visual on this page must use fictional jewellery and must not imply hallmark, purity, weight, stone identity or merchant performance.

    AI can help a jewellery seller remove a background, create secondary context or prepare channel crops, but the sale piece must remain the source of truth. Keep real main and macro photographs for proof. Count every stone and setting, verify clasp and chain geometry, preserve meaningful reflections, measure scale, and photograph—not generate—any hallmark. Reject an output if even one buying-relevant feature changes or cannot be verified.

    Table of contents

    1. Why jewellery needs a stricter workflow
    2. Build proof, presentation and context images
    3. Make a jewellery truth card
    4. Capture the exact piece
    5. Control reflections without erasing material
    6. Audit stones, settings and construction
    7. Handle hallmarks and HUID safely
    8. Prove scale, colour and quantity
    9. Choose the safe AI lane
    10. Run the jewellery product-truth gate
    11. Use the workflow for Indian jewellery cases
    12. Fix common failures
    13. Know when real capture is mandatory
    14. Frequently asked questions

    Why jewellery needs a stricter AI photography workflow

    Jewellery combines small geometry, reflective materials, repeated detail and high-value product claims. A tiny visual change can alter what the buyer thinks is included or what the piece is made of.

    An AI editor can make a plausible ring while changing a prong. It can make a necklace “cleaner” while removing a link. It can turn a pair of earrings into two slightly different designs, brighten stones beyond their real appearance, or rebuild a blurred mark into convincing nonsense.

    The danger is not that the result looks artificial. The danger is that it looks believable.

    Treat these as separate questions:

    • Does the image look attractive? This is a presentation decision.
    • Does it show the exact sale piece? This is a product-truth decision.
    • Does it prove purity, weight, stone identity or certification? Usually not. Those facts require verified product records and, where applicable, formal marks or reports—not a photograph alone.

    The complete AI product photography guide for Indian businesses gives the category-level strategy. This page owns the jewellery stop-ship fields: stone and prong count, setting geometry, clasp and chain construction, hallmark evidence, reflections, colour, scale, symmetry and offer quantity.

    One clean photo cannot do every job

    A ring main image should let a buyer identify the exact ring. A macro image should show setting and finish. A measured scale image should answer size questions. A model image may provide context, but it cannot replace those proof views.

    Google Merchant Center’s current additional-image guidance explicitly separates a main product image from additional views and even uses a ring example with another angle, a model view and packaging. That is useful as an image-role model. It is not a claim that Google approves any AI-generated jewellery image.

    Build three image layers: proof, presentation and context

    Create the evidence layer before asking AI for decoration.

    Layer Buyer question Appropriate source AI freedom Non-negotiable rule
    Proof What exactly will I receive? Real main, back, side, clasp, setting, hallmark and measured views of the exact piece Very low Product pixels and verified data must remain real and legible
    Presentation Can I inspect it clearly? Real product isolated and carefully retouched Low Crop, dust cleanup and background work cannot alter construction, colour or quantity
    Context How might it look when worn or displayed? Retained real product layer plus verified measurements; real model when fit/scale matters Limited and controlled Context cannot imply false size, drape, inclusion, stone behaviour or certification

    For high-value, one-off, antique, custom or regulated claims, real capture should dominate all three layers. A generated wearing image can be a concept for a shoot; it is not proof that the piece will sit at that size, angle or fall on a real person.

    Keep the sale offer separate from the styling set

    If the buyer receives a necklace and earrings, show the three pieces clearly. If the chain is a styling prop and not included, do not let it appear as part of the set. If a listing sells one earring rather than a pair, the image, title, quantity and price must all agree.

    Google’s current customized-products guidance gives a jewellery-relevant example: a seller offering either a full ring or a stone only should make the title, image, description and price reflect the actual offer. Apply the same offer-truth discipline on your website, B2B catalogue and WhatsApp catalogue even when Google is not the destination.

    Make a jewellery truth card before the shoot

    Put the exact physical piece, its SKU record and its included components together. Complete one truth card per child variant—not one card for an entire design family.

    Truth field Record from the physical piece and verified data Automatic-reject example
    Identity SKU/design code, metal/finish variant, size and current version Image shows a neighbouring size, finish or customisation
    Offer quantity Single piece, pair, set and every included component Extra chain, charm, earring, backing or box appears included
    Stone map Count, shape, position, size relationship and repeated sequence Missing, added, duplicated or relocated stone
    Setting map Setting type as recorded, prong/bead/channel pattern and visible seat Prong count, spacing or setting geometry changes
    Construction Links, joints, hinges, backs, screw/post, clasp, bail and detachable parts Link thickens, clasp changes, hinge disappears or bail is rebuilt
    Metal appearance Verified metal/finish description and reference images Yellow/rose/white tone changes or matte becomes mirror-polished
    Surface detail Engraving, texture, enamel, filigree, granulation and maker marks Pattern is simplified, mirrored or invented
    Hallmark/identifiers What is physically present, where it is and the linked record Mark is sharpened, completed, moved, copied or created
    Dimensions Measured length, width, diameter, drop and relevant thickness Model/context image makes the piece materially larger or smaller
    Weight/purity/stone claims Verified product record, invoice/report or applicable official record Image or caption infers a fact from visual appearance

    Do not ask a generative system to decide whether a stone is natural, laboratory-grown, treated or a particular variety. Do not infer gold purity, silver fineness, carat weight or total product weight from appearance. Visuals can show a piece; verified records must support the claim.

    Capture a source-of-truth pack for the exact piece

    The product should be cleaned and handled by someone who understands the material. Do not polish away intentional patina or alter an antique finish merely for the shoot.

    Capture the minimum proof views

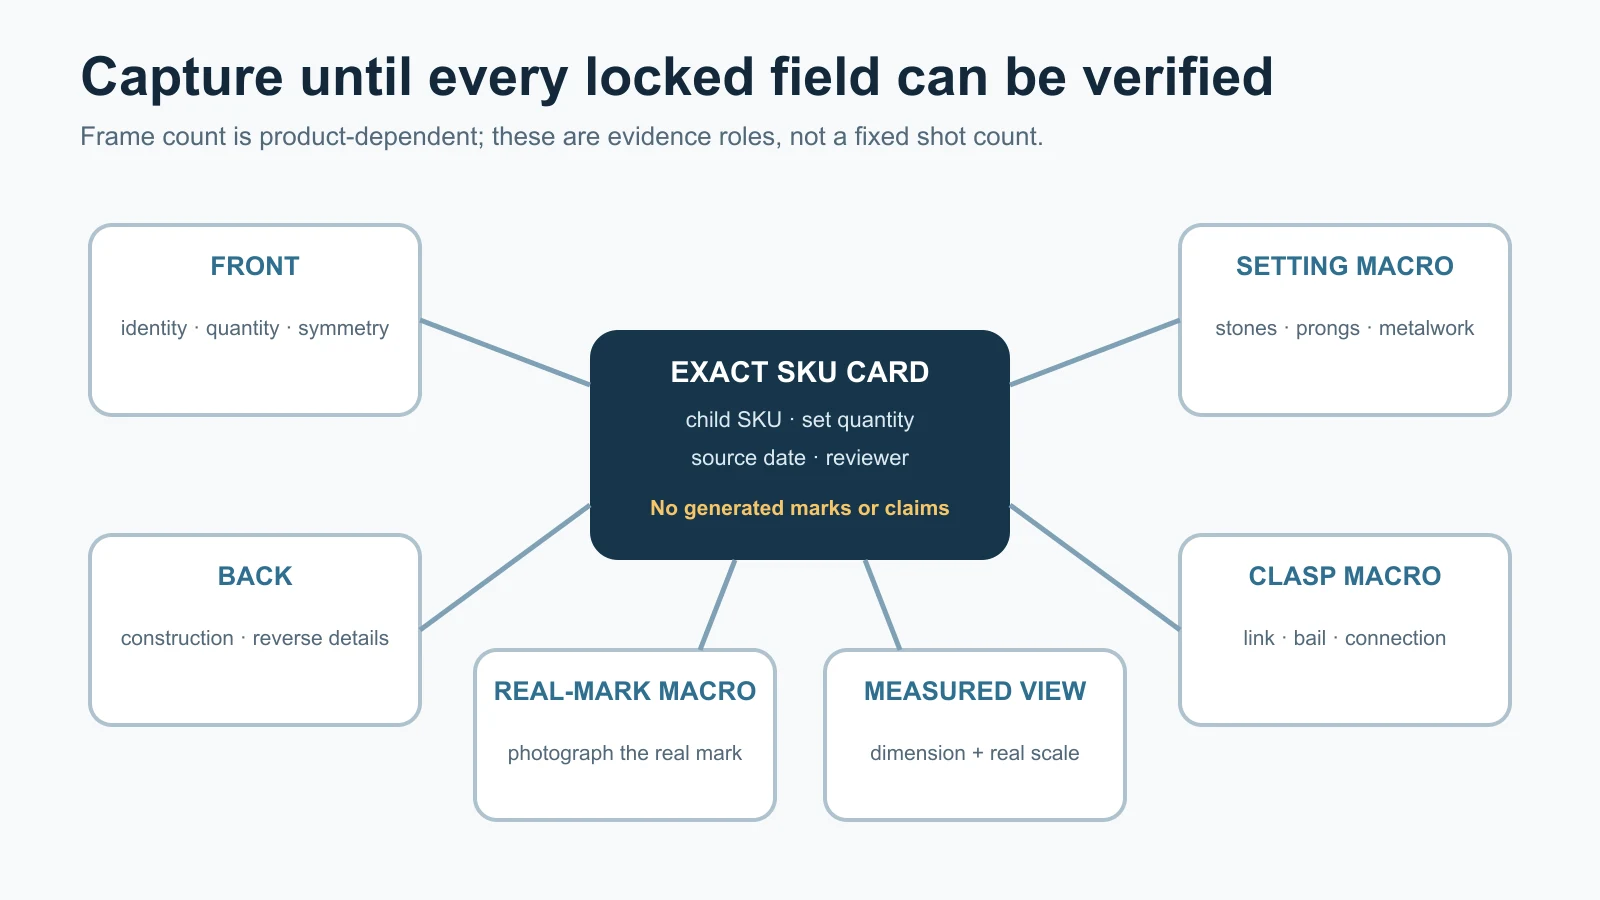
    The exact shot list depends on the piece, but a useful jewellery source pack often includes:

    1. full front view;
    2. full back view;
    3. left and right profiles where construction differs;
    4. 45-degree view showing depth;
    5. macro of the main setting and stone map;
    6. macro of clasp, hinge, post, screw, bail or other operating part;
    7. real hallmark/identifier view where applicable;
    8. measured scale view with a ruler or controlled reference;
    9. every item in the pair or set; and
    10. packaging only if it is included in the offer.

    For a chain or anklet, add a full-length laid-straight view and close-ups of the repeating link pattern. For earrings, capture both items together and each item separately. For a ring, capture the head, shoulders, shank, gallery and inner band. For an articulated necklace, capture the back and closures so the AI cannot invent how parts connect.

    Use repeatable light, not maximum sparkle

    GIA’s official phone jewellery and gem photography guidance notes that background can influence the apparent colour of metals and gemstones, recommends using one light colour/temperature rather than mixed lighting, and discusses bounced and diffused light. Its old social-media sizing examples should not be used as current platform rules; the useful evidence here is the lighting and background principle.

    Use diffusion to make reflections controllable, not to remove every reflection. Keep the camera stable. Capture a colour/neutral reference in a separate frame when colour matters. Inspect fine settings and marks at full file resolution before putting the piece away.

    Keep a real scale reference outside the sales frame

    Photograph a ruler or measurement grid beside the piece for internal verification. The final clean product frame may omit it, but the reviewer needs a measured reference before approving an on-model or contextual image.

    Do not use a coin, fingertip or generic hand as the only scale proof. Coins differ across markets and a generated hand can make a ring or earring look materially larger or smaller.

    Jewellery source-pack map showing front, back, setting, clasp, hallmark and measured views

    Original GPTWala source-pack map. Photograph the real mark; do not generate one. The number of frames is product-dependent; capture until every locked field can be checked without inference.

    Control reflections without erasing material truth

    Reflections are part of how buyers read polished metal, faceted stones and curved surfaces. A reflection can be distracting, but removing all reflections can turn gold, silver, steel or a gemstone into a flat material that the product is not.

    Classify each reflection before changing it

    Reflection type What it tells the buyer Safe treatment Stop rule
    Edge highlight Shape, thickness and curve Soften distractions while retaining continuous geometry Reject if the edge disappears or changes shape
    Metal gradient Finish and curvature Balance exposure conservatively Reject if texture/finish becomes another material
    Facet highlight Cut/facet orientation and light return Retain real pattern; use additional real angles Reject invented, cloned or symmetrical sparkle
    Dark flag/reflection Surface curvature or studio environment Reduce only if the underlying surface remains truthful Reject if removal erases engraving, setting or joint
    Coloured cast Light/background contamination Correct against the physical piece and neutral reference Stop if the variant cannot be verified
    Camera/room reflection Unwanted studio information Reshoot with flags/diffusion or carefully retouch Do not rebuild the jewellery underneath from imagination

    If an AI “clean-up” makes every stone equally bright, duplicates the same highlight across different facets or turns a brushed surface into chrome, the result has stopped being a conservative edit.

    Use real capture to solve reflection problems first

    Move and diffuse the light, change the camera angle slightly, use white/black cards to shape the metal, and capture several truthful options. When the source already contains readable material cues, background removal is easier to audit. When the source is a white glare surrounded by black void, AI must invent what the camera did not record.

    Audit stone count, settings and construction

    The jewellery audit starts with counting, not admiring.

    Build a stone-and-setting map

    For one exact piece, mark:

    • centre stone or focal element;
    • side and accent stones;
    • repeated stone sequence;
    • shape and relative size of each visible stone;
    • prongs, beads, channels, bezels or other visible setting structure;
    • intentional asymmetry;
    • empty spaces and negative shapes; and
    • connection points between the setting and metalwork.

    Use a real macro and a simple numbered overlay outside the sale image. The overlay can say “S1–S12” or use zones; do not place generated numbers over the product and trust them.

    Count both the stones and the structures holding them

    An output can keep twelve bright objects but change the setting. Check prongs or beads around each stone, channels, bezels, gallery openings and the seat. A repaired-looking prong can imply intact construction when the physical piece differs.

    For pavé, kundan-style, polki-style, meenakari, filigree or other detailed work, use the exact terminology and material claims your verified product record supports. A visual style resemblance is not evidence of technique, origin, stone identity or metal purity.

    Check pair and set symmetry without forcing false symmetry

    Two earrings in a pair should match the physical pair. Do not mirror one earring to manufacture the second unless the actual sold pair is separately verified and truly mirrored. Handmade or hand-finished pieces can contain real, acceptable differences; do not let AI “correct” them into a different product.

    Photograph hallmarks and HUID—never generate them

    A hallmark is not a decorative texture. Treat it as a separate proof asset tied to the physical article and its records.

    What current BIS guidance supports

    The Bureau of Indian Standards hallmarking overview, last updated 23 April 2026, describes hallmarking as the official recording of precious-metal content and says gold and silver are within India’s hallmarking system.

    The current BIS general hallmarking FAQ states that a gold hallmark introduced with HUID contains three elements: the BIS mark, purity in caratage/fineness and a six-digit alphanumeric HUID. It also says consumers can use Verify HUID in the BIS Care app, and that each item in a pair and detachable parts should bear their applicable separate marks/HUIDs.

    This has direct photography implications:

    • photograph the mark on the exact article or part;
    • capture enough real resolution for a reviewer to compare it;
    • keep the mark linked to the correct SKU and component;
    • verify the HUID through the current BIS route where applicable; and
    • never copy one item’s mark onto its pair, another size or another child variant.

    Do not use one generic rule for every silver piece

    BIS’s October 2025 newsletter says revised IS 2112:2025 introduced voluntary HUID-based silver hallmarking from 1 September 2025, with its own components and BIS Care details. Some BIS FAQ text still names the earlier silver standard. Because metal, marking date and applicable scheme matter, do not reconstruct a silver mark from this article or copy a gold layout. Check the physical piece and the latest BIS hallmarking sources before making a live claim.

    A hallmark photo is not the whole verification

    A sharp image can still show a copied, mismatched or irrelevant mark. Verification belongs to the physical article, BIS records where applicable, invoices/reports and the seller’s controlled product data. Photography documents what is visible; it does not assay the metal.

    Automatic reject: the edit sharpens unreadable characters, completes a partial mark, changes a digit/letter, moves the mark, invents a purity stamp, transfers a mark between items or hides a real mark that buyers need to inspect.

    Prove scale, colour and quantity

    Scale needs measurements, not mood

    Record the dimensions that define the piece:

    • ring inner diameter/size and head dimensions;
    • earring width, height and drop;
    • pendant dimensions and chain length;
    • bangle inner diameter and opening;
    • bracelet/anklet length and extension range;
    • necklace length, drop and component spacing; and
    • relevant thickness where it changes appearance or use.

    Use those measurements to review any model or contextual image. If an earring that is 18 mm tall appears 35 mm tall relative to the ear, the image is misleading even if every stone is present.

    Do not print dimensions inside an AI-generated scene. Put verified measurements in native page text or a controlled graphic outside the jewellery pixels.

    Colour needs controlled comparison

    Gem and metal appearance changes with illumination, background, viewing angle and display. GIA’s official diamond colour overview describes colour grading under controlled lighting and precise viewing conditions; this is why a dramatic image cannot establish a laboratory colour grade. Keep the physical piece available during correction, use consistent light and compare against a neutral reference.

    For colour-change, pleochroic, opalescent or otherwise lighting-dependent material, use multiple real photographs with clear lighting disclosure and specialist review. Do not ask AI to create a “more accurate” colour from memory.

    Quantity must match the actual offer

    Count sale units and detachable components separately from styling props.

    Offer Required proof Common AI/production error
    Pair of earrings Both actual earrings, both backs if included, pair-specific marks where applicable One earring mirrored into a fake pair; missing back
    Necklace set Exact necklace, earrings, pendant/tikka or other included pieces Extra matching piece invented; one component omitted
    Ring only Exact ring and child size/variant Gift box or loose stone appears included
    Stone only Stone-only image and matching title/description/price Image shows a setting or completed ring
    Chain with pendant Confirm whether detachable pendant and chain are both included AI merges chain and pendant or changes bail
    Wholesale assortment Every SKU/quantity or an explicit representative-sample label One image implies all shown designs/colours are supplied

    Choose the safe AI lane for each image

    The safest tool is not the one with the most realistic output. It is the one that can perform the narrow job without making the truth unreviewable.

    Lane Allowed task Suitable output Required review
    Preserve — preferred Crop, canvas, restrained exposure/colour correction, dust cleanup and non-generative background isolation around retained real jewellery pixels Main, macro or catalogue presentation image subject to destination rules Compare at full resolution with real source and truth map
    Contextualise — limited Create background or model/display context around a retained, verified product layer Secondary lifestyle/banner/ad concept Product truth plus measured scale, lighting, contact and offer review
    Concept only — not commerce proof Generate a jewellery design, wearing view or scene where the sale piece itself is redrawn Moodboard or shoot planning Keep internal; recreate with the real piece before selling

    OpenAI’s current Images in ChatGPT documentation says an existing image can be edited with a selection or direct instruction, but warns that selections are not always precise and edits may extend beyond the highlighted area. Google’s current Product Studio documentation describes background, removal, resolution and image-generation features while warning that experimental features may produce unexpected outputs.

    Those are the right risk assumptions for jewellery: a mask and prompt are instructions, not locks.

    A safer background-edit instruction

    Using the supplied photograph of the exact jewellery SKU, change only the area outside the jewellery to a plain neutral studio background. Preserve the original jewellery pixels and its exact stone count, stone positions, prongs/settings, metalwork, chain/link pattern, clasp, bail, engraving, hallmark area, colour, finish, scale, pair/set quantity and camera angle. Do not add sparkle, stones, symmetry, marks, text, props or accessories. Do not sharpen or reconstruct any hallmark. Keep realistic existing reflections and add only a restrained contact shadow outside the product. Output one candidate for human review.

    This is a constraint prompt, not a fidelity guarantee. Use the product-truth prompt pack for additional roles, and the background-generation guide for mask/context technique. Jewellery approval still belongs here.

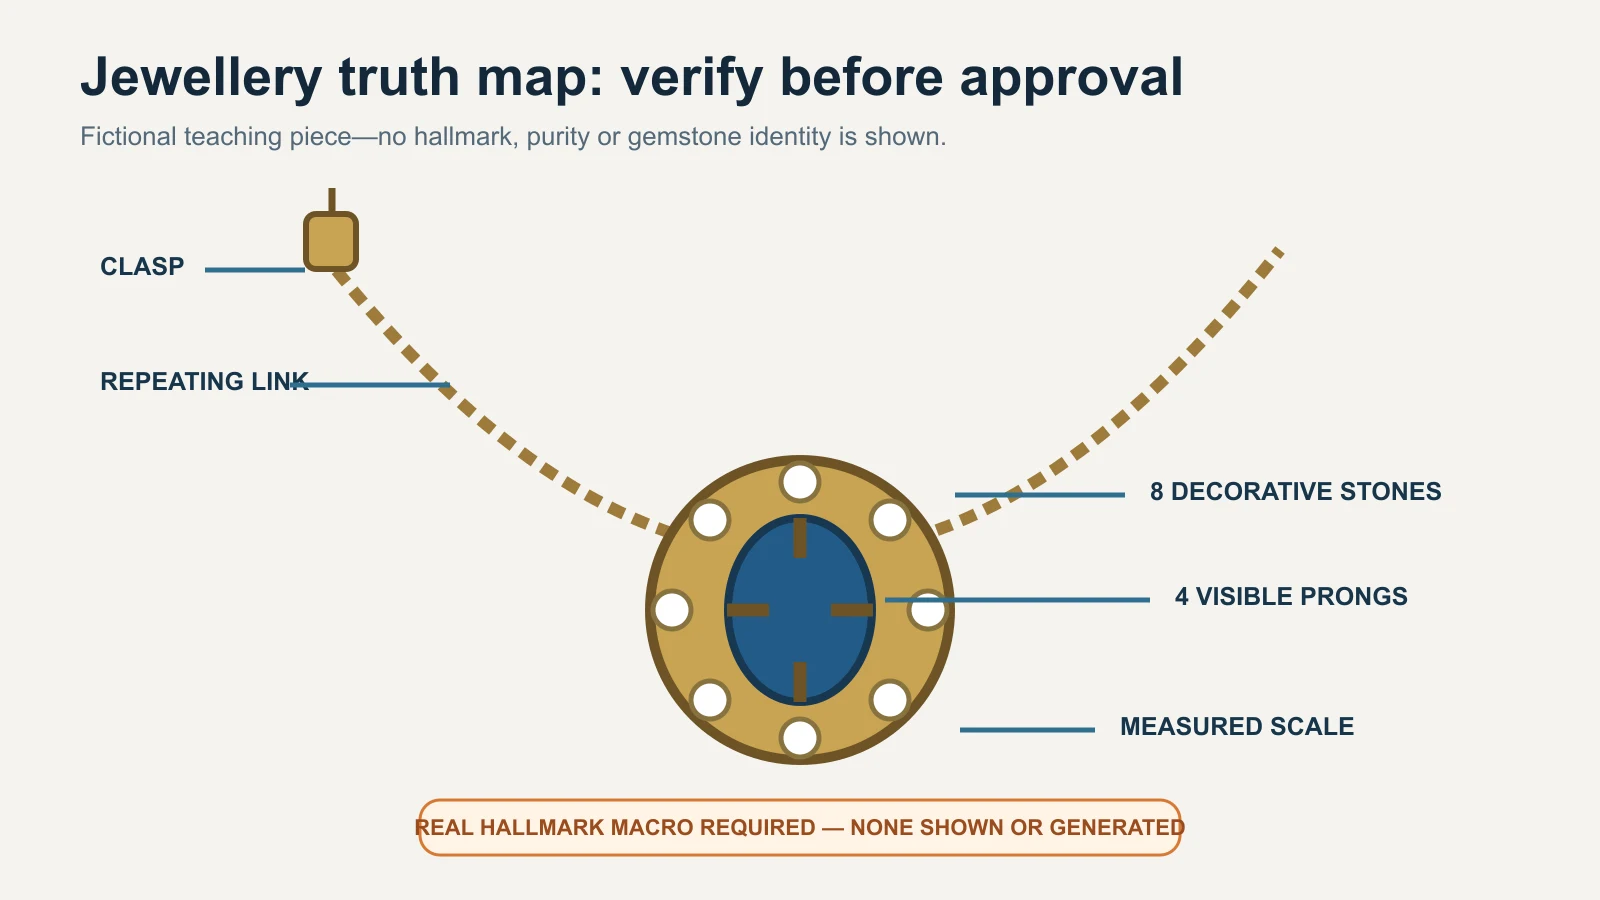
    Jewellery truth map marking clasp, repeating links, stone count, visible prongs, measured scale and the need for a real hallmark macro

    Original GPTWala truth map using a fictional piece. It shows no hallmark, purity, weight or gemstone-identity claim.

    Run the jewellery product-truth gate

    Review the candidate beside the physical piece, source views, truth card and verified product data. Use a product expert—not only the person who generated the image.

    Gate Inspect Pass condition Stop-ship error
    Identity SKU, variant, size and customisation Exact sale child SKU Similar design or wrong variant
    Offer Pair/set count, backs, chain, box and detachable parts Image and listing agree on what is included Extra/missing item or ambiguous prop
    Stone map Count, position, shape and relative size Every visible element matches the real piece One added, lost, cloned or moved stone
    Setting Prongs, beads, channel, bezel, gallery and seats Construction matches real macro Changed, repaired-looking or impossible setting
    Metalwork Links, joints, clasp, bail, hinge, post/screw and filigree All geometry and articulation match Thickened chain, changed clasp or invented joint
    Surface Finish, engraving, enamel, texture and intentional patina Buying-relevant surface remains true Gloss/material change or pattern invention
    Marks Hallmark/HUID/maker mark area and orientation Real pixels and linked verification retained Generated, sharpened, transferred or hidden mark
    Colour Metal/stone appearance under controlled references No variant or material confusion Unverifiable or materially misleading colour
    Scale Recorded measurements, model/display relation and crop Context agrees with dimensions Piece looks materially larger/smaller
    Reflections Edge, facet, metal gradient and studio artifacts Material cues remain physically plausible Repeated sparkle, flat metal or erased edge
    File/destination Crop, resolution, metadata, alt/caption and current rules Reopened final file still matches approved candidate Compression hides detail or metadata/rule fails

    If any stop-ship field fails, the result is REJECTED. Do not average a wrong stone count against a good background.

    The CCPA’s Guidelines for Prevention of Misleading Advertisements, 2022 require truthful and honest representation and prohibit misleading exaggeration of product capability or performance. This is general compliance context, not legal advice for a specific listing. The practical rule is simple: a beautiful image cannot correct a false product depiction.

    Record the approval

    Field Entry
    SKU / child variant
    Image role and destination
    Source image IDs
    Verified product-data record
    AI/retouch method and date
    Prompt/mask/version
    Stone/setting map checked
    Hallmark/HUID route checked where applicable
    Dimensions and quantity checked
    Decision and reason APPROVE / REVISE / REJECT
    Product expert / channel reviewer
    Final filename

    Keep the table blank until a real piece is reviewed. Never fill it with illustrative approval data.

    How the workflow changes across Indian jewellery cases

    These examples are fictional operating cases, not client results or claims about every seller in a city.

    Jaipur kundan-style necklace set

    Photograph the full set, back construction, focal setting, repeated motif, closures and each included piece. Map the decorative elements and intentional asymmetry. Do not label a technique, stone, metal or origin from appearance alone; use the seller’s verified product record. An AI background is secondary. Any extra motif, missing setting or invented matching accessory is a reject.

    Hyderabad pearl-strand retailer

    Count pearls, record sequence and strand length, photograph the clasp and capture colour/lustre in consistent light. AI must not make every pearl identical, rounder or brighter than the physical strand. A model image needs measured length and fall; a generated neck cannot prove fit.

    Thrissur gold-jewellery store

    Keep real main, reverse, clasp and hallmark views tied to the exact item. Verify applicable HUID details through the current BIS route and product records. Do not move a hallmark to a cleaner area or reuse one child variant’s detail view for another weight or size. A purity or weight claim lives in verified data, not in gold-looking pixels.

    Rajkot silver anklet wholesaler

    Capture both anklets, full length, repeating links/bells, closure, marks and every detachable part. Because current silver hallmarking details depend on the applicable standard and marking date, check the exact article and latest BIS source. For a wholesale assortment, state whether the image shows the supplied lot or only a representative design.

    Surat fashion-jewellery seller

    Lock plating colour, stone count, backing, pair symmetry and set quantity. Avoid words such as “gold,” “diamond,” “emerald” or “silver” when only a colour/style resemblance is known; use verified material descriptions. AI may clean a background, but it must not turn plating into a precious-metal claim or costume stones into gem-identification evidence.

    Common AI jewellery image failures and safe fixes

    Symptom Why it matters Safe fix
    Extra or missing stone Changes the sale design and possibly perceived value Reject; return to retained real product pixels
    Different prong/setting Implies another construction or condition Use the real macro; do not generate a repair
    Mirrored earring pair Can hide real pair differences and marks Photograph both actual items and review separately
    Thickened/thinned chain Changes proportions, strength impression and scale Recapture full length; composite the real chain layer
    Cleaner but unreadable hallmark becomes text Invents official-looking evidence Reject; recapture mark and verify through records
    More yellow/white/rose metal Can confuse variant or material Correct only against the physical piece under controlled light
    Identical sparkle on many stones Signals cloned highlights and hides real facet behaviour Keep real reflections; reduce generative relighting
    Flat, plastic-looking metal Material cues were erased Restore real gradients/reflections or reshoot
    Floating necklace/earring Contact, weight and scale become implausible Simplify background; use real display or restrained shadow
    On-model piece is oversized Misleads fit and perceived value Use measured overlay/composite or a real model shoot
    Extra box/chain/prop Changes what appears included Remove props or label offer clearly outside image
    Macro looks sharp but geometry is invented Upscaling/generation created plausible detail Compare with source; recapture rather than infer

    The common AI product-photography mistakes guide handles broad symptom diagnosis. This page is the final authority for jewellery-specific truth fields.

    When to stop AI and use real capture or a specialist

    Use real capture or a specialist jewellery photographer/retoucher when:

    • the piece is one-off, antique, custom, high-value or cannot be replaced;
    • stone, prong, engraving, filigree, enamel or hallmark details are below the source’s usable resolution;
    • reflections or transparency hide construction;
    • accurate metal or gemstone colour is commercially critical;
    • colour-change or optical phenomena must be shown;
    • a model image must prove scale, fit or fall;
    • purity, fineness, weight, certification or stone identity is part of the offer;
    • the jewellery has fine chains, moving parts or multiple detachable components;
    • the output will be the primary evidence for a marketplace or paid ad; or
    • repeated edits change any locked field.

    Use a hybrid when you want a new environment: photograph and retouch the real jewellery layer under controlled conditions, place it into a measured context, and review the composite against the piece. The AI versus traditional product-photoshoot guide helps choose the method; it does not relax this jewellery gate.

    Check the destination after product truth

    Product accuracy is necessary but not sufficient. Each marketplace, feed, website theme and ad surface has current format and content rules. Google Merchant Center’s main-image guidance requires the actual/correct product and variant and restricts placeholders and promotional overlays. Its AI-generated-content guidance requires applicable generative-AI product images to retain specified IPTC digital-source metadata.

    Use the product-image rules by destination before upload. Do not assume a tool’s “marketplace” preset satisfies a platform, category or seller-account rule. Inspect the final delivered file because optimisation can strip metadata or soften tiny details.

    Connect truthful jewellery images to online growth

    An approved jewellery image set can feed a digital product catalogue, a WhatsApp Business catalogue or a product landing page. The images still need accurate SKU data, offer quantity, price, follow-up and a responsible publishing process.

    The GPTWala workshop connects this AI Content Creation step to the DAA path: Digital Presence → AI Content Creation → ₹100/day WhatsApp ads. It is an educational system, not a promise of enquiries, sales, earnings or return on ad spend.

    See the GPTWala workshop
    Learn how verified product content can support a broader online-growth workflow.

    Frequently asked questions

    Can AI create jewellery product photos from one phone picture?

    It can create a plausible image, but one picture is rarely enough to verify settings, back construction, clasp, hallmark, scale and every included item. Use real front, back, profile, macro, measured and quantity views. If a buying-relevant field is not visible, recapture it rather than asking AI to infer it.

    Can I use AI to remove a jewellery background?

    Yes, as a candidate workflow when the real jewellery layer and fine edges can be retained. Review every chain link, prong, stone, clasp, reflection and mark after removal. If masking erodes detail or regenerates the product, use a controlled non-generative mask or specialist retouching.

    How do I stop AI from changing the stone count?

    Create a numbered stone map from a real macro, name stone count/position as locked fields, and compare the output at full resolution. A prompt cannot guarantee the count. If one stone changes, reject the result and return to real product pixels.

    Should I enhance a blurred hallmark or HUID with AI?

    No. A generated enhancement can create official-looking but false characters. Recapture the physical mark with appropriate magnification and light, tie it to the correct article, and use current BIS verification where applicable. A photograph alone does not assay or certify the metal.

    How can I show the true colour of gold, silver or stones?

    Use consistent controlled light, a neutral environment/reference and the physical item during correction. Provide multiple real images when appearance changes with angle or light. Do not claim exact colour across every screen, and do not use a dramatic AI relight as evidence of material or gem grade.

    Are AI model images safe for earrings and necklaces?

    Only as carefully reviewed secondary context. Use recorded dimensions, retain the real jewellery layer and compare its scale, contact and fall. A generated ear, neck or hand can make a piece look larger, smaller or differently positioned, so use a real model shoot when fit or scale is a buying decision.

    Can I mirror one earring to make a pair?

    Do not do this when selling a physical pair. Photograph and review both actual earrings, their backs and applicable marks. Mirroring can hide real construction, intentional asymmetry, condition differences or separate identifiers.

    Does an attractive jewellery photo prove purity or stone identity?

    No. Gold-looking colour does not prove gold purity; a clear stone image does not establish whether a stone is natural, laboratory-grown, treated or a specific variety. Use verified product data, applicable hallmarks/HUID checks, invoices and laboratory reports where relevant.

    Can an AI jewellery image be a marketplace main image?

    Only if it accurately shows the exact sale piece and meets the current platform, account, category and image-role rules. Keep real proof views, verify product truth first, preserve required provenance metadata and treat platform approval as a separate check.

    Sources and review method

    Reviewed 12 August 2026. Official sources were used for BIS hallmarking/HUID facts, Indian misleading-advertising context, Google product-image/AI-metadata rules and named AI-editor limitations. GIA guidance supports lighting/background cautions. No tool output, jewellery result or seller-account submission was tested. Recheck all platform-, hallmark- and account-sensitive claims within 24 hours of publication.

  • AI Product Photography Workflow: From Phone Capture to an Approved Image Set

    Phone capture, AI-assisted edit, product-truth check and approved exports for the same fictional product
    Editorial illustration of a seven-gate product-image workflow. The product is fictional; commercial assets require exact-SKU review.

    Reviewed and updated: 11 August 2026

    Editorial image disclosure: the featured visual was created with AI for this guide using a fictional, unbranded terracotta product. It is an editorial concept—not a merchant result, exact-SKU evidence or proof of product accuracy.

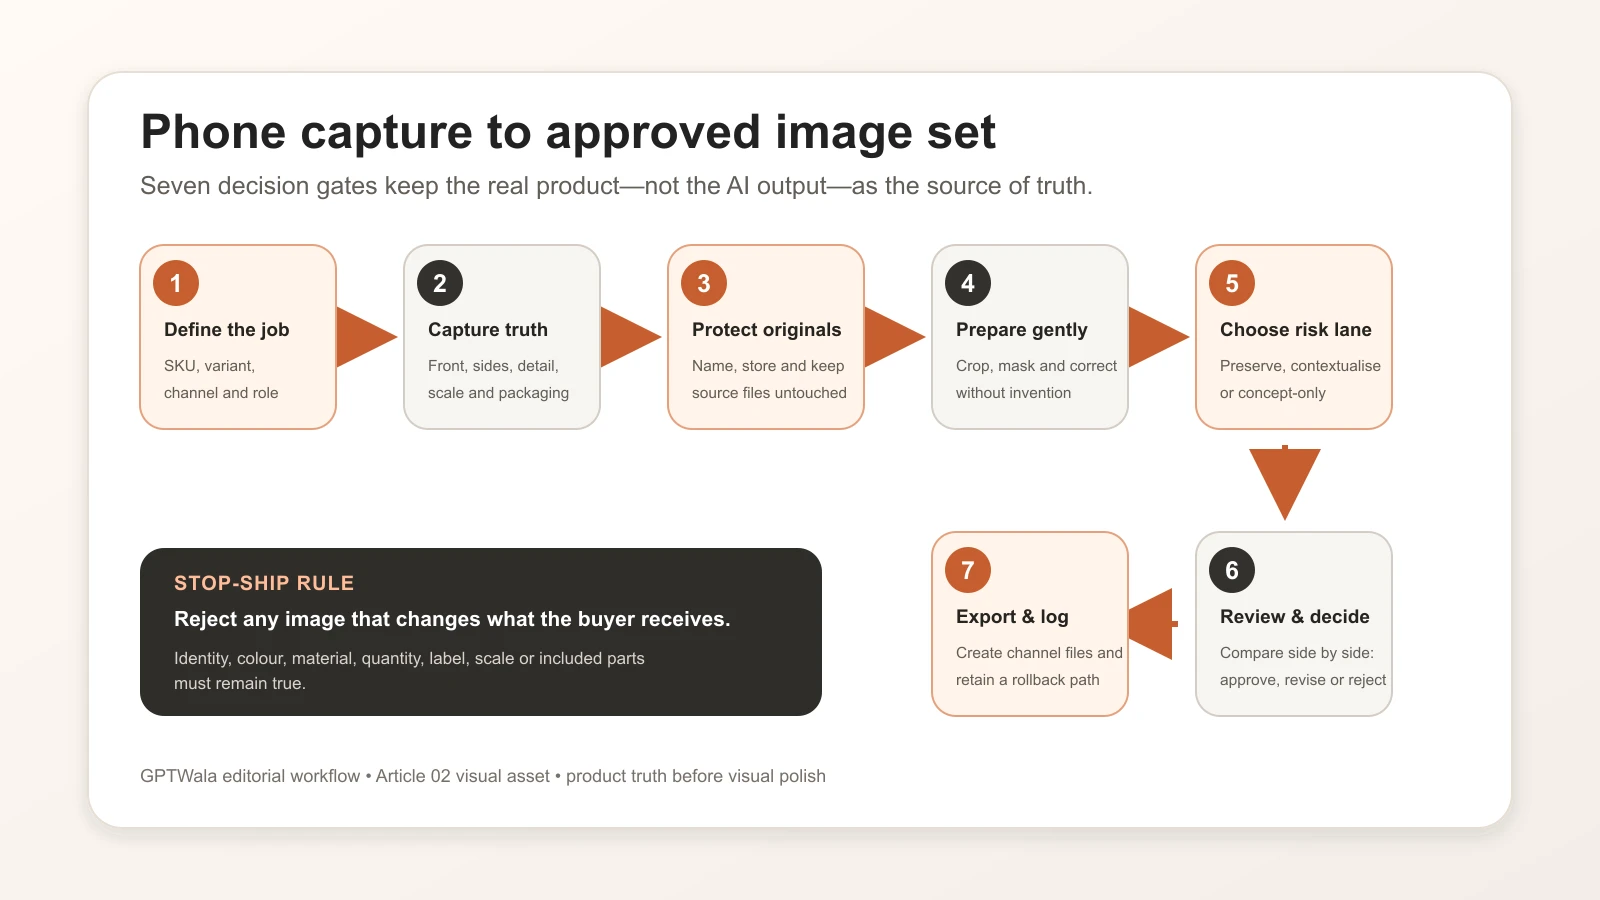
    To turn phone photos into an approved product-image set, start with the exact SKU and define what each image must do. Capture a complete reference pack, protect the untouched originals, and use AI only inside a chosen risk lane. Compare every output with the product side by side, then approve and export it for one destination. One phone photo is not enough when reverse details, reflective finish, fit, shape or scale cannot be verified.

    Table of contents

    1. The phone-to-approved workflow at a glance
    2. Gate 1 — Write the image job before taking a photo
    3. Gate 2 — Capture a truthful phone reference pack
    4. Gate 3 — Ingest, name and protect the originals
    5. Gate 4 — Prepare the product layer without inventing it
    6. Gate 5 — Use AI inside the chosen risk lane
    7. Gate 6 — Review side by side and record the decision
    8. Gate 7 — Export, hand off and keep a rollback path
    9. Four illustrative Indian operating examples
    10. Approval log and cost-per-approved-asset worksheet
    11. Common hand-off failures and safe fixes
    12. A one-day pilot for five SKUs
    13. Frequently asked questions

    The phone-to-approved workflow at a glance

    An AI-generated image is an intermediate file. It becomes a business asset only when it is tied to the right SKU, image role, version, reviewer and destination.

    This seven-gate workflow is GPTWala editorial practice for a small product team. A single owner can fill every role, but the decisions must still be explicit.

    Gate Input Owner Output Pass condition Stop rule
    1. Brief Exact physical SKU and sales need Merchandiser or owner Image job card and truth card Variant, role, destination and locked attributes are known Product or intended use is ambiguous
    2. Capture Clean product and job card Photographer or trained staff member Complete source-of-truth pack All deciding details are visible and usable A material detail is missing, blurred, clipped or colour-shifted
    3. Ingest Phone originals Asset operator Named, backed-up source folder and working copies Files map to one SKU and originals are protected Mixed variants, duplicates or missing views remain unresolved
    4. Prepare Working copies Retoucher or operator Clean product layer or conservative edit Real geometry, edges, text and finish remain intact Cleanup requires the tool to invent missing product pixels
    5. Edit Protected product layer, job card and constraints AI operator Review candidates Edit stays inside the approved preserve, contextualise or concept lane Product identity or offer truth changes
    6. Review Candidate, references and destination rules Product expert and channel owner Approve, revise or reject decision Truth, visual quality and destination checks all pass Any essential field is wrong or cannot be verified
    7. Export Approved master and decision record Asset owner or publisher Channel copy, hand-off record and rollback path Final reopened file matches approval and destination Metadata, crop, resolution, SKU mapping or version is uncertain

    Seven gates from SKU brief and phone capture to review and approved channel exports

    GPTWala’s seven-gate editorial workflow: define, capture, protect, prepare, choose a risk lane, review, then export with a rollback path.

    The job card should name one primary image role: a clean listing image, a proof/detail image, a lifestyle image, an ad creative or a B2B catalogue image. These roles can share the same source pack, but they do not share the same acceptance test. The complete AI product photography guide for Indian businesses explains the broader strategy; this page owns the operating trail.

    Gate 1 — Write the image job before taking a photo

    Identify the exact SKU and variant

    Put the product on the table before opening an editor. Record:

    • SKU or design code;
    • parent range and exact child variant;
    • colour or finish name used in the catalogue;
    • physical dimensions;
    • quantity and included components;
    • packaging or label version; and
    • the date the physical item was verified.

    Do not use a neighbouring colour, an old pack, a prototype or a similar design as the silent source. If the sale item changed, begin a new source pack. The same filename attached to two physical versions is a future listing error waiting to happen.

    Choose one destination and image role

    Write a one-sentence job:

    Create a secondary website lifestyle image for SKU KSM-JAR-750-TC that shows the exact jar on a kitchen shelf without changing its lid, handle, glaze, label or apparent capacity.

    That is clearer than “make this image premium.” It tells the operator what may change, what may not change and where the asset will appear.

    A marketplace main image, a WhatsApp catalogue thumbnail and a wide website banner may need different crops and scene rules. One approved master can support several exports, but one production brief should not combine contradictory jobs.

    For example, Google Merchant Center’s current main-image guidance requires the actual product, the correct variant and no promotional overlays; its additional-image and lifestyle attributes allow different kinds of product staging. Check the destination before production, not after a batch is finished. See Google’s official main-image, additional-image and lifestyle-image guidance.

    Lock the attributes that cannot change

    Create a product truth card for the exact item. Attach a real reference view beside each high-risk field.

    Truth field What to record Automatic-reject example
    Identity SKU, design code and current pack version Output uses another variant
    Silhouette and proportions Overall shape and dimension relationships Neck, handle, hem or clasp changes
    Colour and finish Catalogue colour name plus verified references Matte finish becomes glossy or colour changes buying meaning
    Pattern and construction Print, weave, seams, joints, stone settings or mould lines Motif, stitch, setting or part is invented
    Label and logo Exact spelling, position and orientation Text is garbled or logo is moved
    Quantity and components What the buyer receives Extra item appears included
    Scale Actual dimensions and a truthful comparison reference Scene makes the item materially larger or smaller
    Claims and use Only approved, supportable claims Visual implies unsupported heat, waterproof or safety performance

    If a locked field is not visible in the source pack, mark it “unknown—recapture.” Do not ask a prompt to recover evidence that was never captured.

    Gate 2 — Capture a truthful phone reference pack

    Build the minimum shot list

    For many rigid products, start with front, back, left, right, a 45-degree view, top and bottom where relevant, plus close-ups of text, material and joining details. Add:

    • packaging and every included component;
    • a frame with a ruler or known-size object for internal scale checking;
    • category-specific proof, such as a clasp, sole, border, connector, batch label or texture;
    • a view that separates reflective or transparent edges from the background; and
    • one frame that shows the entire product without clipping.

    This is not a universal shot count. A flat notebook may need fewer views; a reflective kada, sari border, mixer attachment set or ceramic vessel may need more. Capture until a reviewer can verify the locked fields without guessing.

    If the reader needs a narrower creation walkthrough rather than a team SOP, use create one product image from a phone photo when that guide is live.

    Use a simple, repeatable capture setup

    The goal is reliable evidence, not an equipment contest.

    1. Clean the product and the phone lens.
    2. Use a stable support and keep the camera level where geometry matters.
    3. Place the product against an uncluttered, contrasting background.
    4. Use soft, even light that reveals texture without hiding edges in glare or shadow.
    5. Avoid digital zoom; move or reframe while keeping the whole item sharp.
    6. Include a neutral or known reference where colour is commercially important.
    7. Keep the product, lighting and camera position consistent across variants.

    These are editorial capture practices, not universal device requirements. No minimum megapixel count or phone model guarantees a truthful source. A high-resolution blurred image is still a failed reference.

    Inspect before putting the product away

    Review the frames at full size, not only as phone thumbnails. Zoom into labels, stitching, stone settings, edges, reflective highlights and included parts.

    Retake now if any answer is “no”:

    • Can I read the required text?
    • Can I distinguish every thin or transparent edge?
    • Is the exact variant obvious?
    • Are highlights showing the material rather than erasing it?
    • Is every included item documented?
    • Can I verify the back, underside and closures?
    • Does a trusted observer see an obvious colour cast?

    Keeping the item on the table for five more minutes is safer than letting an AI system infer an unseen feature later.

    Gate 3 — Ingest, name and protect the originals

    A folder structure a small team can use

    Use one folder tree per SKU:

    /KSM-JAR-750-TC/
      /source/
      /working/
      /review/
      /approved/
        /website/
        /whatsapp/
        /marketplace/
        /ads/
      /rejected/
    

    The source folder contains untouched phone files. Working files are duplicates. Review contains candidates, approved contains signed-off masters and channel copies, and rejected holds failures worth learning from.

    Use a filename that answers five questions without opening the file:

    SKU_role_view_version_status.ext
    

    Illustrative example:

    KSM-JAR-750-TC_lifestyle-front_v03_review.png
    

    Do not put “final-final-new” in filenames. Use a version number and a controlled status such as WORKING, REVIEW, APPROVED or REJECTED.

    Never overwrite the source-of-truth files

    Copy phone originals into the source folder, preserve their original identifiers in the job record and make the folder read-only for routine operators where practical. Edit duplicates only.

    Before processing:

    • compare the physical label or design code with the folder name;
    • remove accidental duplicates without deleting the only copy;
    • flag files that show another variant;
    • note any missing view; and
    • back up the source pack in a second controlled location.

    This is simple version control. It creates a rollback path when an edit, export or upload damages an asset.

    Gate 4 — Prepare the product layer without inventing it

    Correct capture problems conservatively

    Safe preparation may include rotation, crop, modest exposure and white-balance correction, dust cleanup and careful background removal. Keep a before-and-after comparison.

    Do not use generative fill to rebuild a clipped handle, hidden chain, missing label corner, unseen sole or incomplete garment border. That produces a plausible answer, not a verified one. Return to Gate 2 or use manual retouching that works from real pixels.

    Inspect masks and difficult edges

    Zoom in around:

    • chains, prongs and fine jewellery work;
    • lace, loose fibres, tassels and hair;
    • glass, translucent plastic and sheer fabric;
    • polished metal rims and glossy ceramics;
    • thin handles, spokes and wires; and
    • printed or embossed text near an edge.

    A rough mask can silently remove product material; an over-wide mask can invite the model to redraw it. Give high-risk edges one of three treatments: protect the existing product layer, refine the mask manually, or return to capture with better separation. If none produces verifiable edges, use the real photo.

    Gate 5 — Use AI inside the chosen risk lane

    Choose a tool only after the job, locked attributes and pass condition are written. The separate same-SKU benchmark will compare AI product-photo tools on the same SKU instead of declaring a winner from vendor examples.

    Preserve lane

    The product pixels or protected product layer remain unchanged. AI or conventional editing changes only canvas, placement or the surrounding background. Use this lane for truth-sensitive listing support when the workflow can genuinely keep the product intact.

    Pass only if an overlay comparison shows that the product boundary, text, colour and components are unchanged.

    Contextualise lane

    AI creates a scene around a protected product. State the intended viewpoint, scale, supporting surface, contact shadow and forbidden product changes. Treat props as context, not included items.

    A concise production instruction can be:

    Retain the exact supplied product layer without redrawing it. Create a warm neutral kitchen-shelf setting around it, match the existing camera angle, add a physically plausible contact shadow, and do not change the product’s shape, glaze, lid, handle, label, colour, quantity or proportions. Do not add text, badges or accessories that could appear included.

    A prompt is not an accuracy guarantee. Use the product-truth AI photography prompt pack for reusable prompt structures, and generate a background without changing the product for the dedicated masking workflow once those articles are live.

    Concept-only lane

    Use text-to-image output to explore mood, styling or campaign direction when it does not depict a verified sale item. Label it internally as concept-only. It cannot become a product-proof image merely because it looks realistic.

    Rebuild an approved concept around the real SKU, or keep it outside the catalogue. Text-to-image generation must not silently invent the product for sale.

    Gate 6 — Review side by side and record the decision

    Never approve from memory. Put the candidate next to the full source pack and truth card at a useful zoom level.

    First pass: identity and offer truth

    Check the exact SKU, variant, quantity, included components, label, logo, claims and use context. A wrong SKU, quantity, component, material, label, claim or essential geometry is an automatic reject.

    This is also the customer-truth pass. India’s Consumer Protection (E-Commerce) Rules and misleading-advertisement guidance are relevant to accurate online representations, while the ASCI Code says advertisements must be truthful and not mislead through visual presentation, implication or omission. The practical rule is to avoid visually adding or implying anything the buyer will not receive. This article is operating guidance, not legal advice. Review the Consumer Protection (E-Commerce) Rules, 2020, the CCPA Guidelines for Prevention of Misleading Advertisements, 2022 and the ASCI Code for the current text.

    Second pass: geometry, material and scale

    Check silhouette, proportions, pattern, texture, colour, finish, reflections, contact with the surface and believable scale. Use an opacity overlay or rapid source/candidate toggle where the viewpoint matches.

    Ask a category expert, not only the designer, to review high-risk fields. A jewellery owner may notice a missing prong; an apparel merchandiser may catch a changed border; a manufacturer may see a mould line or connector that an editor misses.

    Third pass: destination and file integrity

    Check crop, aspect ratio, resolution, text and overlay rules, embedded metadata, rights, filename, export format and the destination’s current policy. Platform acceptance, product truth and visual quality are three different approvals; passing one does not prove the others.

    Use only:

    • APPROVE: all required checks pass for the named destination;
    • REVISE: the issue is fixable without guessing or changing a locked field; or
    • REJECT: a material field is wrong, unverifiable or repeatedly reconstructed.

    Record the reviewer and the reason. “Looks good” is not a production status. For a deeper severity model, use the full product-accuracy audit for AI images when live. If a known symptom keeps returning, diagnose the AI product-photo failure instead of adding random prompt adjectives.

    Gate 7 — Export, hand off and keep a rollback path

    Create destination presets only after current rules are checked

    Build exports for a named destination: website main, website detail, WhatsApp catalogue, B2B catalogue, marketplace main, marketplace additional, lifestyle or ad. Keep the approved master separate.

    Do not copy an old marketplace template into every channel. For Google Merchant Center, current main, additional and lifestyle-image requirements are separate. For Amazon.in, the signed-in Product Image Requirements and current category style guide for the seller’s account should control; public forum guidance is only a secondary pointer. For Flipkart or Meesho, check the current seller surface rather than repeating an old number from a blog. The dedicated current channel image-rules guide should own the detailed rule table when published.

    Preserve the approved master and metadata

    Keep:

    • the approved master at its review resolution;
    • the source IDs and truth card;
    • the tool or method and version/date;
    • the final prompt or edit instructions;
    • the approval record;
    • every channel copy; and
    • licence, consent or release information where relevant.

    Google Merchant Center currently requires generative-AI images used in the relevant product-image attributes to retain embedded IPTC digital-source metadata. Google’s AI-generated-content guidance and additional-image guidance say not to remove the relevant embedded tag.

    Do not assume your export, compressor, media library or CDN preserves it. Run this test for every changed pipeline:

    1. Inspect the approved file with a metadata reader and save the report.
    2. Export the channel copy.
    3. Process it through the same compression and upload path used in production.
    4. Download the delivered file.
    5. Inspect the downloaded file and compare the required field.
    6. If the field is missing, stop that destination and repair the workflow.

    A caption, filename or alt text does not replace required embedded provenance. This article does not claim that the current GPTWala WordPress pipeline preserves IPTC metadata; that must be verified after WordPress access is restored.

    Publish one controlled pilot before batching

    Place one approved channel copy in the real destination, then inspect:

    • the live mobile and desktop crop;
    • the correct SKU and variant mapping;
    • labels and deciding details at the displayed size;
    • compression damage and colour shift;
    • surrounding copy, price and included-items information; and
    • any platform diagnostic or rejection.

    Keep the rollback path ready. Do not mass-update a catalogue because one generated file looked right inside the editor.

    Four illustrative Indian operating examples

    These are workflow examples, not client results or claims about every business in the named location.

    Morbi ceramics manufacturer

    The job card names the tile or vessel design, size, glaze, surface finish and batch-relevant variation. The source pack includes straight views, edge thickness, underside, a raking-light texture frame and scale. AI may build a dealer-catalogue layout around a protected product image. The reviewer rejects changed proportions, softened relief, false gloss or an installation scene that implies an unavailable size.

    For many SKUs, move into a dedicated catalogue workflow for manufacturers and wholesalers rather than hiding batch logic inside one folder.

    Surat apparel wholesaler

    Each colourway is a child SKU, not a recolour instruction. The truth card records fabric, colour, print repeat, border, embroidery, blouse piece or included components, and verified dimensions. Flat and close-up source views remain proof. A model or lifestyle image is secondary and is rejected if fit, drape, border, motif or transparency changes.

    Jaipur jewellery retailer

    The source pack includes front, back, side, clasp, hallmark where appropriate, stone setting and a physical scale reference. Reflective edges and thin chains receive a high-risk flag. A contextual image can support discovery, but a real macro remains product proof. Any changed stone count, setting, metal tone, chain length or included piece is an automatic reject.

    Local packaged-goods retailer

    The folder is tied to the current stock version and pack size. The truth card locks brand text, flavour or variant, net quantity, cap, label panel, pack count and included offer. The reviewer rejects an old label, false quantity, extra pack, invented badge or context that implies a benefit not stated on the verified packaging.

    The approval log and cost-per-approved-asset worksheet

    An approval log turns judgement into a traceable decision. Use one row per candidate, not one row per SKU.

    Field What to enter
    Asset ID Unique candidate identifier
    SKU and variant Exact physical product
    Image role and destination Main, detail, lifestyle, ad or catalogue plus named channel
    Source IDs Every reference file used
    Risk lane Preserve, contextualise or concept-only
    Tool/method/version/date Enough detail to repeat or audit the operation
    Prompt or edit record Exact instruction, mask notes and manual edits
    Operator effort Hands-on capture, editing and export time
    Generation and tool cost Actual credits or allocated subscription cost
    Review and rework Reviewer, elapsed effort and number of revisions
    Decision APPROVE, REVISE or REJECT
    Reason code Identity, geometry, colour, edge, context, destination, metadata or other
    Approved master and exports File paths and destination status

    Use actual records, not an online “average”:

    Cost per approved asset = (source capture + tool or credit cost + operator time + retouching + review + rework or reshoot) ÷ approved usable assets

    Also track:

    • approval rate = approved candidates ÷ reviewed candidates;
    • rework rate = candidates needing another edit ÷ reviewed candidates; and
    • hands-on time per approved asset = total hands-on time ÷ approved assets.

    If owner time has no salary line, assign and document an internal rate rather than treating it as free. Compare workflows only when the brief, destinations and quality threshold are similar.

    Common hand-off failures and their safe fix

    Symptom Risk Return to gate Safe fix
    Two colour variants appear in one folder Wrong image reaches the listing 1 or 3 Separate child-SKU folders and re-verify source IDs
    Reverse view is missing Hidden geometry or text is invented 2 Recapture; never infer a sale detail
    Source was overwritten No trustworthy rollback or comparison 3 Restore from backup and restrict source-folder edits
    Logo or label is cropped Buyer cannot verify identity or quantity 2 or 4 Use a complete source and adjust crop without rebuilding text
    Product floats Scene looks false and can distort scale 5 Rebuild contact shadow around the protected product layer
    Colour drifts Buyer may receive a materially different-looking variant 2, 4 or 5 Check capture cast, compare verified references and use a real image if unresolved
    Required metadata disappears Destination or provenance requirement may fail 7 Stop upload, identify the stripping step and retest the full pipeline
    Wrong destination preset is used Crop, overlay or file rule can fail 7 Re-export from the approved master after checking current rules
    Staff approve from a phone thumbnail Small text, edge and geometry errors survive 6 Review at useful zoom beside the source pack

    A one-day pilot for five SKUs

    A “one-day pilot” means a constrained production exercise, not a promise that every team will finish five SKUs in a day. Choose four normal products and one difficult product, or use one SKU with five materially different image jobs if stock access is limited.

    Sequence Work Evidence to keep
    Set the jobs Write five job cards, truth cards and destination checks SKU, role, locked fields, owner and stop rule
    Capture Create and inspect source packs Shot list, source IDs and recapture reasons
    Ingest Name, back up and separate working files Folder tree and duplicate/variant check
    Prepare and edit Produce a small, controlled candidate set Method, prompt, mask, attempts, cost and operator time
    Review Compare every candidate side by side APPROVE/REVISE/REJECT plus reason
    Export Create channel copies from approved masters Preset, metadata before/after and reopened-file check
    Retrospective Count outcomes and recurring defects Approval rate, rework rate, time and cost per approved asset

    Use blank templates if a real test cannot be completed. Any filled example must be labelled illustrative unless it records an actual, dated pilot. Do not invent an approval rate, staff time or savings claim.

    The decision at the end is:

    • Go: the workflow consistently produces verifiable, findable assets at an acceptable internal cost;
    • Change: a specific capture, tool, mask, review or export step causes repeatable rework; or
    • Stop: product truth or destination compliance cannot be controlled.

    Commercial performance is a later observation. A clean pilot does not prove that an image will generate enquiries or sales.

    What comes after an approved image set

    An approved image set can now feed a website, dealer catalogue, WhatsApp Business catalogue or campaign brief without each team recreating the product. Next, build a digital product catalogue or set up a WhatsApp Business catalogue when those guides are live.

    But approved images are only the AI Content Creation part of online growth. Product businesses also need a discoverable digital presence and a controlled way to generate and follow up enquiries.

    If your business still depends mainly on walk-ins, the GPTWala workshop explains the DAA path: Digital Presence → AI Content Creation → ₹100/day WhatsApp ads. It shows how approved product assets connect to an online presence and a small-budget enquiry system without promising leads, sales or ROI.

    See the GPTWala workshop
    Connect your approved product assets to a broader online-growth process.

    Frequently asked questions

    Is one phone photo enough for an AI product image?

    Only when that one view contains everything the edit must preserve and no hidden detail needs to be inferred. For most commercial workflows, capture more views. Reverse-side text, closures, reflective edges, fit, scale and included components often need their own evidence. If a locked field is not visible, recapture it rather than asking AI to guess.

    Which source angles should I capture?

    Start with front, back, both sides, a 45-degree view, top and bottom where relevant, then add close-ups of text, texture, joints and included parts. The product decides the final shot list. Jewellery needs setting and clasp detail; apparel needs print, border and construction proof; packaged goods need readable current labels and quantity.

    How should product-image files be named?

    Use a consistent pattern such as SKU_role_view_version_status.ext. Keep the exact child SKU first, then one image role, the view, a numeric version and a controlled status. Keep APPROVED files separate from REVIEW and REJECTED files. Do not overwrite phone originals or use labels such as “final-new.”

    Who should approve an AI-assisted product image?

    Use a product expert for identity, construction and offer truth, and a channel owner for crop, format and destination rules. In a very small business, one owner may do both jobs, but should still complete both checks. The person who created the image should not approve a high-risk field from memory.

    Can an AI-assisted output be a marketplace main image?

    Sometimes, but only if it accurately shows the exact product and follows the current rules for the seller’s account, category and image role. Google distinguishes main, additional and lifestyle images. Other marketplaces have their own current requirements. A tool’s “marketplace-ready” export is not proof of acceptance.

    Can a phone and AI reproduce exact product colour?

    Do not promise exact physical colour from an uncalibrated capture-and-screen chain. Control lighting, keep a verified reference, compare with the physical item and involve the product owner. If colour changes buying meaning and the team cannot verify it, use a real product image or a controlled professional colour workflow.

    What metadata should I keep?

    Keep source IDs, SKU, image role, method/tool/version, prompt or edit record, approval and rights information. Preserve any destination-required embedded provenance. Google Merchant Center currently requires applicable generative-AI product images to retain specified IPTC digital-source metadata. Test the final delivered file because export and optimisation steps can strip fields.

    When should I hire a photographer or specialist retoucher?

    Use a specialist when capture needs controlled colour, complex reflections, translucent or very small details, model fit, safety-critical views or reliable dimensions that the team cannot produce and verify. Hire one as soon as repeated AI or phone attempts create more uncertainty than approved assets. A hybrid workflow can keep real product proof while using AI for controlled context.

    Sources and review method

    Reviewed 11 August 2026. Platform rules, seller-account requirements and tool behaviour can change. Recheck destination-sensitive claims within 24 hours of publication and at least every 90 days. The folder, gate and approval templates are GPTWala editorial practice, not a claimed industry standard.