Reviewed and updated: 12 August 2026
Editorial disclosure: this guide gives a beginner workflow and a documentation-checked ChatGPT Images example. GPTWala did not run or benchmark the named interface for this article. Tool labels and behaviour can change; product accuracy must be checked on every output.
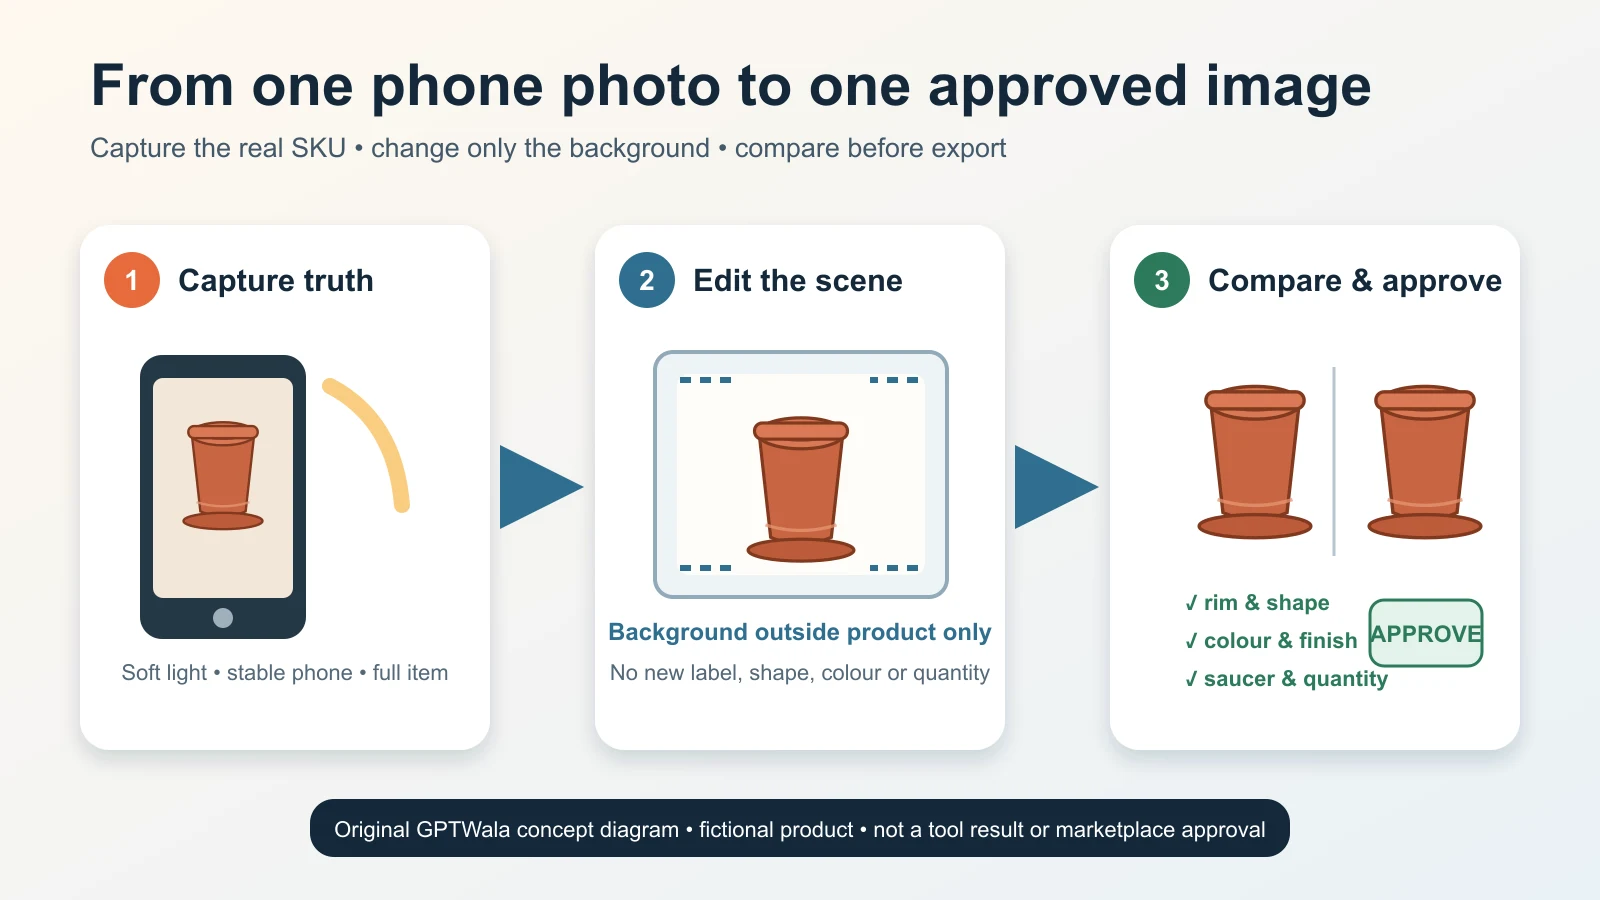
To create a product image from a phone photo, photograph the exact SKU in soft, even light, keep the original file, and edit only the background around the product. Then compare the result with the physical item at useful zoom. Approve it only if shape, colour, material, text, quantity and included parts remain true. If a detail is blurred, hidden or reflective, recapture it instead of asking AI to guess.
Table of contents
- What this tutorial creates
- Choose a safe first product
- Write a one-image truth card
- Set up a simple phone shoot
- Capture the source photo
- Protect the original
- Change only the background
- Choose a candidate
- Run the product-truth check
- Export for one destination
- Indian product examples
- Failures and safe fixes
- When to recapture or hire a specialist
- Frequently asked questions
What this tutorial creates
This walkthrough creates one clean product image from one primary phone photo. The intended result is a truthful image for a product page, a B2B catalogue draft, a WhatsApp catalogue draft or another destination whose current rules you have checked.
It does not create a batch, a lifestyle campaign or a complete marketplace image set. It also does not certify that an output is “marketplace-ready.” The phone-to-approved product-image workflow owns team roles, folders, batches, review logs and hand-off. This page owns the smaller beginner job: one product, one background edit, one final decision.
If you first need to decide what AI product photography should and should not do, start with the complete AI product photography guide for Indian businesses.
The safest first output has four qualities:
- the entire sale item is visible;
- the product itself does not need to be regenerated;
- the new background is simple and neutral; and
- a person who knows the SKU can compare the output with the real item.
Beginner rule: remove or replace the background around a real product. Do not generate the product from its name.
Choose a safe first product
Start with a rigid, opaque, matte product that has a clear outline. A plain ceramic planter, closed cardboard box, wooden tray or non-reflective household item is easier to verify than a chain, transparent bottle, glossy steel vessel or draped garment.
| Product condition | Good beginner job? | Why | Safer action |
|---|---|---|---|
| Rigid, opaque, matte, fully visible | Yes | Outline and surface are easier to compare | Use the tutorial and keep the edit outside the product |
| Fine printed label or small logo | Caution | Generative edits can corrupt text | Keep the real product pixels; recapture if text is not readable |
| Shiny steel, chrome, glass or transparent edge | Usually no | Reflection and edge cues are easy to erase or invent | Use controlled photography or specialist masking |
| Jewellery with small stones, prongs or chain links | No for a first attempt | One changed setting or link can misrepresent the item | Use macro references and an experienced jewellery workflow |
| Apparel where fit, fall or drape matters | No for this tutorial | A single flat or front view cannot prove worn behaviour | Capture the garment properly and use a fit-aware workflow |
| Regulated, safety-critical or high-value product | No without expert review | A visual change may imply a false feature or performance claim | Use verified real photography and relevant compliance review |
AI can produce a plausible image from a weak source. Plausibility is not proof. If the phone photo does not show a feature, no prompt can turn that missing information into evidence.
Write a one-image truth card
Before touching the camera, put the exact sale item on the table. Write down what the image must preserve. This takes two minutes and prevents a pretty but wrong result from being approved from memory.
| Truth field | What to record | Reject the output if… |
|---|---|---|
| SKU and variant | Exact code, colour and current pack/design version | It resembles another variant or an old package |
| Shape | Silhouette, openings, handle, lid, clasp or other defining geometry | A curve, edge, opening or component changes |
| Colour and finish | Catalogue colour name; matte, gloss, brushed, woven or other finish | The buying-relevant colour or finish changes |
| Pattern and construction | Motifs, seams, joints, borders, stone settings or grain | A mark, motif, seam or part is invented or removed |
| Text and marks | Exact visible label, logo, quantity and orientation | Text becomes garbled, sharper than the source or moves |
| Offer | Number of pieces and every included accessory | An extra prop appears to be included or a real part disappears |
| Size evidence | Physical dimensions and any truthful scale reference | The scene makes the item materially larger or smaller |
Choose one image job as well. A useful example is:
Create one square, clean-background secondary product image for fictional SKU KHP-PLANTER-18-TC. Keep the planter’s exact rim, tapered body, terracotta colour, matte finish and drainage-saucer count. Change only the area outside the product.
“Make it premium” is not a job. It gives the editor freedom without saying what truth must remain locked.
Step 1: Set up a simple phone shoot
You do not need to claim that one phone model, camera mode or megapixel count works for every product. You need a file that clearly records this item.
Clean the subject and lens
Remove dust, fingerprints, loose threads and temporary stickers that are not part of the sale item. Wipe the phone lens. If you sell the product with a label, seal, tag or protective film, do not remove it merely to make the image prettier.
Use soft, even light
Place the product near a bright window out of direct sun, or use two diffused lights if you already have them. Avoid a mix of strongly different light colours. Move the product until you can see its surface without a hard shadow hiding one side.
Soft light is not a guarantee of exact colour. If colour determines the variant, keep the real item available for review and include a trusted neutral or colour reference in a separate safety frame. A phone screen and a buyer’s screen can render the same file differently.
Choose a simple, contrasting background
Use plain paper, foam board, cloth pulled smooth or a clean wall-and-table sweep. The product must separate from the background. Do not place a white translucent item on white or a dark fine-edged product on black if the outline disappears.
The source background does not need to be beautiful. It needs to make selection and edge review easy.
Stabilise the phone and avoid destructive effects
Use a small tripod, shelf, stack of books or both hands braced against a stable surface. Keep the camera reasonably level when straight product geometry matters. Move closer rather than relying on heavy digital zoom.
Default camera modes are often easier to verify than portrait, beauty or artificial-blur modes, but that is not a universal device rule. Take a normal frame and inspect it. If a mode softens the outline, changes texture or blurs a handle, use another mode.
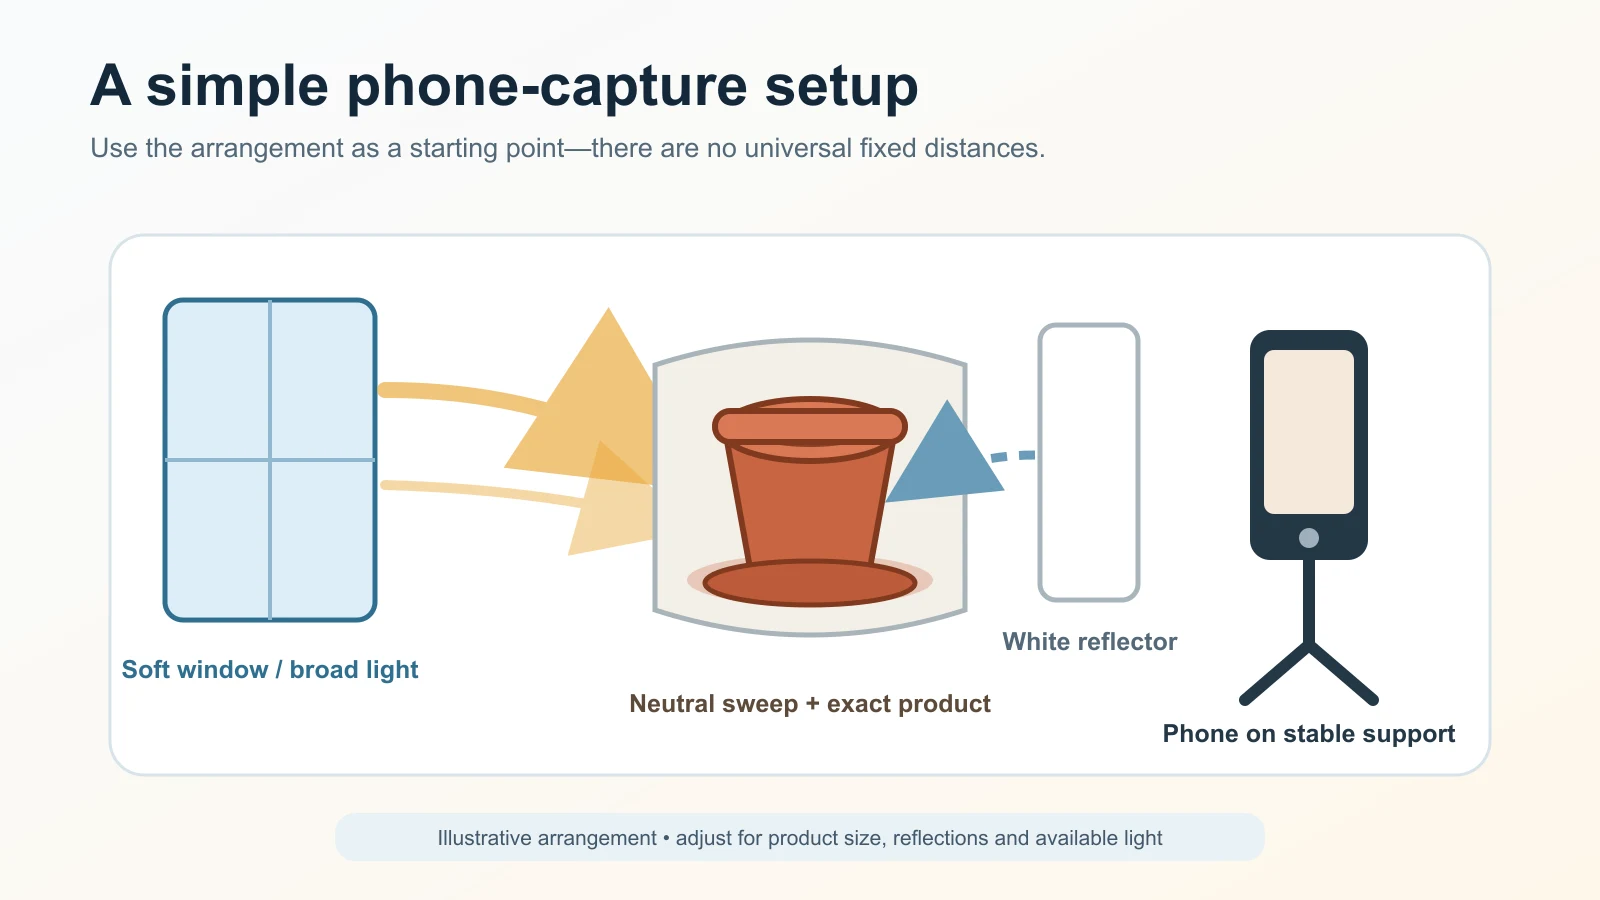
A simple capture arrangement, not a fixed lighting specification. Adjust the distance and light to the real product.
Step 2: Capture one primary photo and two safety references
This tutorial edits one primary photo. Take two extra reference frames anyway. They are not extra final images; they are evidence for checking whether the edit changed the SKU.
Take the primary frame
For the first job, use a straight-on or gentle 45-degree angle that shows the product’s defining shape. Leave some space around the whole item. Do not clip the top, base, handle, hanging loop, package edge or included part.
Tap or otherwise set focus on the product using the controls your phone provides. Take several frames without changing the setup. A small hand movement can make fine text or edges unusable even when the phone thumbnail looks sharp.
Take two safety references
Take:
- one alternate angle that reveals depth, back geometry or the opposite side; and
- one close-up of the most fragile truth field—such as a label, border, clasp, texture, handle joint or set of included parts.
For a fictional Khurja terracotta planter, the primary frame could show the front and rim; the alternate frame could show the back and saucer; the close-up could show the rim profile and matte surface. The primary image alone might not prove that the saucer is included or that the rim stayed the same.
Inspect before putting the product away
Open the sharpest candidate at full resolution. Reject the capture and retake it if:
- the exact variant cannot be identified;
- required label text is unreadable;
- a defining edge blends into the background;
- highlights erase material detail;
- the base, top or included item is clipped;
- the file is visibly blurred or heavily compressed; or
- the colour cast is strong enough to confuse the variant.
AI “enhancement” cannot recover proof that the camera never recorded. If a generated result makes blurred label text readable, treat that text as invented until it is independently verified.
Step 3: Protect the original and make a working copy
Keep the untouched phone file. Duplicate it and edit the duplicate.
Use a short filename that ties the image to the sale item:
KHP-PLANTER-18-TC_phone-front_source.jpg
KHP-PLANTER-18-TC_clean-bg_working-v01.png
KHP-PLANTER-18-TC_clean-bg_approved-v01.png
The code is illustrative. Use the product identifier your business already controls. Do not mix two colours or package versions in one folder just because they look similar.
If your product is confidential or unreleased, check the tool’s current privacy, retention, model-improvement and account settings before uploading it. Do not infer data protection from a feature page.
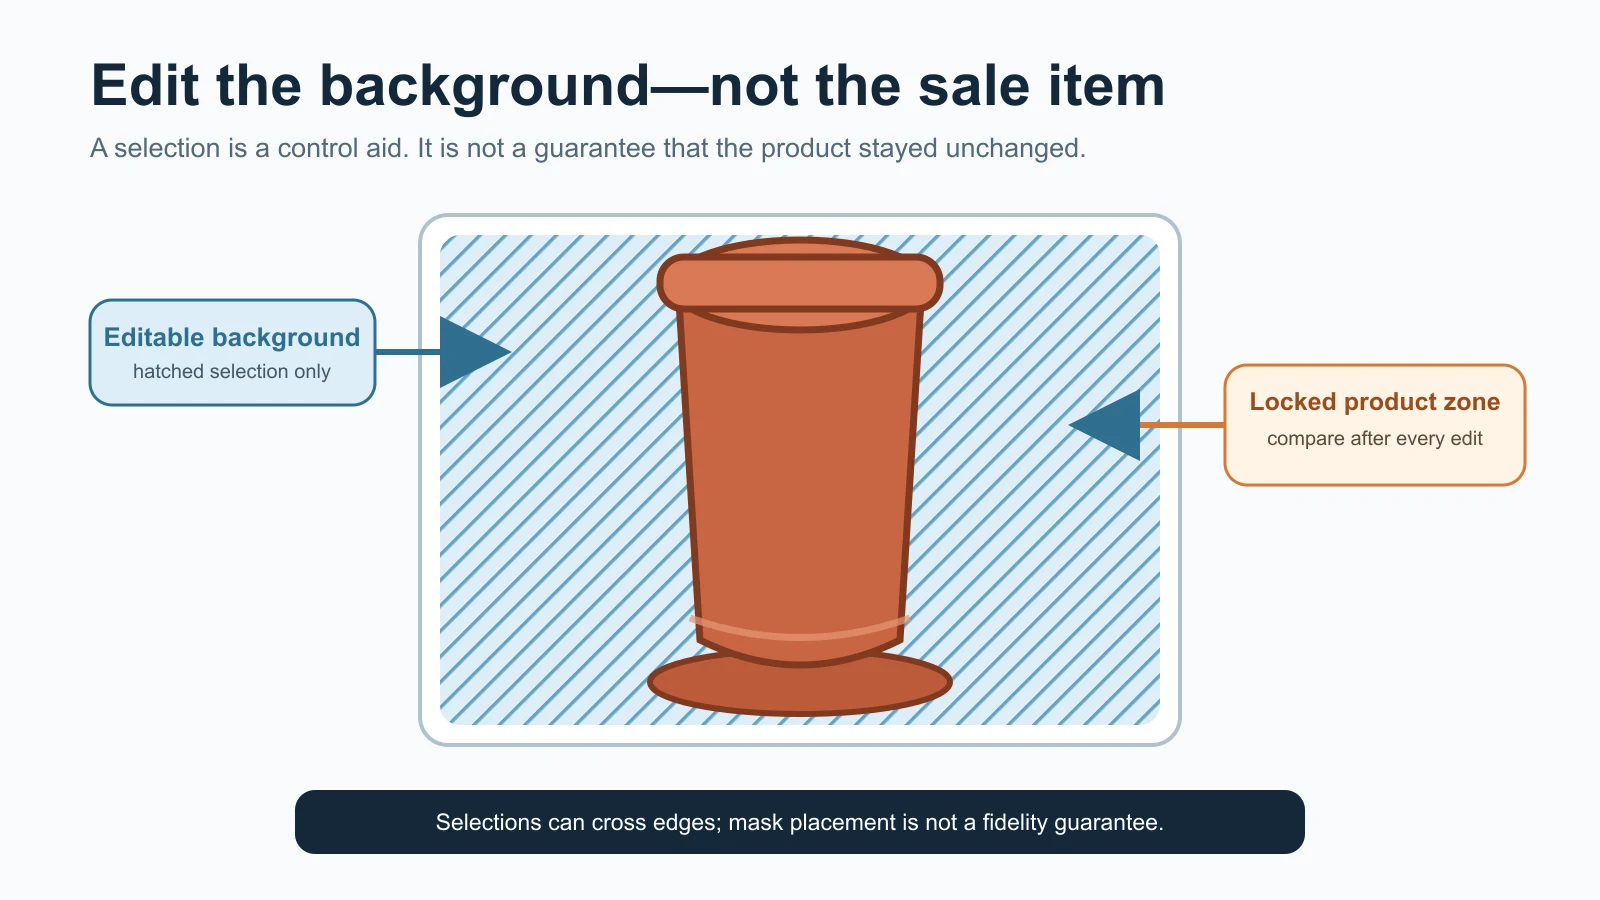
Original GPTWala mask diagram. A selection is a control aid, not a guarantee that the product pixels stayed unchanged.
Step 4: Change only the background
The exact interface depends on the editor. The safe logic is the same:
- upload the working copy of the real product photo;
- select or mask the background, not the product;
- request a simple background and believable contact shadow;
- keep the product’s identity fields locked in the instruction;
- generate a small number of candidates; and
- assume every candidate is unapproved until compared with the SKU.
A documentation-checked example in ChatGPT Images
As of 11 August 2026, OpenAI’s official Images in ChatGPT guide says a user can upload an existing image and describe an edit. The documented editor includes Select for highlighting an area, Undo, Redo, Cancel, Aspect ratio and Save. It also warns that highlights are not always precise and that edits can extend beyond the selected area.
That warning matters more than the button names. A background selection is a request, not a product lock.
Use this documented route as an example, adapting it to the interface currently visible in your account:
- Upload the working copy of the phone photo.
- Open the image editor.
- Choose Select and highlight the background around the product. Keep the selection away from thin edges until you can inspect the result.
- Use Undo or Redo if the selection crosses the product.
- Describe the edit. If the editor allows a direct instruction without selection, state the exact area that may change.
- Review the result. Use Save only to download a candidate—not to mark it approved.
This article does not claim the route was hands-on tested. Recheck the official help page and your account before publication or training staff, because availability and labels may change.
Use a product-truth background prompt
Copy and adapt this narrow prompt:
Using the uploaded photo of the exact SKU, replace only the area outside the product with a plain warm-white studio background. Preserve the product pixels and its exact silhouette, proportions, colour, material, finish, pattern, label/logo text, number of parts and included accessories. Do not add, remove, redraw, sharpen or reshape the product. Keep the same camera angle and crop. Add only a soft, physically plausible contact shadow directly beneath the product. No props, text, border, watermark, offer badge or extra sale item. Output one clean square candidate for review.
The instruction reduces ambiguity; it does not prove compliance. If the product changes, reject the output even if the background looks excellent. The product-truth prompt pack contains prompts for other image roles; do not expand this beginner job into a lifestyle scene yet.
Keep the first background boring
A plain warm white, pale grey or another destination-appropriate neutral is easier to verify than a room scene. It also reduces false scale, floating products and accidental props.
Do not add flowers beside a vase, ingredients beside food packaging or utensils beside a kitchen product unless the image role and offer make it unambiguous that the props are not included. For a first approved image, remove that risk entirely.
Step 5: Choose the truest candidate, not the prettiest one
If the tool returns several candidates, do not choose by mood. Eliminate any candidate with a product-truth error first.
Use this order:
- exact SKU and variant;
- complete shape and correct part count;
- label, logo and pattern integrity;
- material, finish and colour plausibility against the real item;
- clean edges and contact with the surface;
- appropriate crop for the one destination; and
- visual polish.
One wrong handle is more important than a perfect shadow. One invented stone is more important than a premium-looking surface.
If the product changed, try one controlled repair only when you can isolate the error without redrawing more of the item. Otherwise return to the source, tighten the mask or use a non-generative background-removal/compositing method. Repeated product drift is a routing signal, not a reason to keep generating until one output happens to look right.
Step 6: Run the five-minute product-truth check
Put the physical item beside the screen when possible. If it is no longer available, use the primary phone photo plus the two safety references. Do not approve from memory.
Inspect the full product and then zoom into fragile areas. Review the file once against a neutral background and once at the intended crop.
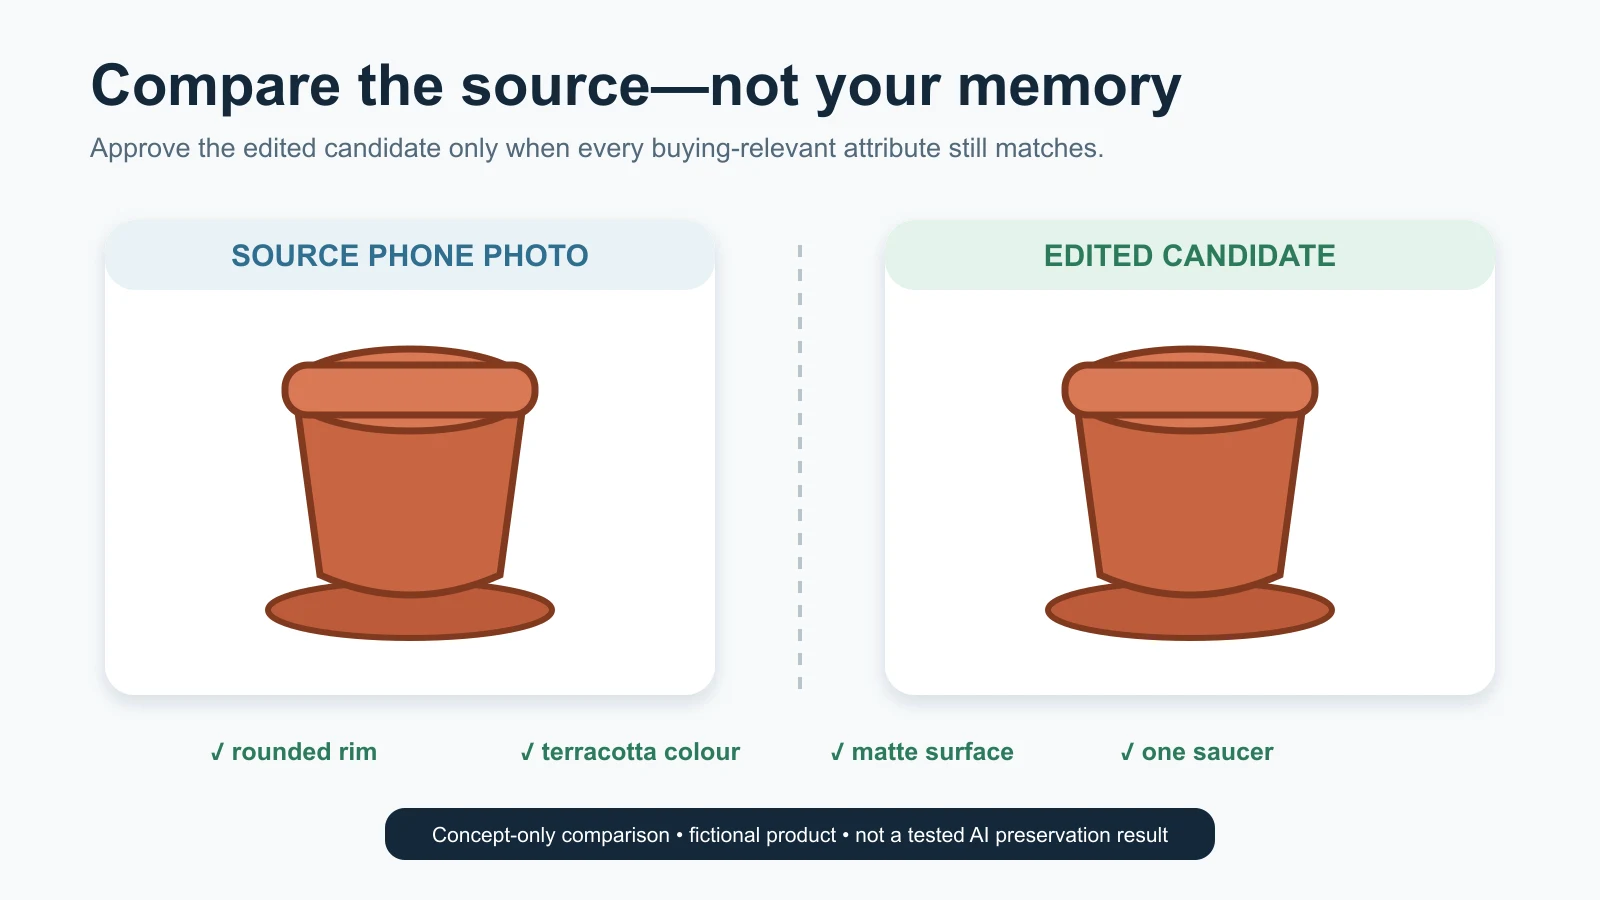
Original concept-only comparison using one fictional product. It is not a tested AI preservation result or an approval record.
| Check | Compare | Automatic reject | Safe next action |
|---|---|---|---|
| Identity | SKU, variant and pack/design version | Wrong or ambiguous item | Find the right source; do not repair a wrong SKU |
| Geometry | Silhouette, rim, handle, neck, openings, base and proportions | Any defining shape changes | Remask, composite the real product layer or recapture |
| Quantity | Product units and included parts | Extra or missing component | Remove candidate; rebuild from a correct complete source |
| Text and marks | Label, logo, hallmark, care text and orientation | Garbled, invented, moved or falsely sharpened text | Keep real text pixels or use verified manual layout outside the product |
| Pattern and construction | Motifs, weave, seams, joints, settings and grain | Invented, repeated, missing or shifted detail | Reject; use a stronger reference or real photograph |
| Colour and finish | Real item under controlled viewing; verified references | Variant confusion or material changes | Correct capture cast conservatively; use specialist colour control if critical |
| Edges | Thin parts, transparent areas, hairlines and cut-outs | Halo, erosion, clipping or new edge | Refine a non-generative mask or hire a retoucher |
| Scene physics | Contact shadow, reflection, scale and orientation | Floating item, impossible shadow or misleading size | Simplify the background and rebuild the shadow |
Use the full product-accuracy audit for AI images when the SKU has more fragile fields than this compact check can cover.
The CCPA’s Guidelines for Prevention of Misleading Advertisements, 2022 apply across advertising forms and media. Among their conditions for a valid, non-misleading advertisement are truthful and honest representation and no exaggeration of a product’s capability or performance. A visually invented feature is not cured by calling the image “AI-assisted.”
The one-image approval card
Complete this before changing the filename to APPROVED:
| Field | Entry |
|---|---|
| SKU and variant | |
| Image role and destination | |
| Source filename | |
| Editor/tool and date | |
| Edit instruction or prompt | |
| Truth fields checked | |
| Destination rule checked on | |
| Decision | APPROVE / REVISE / REJECT |
| Reviewer and date | |
| Final filename |
Keep the table blank until a real image is reviewed. A filled fictional approval is not an operating record.
Step 7: Export and approve for one destination
Do not export one universal “social-commerce-marketplace” file. Choose one destination, check its current rules, and create one channel copy from the reviewed candidate.
Before a marketplace or shopping-feed upload, consult the current product-image rules by destination and recheck the seller account itself.
| Destination | What to check before export | Important limit |
|---|---|---|
| Own product page | Site aspect ratio, sharpness, responsive crop, file weight, accurate alt text | Your theme may crop differently on mobile and desktop |
| WhatsApp catalogue draft | Current crop/preview in the actual app, complete product, readable identifying detail | An attractive thumbnail does not prove product truth or platform acceptance |
| B2B PDF/digital catalogue | Consistent canvas, print/screen quality, SKU mapping and caption | Keep dimensions and offer facts as native text, not AI-drawn text inside the image |
| Google Merchant Center main image | Current image and category rules, exact variant, complete product, minimal staging and no prohibited overlays | A background tool’s preset is not Google approval |
| Other marketplaces | Current seller-account, category and image-role rules | Do not copy Google’s requirements and assume they apply elsewhere |
Google’s current Merchant Center main-image guidance requires the image to accurately show the product and correct variant, rejects generic or placeholder images for most products, and restricts promotional overlays. It also gives destination-specific size, file and framing guidance. Treat those numbers as Google Merchant Center rules checked on the review date—not as universal requirements for WhatsApp, your website or every marketplace.
Google also says product images created using generative AI must retain specified IPTC digital-source metadata. See its official AI-generated content guidance. Do not assume that downloading, compressing or uploading through WordPress preserves metadata; inspect the final delivered file when that destination requires it.
Name, reopen and inspect the final file
Use a filename such as:
KHP-PLANTER-18-TC_clean-bg_website-approved-v01.webp
Reopen that exact file. Confirm that:
- it is not the wrong candidate;
- the crop still includes the complete product;
- the product has not become soft after compression;
- transparency behaves as expected on the actual background;
- required provenance metadata is present; and
- the filename maps to the right SKU.
Use literal alt text that describes what is visible, such as “Matte terracotta planter with matching saucer on a warm-white background.” Do not write an unseen feature, promotional claim or list of SEO keywords as alt text.
Which Indian product examples fit this workflow?
These are illustrative routing examples, not reported client results.
| Example | Safe one-image job | What must stay true | Stop or escalate when… |
|---|---|---|---|
| Khurja ceramic planter | Replace a plain capture background with warm white | Rim, taper, glaze/matte finish, colour and saucer count | Glaze colour is buying-critical or the rim/handle changes |
| Morbi cardboard tile-sample box | Clean the background around the closed package | Current label, size, colour code and box construction | Text is blurred, package version is old or surface swatch colour drifts |
| Rajkot stainless-steel tiffin | Conservative non-generative cleanup only | Number of tiers, latches, lid shape and steel finish | Reflections merge with background or AI redraws a latch |
| Surat printed kurti | Clean flat-lay background only when the full garment is documented | Print sequence, neckline, sleeve, border, colour and size variant | The image is being used to prove fit, fall or worn drape |
| Jaipur earrings | Not a beginner background-generation job | Stone count, settings, pair symmetry, metal colour and scale | Any prong, stone, hallmark, chain or reflection cannot be verified |
| Packaged food or personal-care item | Preserve the photographed pack; change only outer background | Current label, quantity, declarations, seal and pack shape | Text is unreadable or the editor rebuilds the package face |
The narrow workflow is most valuable when it tells you not to generate. A product that exceeds the safe boundary belongs in a more controlled shoot, a layered retouching workflow or a specialist’s hands.
Common failures and their safe fixes
| Failure | What likely happened | Safe fix |
|---|---|---|
| White halo around the product | Source and background had poor separation or mask was too wide | Recapture with contrast or refine a non-generative mask |
| Edge or handle disappears | Selection crossed into the product | Reject; restore from the real source instead of generating the missing part |
| Label becomes “cleaner” but wrong | AI reconstructed unreadable text | Use a sharper real photo; never approve inferred label text |
| Product colour becomes richer | Lighting or generation changed the variant cue | Compare with the physical SKU and verified reference; use real photography if unresolved |
| Product floats | Contact shadow does not match its base | Use a simpler surface and restrained shadow under the real product layer |
| Extra accessory appears | Scene generation treated a prop as part of the offer | Remove all props for the first image and rerun the truth check |
| Surface becomes plastic or glossy | Model simplified the material | Reject; retain the original product pixels or use controlled retouching |
| Product looks stretched | Perspective, crop or aspect-ratio regeneration altered geometry | Return to the original angle; resize the canvas, not the product |
| File passes on phone but fails on desktop | Small-screen review hid edge or text defects | Review at useful zoom on a second display before approval |
For a deeper diagnosis, use the AI product-photography troubleshooting checklist when it is live. If one specific question is “How do I create a new setting without touching the SKU?”, use the AI background-generation guide.
When to recapture or hire a specialist
Recapture the phone photo when
- focus missed the label, edge, pattern or material detail;
- the product is clipped;
- highlights erase a reflective surface;
- the background swallows a thin or transparent edge;
- mixed light makes the variant uncertain;
- the wrong pack, colour or included part was photographed; or
- only a compressed social-media copy remains.
A new capture is usually more trustworthy than a longer prompt. Keep the physical product on the table until the candidate passes review.
Hire a photographer or specialist retoucher when
- exact colour is commercially critical and your capture/review chain cannot control it;
- jewellery, glass, chrome, glossy black, transparent material or fine hairline edges dominate the image;
- dimensions, fit, drape or safety features must be shown as evidence;
- labels, hallmarks or micro-text must remain exact;
- the item is high-value, regulated, one-of-a-kind or expensive to misrepresent;
- repeated masking removes or invents real product detail; or
- you need a consistent high-volume catalogue but cannot maintain the standard internally.
AI and professional photography are not opposites. A hybrid workflow can use a real, carefully retouched product layer and AI only for controlled context. The AI product photography versus traditional photoshoots guide owns that broader decision.
Turn one approved image into an online-growth asset
One truthful product image can now enter a product page, a digital product catalogue or a WhatsApp Business catalogue after the relevant destination checks. It is still only one part of taking an offline product business online.
The GPTWala workshop connects this AI Content Creation step with a broader DAA path: Digital Presence → AI Content Creation → ₹100/day WhatsApp ads. The workshop is educational; it does not guarantee enquiries, sales or return on ad spend.
See the GPTWala workshop
Learn how approved product content fits into a practical online-growth system.
Frequently asked questions
Can any phone photo be turned into a product image?
No. A usable source must clearly show the exact product and the fields the final image needs to preserve. Blur, clipping, glare, heavy compression, missing views and unreadable text are reasons to recapture. AI may make a weak photo look plausible, but that does not restore missing evidence.
Is one phone photo enough?
One primary photo can be enough for one controlled background edit when the product is simple and every important visible feature is captured. Take at least an alternate angle and a fragile-detail close-up as safety references. If hidden geometry, reverse text, fit, scale or included components matter, one photo is not enough.
Should I remove the background before uploading the photo?
Not always. A clean, contrasting source background may be enough for the editor to isolate the product. If automated selection damages thin or reflective edges, use a controlled non-generative mask or specialist retouching. Do not continue erasing until the product changes.
Can I use a ChatGPT Images output as a marketplace main image?
Only after it accurately shows the exact product and passes the marketplace’s current account, category and image-role rules. OpenAI’s editor controls do not provide marketplace approval. Google Merchant Center, Amazon, Flipkart and other destinations have separate requirements that can change.
How do I keep the product colour accurate?
Use consistent neutral light, avoid mixed colour temperatures, keep a verified reference and compare the output with the physical product. Do not promise exact colour from an uncontrolled phone-screen chain. If colour defines the variant and you cannot verify it, use a controlled professional workflow.
Can AI repair a blurry product label?
It can create readable-looking text, but that text is not evidence of the real label. Recapture the package or place verified text in the page layout outside the product image where appropriate. Never publish invented ingredients, quantity, model code, hallmark or compliance text.
What is the safest AI prompt for a first product image?
Ask the editor to change only the area outside the product, preserve named truth fields, keep the same angle and crop, add no props or text, and produce a simple neutral background. Then verify the pixels. A strong prompt narrows the job; it does not lock the SKU.
When should I stop trying AI and hire a specialist?
Stop when repeated edits change product identity, edges, text, colour, finish or scale; when the material is highly reflective or transparent; or when fit, safety, dimensions or high value make error costly. A reliable real photograph is better than an unprovable “perfect” image.
Sources and review method
Reviewed 11 August 2026. Named interface controls and destination-sensitive rules were checked against current official documentation. No hands-on tool test, merchant submission, WordPress metadata test or client result is claimed. Recheck platform-sensitive statements within 24 hours of publication and whenever an interface, account or channel rule changes.
- OpenAI Help Center: Images in ChatGPT
- Google Merchant Center: Image link requirements and guidance
- Google Merchant Center: AI-generated content
- CCPA Guidelines for Prevention of Misleading Advertisements, 2022
- Google Search Central: General structured-data guidelines
- Google Search Central: Changes to HowTo and FAQ rich results
Leave a Reply