Tag: product photography

  • Lifestyle vs White Background Product Photography: Which Image Should Do What?

    GPTWala Business Hub · Practical ecommerce systems

    A channel-by-channel decision framework for combining clear product proof with believable context instead of choosing one style for every image.

    Updated 23 August 2026 · Reading guide for Indian product businesses

    White-background and lifestyle product photography are not competing aesthetics. They solve different buyer tasks. A clean image helps a shopper identify and inspect the product. A lifestyle image helps the shopper imagine scale, use, setting or outcome. Most ecommerce businesses need both, but not in equal numbers and not in the same placement.

    The useful decision is therefore not “which style is better?” It is “what must this image help the buyer decide at this point in the journey?

    The real difference: product proof versus product context

    Dimension White or neutral background Lifestyle or contextual scene
    Primary job Identify and inspect the item Explain use, scale, setting or desired outcome
    Visual competition Low Higher; props and people must be controlled
    Product-truth review Easier Harder because lighting and context influence perception
    Variant clarity Strong when each variant has its own image Can be ambiguous if several variants appear
    Channel fit Common for marketplace main images and catalogues Common for galleries, social, ads and editorial pages
    Production complexity Repeatable once setup is locked More styling, location, talent and rights management

    Google Merchant Center’s current guidance says the main product image should clearly show the product, while additional images can provide other views. It recommends a solid white or transparent background in most cases and also accepts staged or lifestyle images that clearly show the product. See the official product image guidance and always check the target channel before upload.

    When white-background images do the better job

    Identification and comparison

    A consistent background, camera angle and crop help buyers compare variants or SKUs without decoding a new scene each time. This is valuable for catalogues, category pages, marketplaces and WhatsApp product lists.

    Detail and product-truth review

    Neutral surroundings make it easier to inspect edges, colour, material, construction and included parts. They also make internal approval more reliable because creative styling is not masking the product.

    Reusable masters

    A carefully captured clean master can support channel crops, comparison cards, catalogues and approved composites. Keep the actual product layer intact. The phone-to-approved-image workflow shows how to preserve that master.

    White does not mean careless: a clipped white product on a white field, an artificial floating shadow or a tight crop can still damage clarity. Use edge definition and keep the whole sellable item visible where the channel requires it.

    When lifestyle images do the better job

    Scale that words cannot quickly communicate

    A bag held by a person, a lamp on a bedside table or a storage box inside a wardrobe can communicate proportion immediately. The context must be familiar and not rely on misleading perspective.

    Use and assembly

    Lifestyle images can show how a product opens, wears, connects, stores or fits into a routine. If the action is complex, a short demo video may be clearer than one photograph.

    Audience and positioning

    A scene can help a buyer recognise “this is for a small retail counter”, “this suits a modern home” or “this component belongs in an industrial setup”. However, do not let mood substitute for factual product information.

    Desire and campaign storytelling

    Ads and social content often need an idea, not only an isolated item. Use a lifestyle asset after the product, audience and claim are approved. GPTWala’s AI ad creative guide covers the campaign layer.

    Lifestyle versus white background: decision table

    Buyer question Best starting image Reason
    Which exact product/variant is this? Clean background Minimises ambiguity
    What does the back, edge or closure look like? Clean detail view Keeps inspection area clear
    How large is it in normal use? Lifestyle or scale image Adds a familiar reference
    How will it look in my space? Lifestyle Provides believable context
    What comes in the pack? Clean contents layout Separates included items from props
    How do I use or assemble it? Lifestyle sequence or demo video Shows action and orientation
    Does the material/finish match the listing? Clean detail plus controlled context Combines factual inspection and realistic appearance

    A strong gallery often moves from certainty to context:

    1. Identify: clean hero of the exact variant.
    2. Inspect: important front, back, side and construction views.
    3. Prove: material, closure, label, included items or functional details.
    4. Explain scale: on-body, in-hand, dimension graphic or familiar setting.
    5. Show use: one realistic action or placement.
    6. Resolve objections: care, fit, storage, installation or compatibility where visual evidence helps.

    Plan this sequence with the ecommerce product photography shot-list template. Do not shoot random lifestyle options and hope the editor finds a story later.

    Choose the image role by channel

    Channel/placement Default starting role Supporting role Gate
    Marketplace main image Clean product identification Context in allowed additional images Current marketplace image policy
    Own website product page Clear exact-variant hero Full proof and lifestyle sequence Mobile gallery clarity and truthful product data
    Category page Consistent clean thumbnails Occasional campaign tile Easy comparison across products
    WhatsApp catalogue Simple small-screen identification Send context/detail during conversation Readable crop and correct SKU
    Meta ad Depends on hook and placement Clean product proof on landing page Ad claim, product truth and destination match
    B2B catalogue Consistent inspection image Application or installation context Revision and specification accuracy

    Budget and production trade-offs

    A clean-background system is usually easier to repeat across many SKUs after the reference setup is approved. Lifestyle production adds concepting, locations, props, talent, styling, usage rights and more complex approvals. Use the larger budget where context removes a meaningful buyer objection or creates a reusable campaign asset.

    A practical allocation method

    Give every SKU the minimum factual image set. Then prioritise lifestyle assets for hero products, high-traffic pages, unfamiliar products, scale-sensitive items and campaigns with a defined audience. Do not create an elaborate lifestyle set for every low-priority SKU by default.

    Using AI for lifestyle product scenes

    AI can reduce the cost of exploring contexts, but it increases the need for product-truth control. Start with an approved clean master, preserve the product mask, and generate only the environment where the workflow allows.

    • Do not regenerate logos, labels, controls, fit or proportions.
    • Check contact shadows and perspective so the product belongs in the scene.
    • Avoid props that imply unsupported size, compatibility or included accessories.
    • Review colour next to the clean master because scene lighting changes perception.
    • Keep the clean listing image available even when a lifestyle scene performs well in ads.

    Use the detailed safeguards in AI background generation for product photos.

    Measure the right outcome

    Do not declare lifestyle or white-background imagery the winner using one generic engagement number. Evaluate the placement and decision:

    • Product-page gallery interaction and image order
    • Add-to-cart or enquiry rate on the same SKU and audience
    • Variant-selection errors and image-related customer questions
    • Returns or complaints linked to scale, colour or expectation mismatch
    • Ad click and post-click conversion, not click-through alone

    Run controlled tests where traffic allows, but keep marketplace compliance and factual product clarity as guardrails. An attractive image that creates the wrong expectation is not a conversion improvement.

    Frequently asked questions

    What is the difference between lifestyle and white-background product photography?

    White-background images primarily identify and expose the product for inspection. Lifestyle images primarily explain scale, use, setting or outcome.

    Which sells more: lifestyle or white-background product photos?

    There is no universal winner. Performance depends on placement, product risk, audience and the question the image answers. Many effective galleries use a clean hero plus factual details and selected lifestyle context.

    Should the first product image have a white background?

    For many marketplaces, the main image must follow strict clean-background rules. On an own website the exact rule is flexible, but clear product identification is still a strong default. Check the current destination policy.

    How many lifestyle images should a product page have?

    Use only the images that answer distinct questions about scale, use, fit or setting. Give every SKU its factual proof set first, then add context where it reduces a real objection.

    Can I use AI-generated lifestyle images on an ecommerce page?

    Yes when the product itself remains accurate and the scene does not imply false size, function, accessories or claims. Keep an approved clean product image and review every composite against it.

    How should I test lifestyle versus clean images?

    Test a specific placement and decision with the same SKU and comparable traffic. Evaluate post-click conversion and expectation-related questions or returns, not engagement alone.

    Sources and further reading

  • How to Photograph Reflective Products: Glass, Metal and Glossy Packaging

    GPTWala Business Hub · Practical ecommerce systems

    A practical reflection-control method for glass, polished metal, jewellery, bottles and glossy packs without deleting the material cues buyers need.

    Updated 23 August 2026 · Reading guide for Indian product businesses

    Reflective product photography becomes easier when you stop trying to light only the object and start designing what the object is allowed to reflect. Glass, polished metal and glossy packaging behave like curved mirrors. A small lamp can appear as a harsh hotspot; a large white surface can become a clean highlight; a black card can create the dark edge that makes a clear bottle visible.

    The goal is not to remove every reflection. A product with no highlight can look flat, plastic or incorrectly retouched. The goal is to create controlled reflections that reveal shape, finish and product truth. This is a material-specific extension of GPTWala’s AI product photography guide for Indian businesses.

    The reflection principle

    On a matte object, light is scattered in many directions. On a glossy object, the camera sees a more direct reflection of the light source and surrounding set. Moving the lamp a few centimetres may do little; changing the size, angle or reflected surface can transform the image.

    Think in surfaces: a softbox is visible in the product as a bright shape. A black flag is visible as a dark shape. Their size and position define the highlight, edge and perceived curvature.
    Surface What the camera tends to see Useful control
    Clear glass Bright background plus dark or bright edges Backlight/diffusion and side cards
    Polished metal Almost the entire room and camera area Large tent-like diffusion with deliberate dark lines
    Brushed metal Broad directional highlights that reveal grain Long source aligned to the finish
    Glossy pack Rectangular hotspots and warped room reflections Large diffused source placed outside the label’s reflection angle
    Gem or faceted surface Many small reflections with high contrast Controlled bright and dark cards plus category-specific expertise

    Prepare the product and set

    1. Clean with the correct material-safe method. Dust, fingerprints and microfibre lint become obvious under large highlights.
    2. Wear clean gloves where appropriate. Handle from hidden areas.
    3. Remove coloured clutter. Walls, clothing, cables and people can appear in polished surfaces.
    4. Use neutral set materials. White, black and grey boards make reflections intentional and repeatable.
    5. Lock the approved sample. Do not retouch away seams, texture, edges or finish variation that exists on the sellable item.

    Before production volume, add these views to an ecommerce shot list and define which reflections are acceptable for the brand and channel.

    Build a large diffused source

    For many shiny products, a larger apparent light source creates a broader, smoother highlight. You can use a softbox, diffusion fabric or a translucent sheet designed for photography. Keep hot lights and flammable material apart and follow the equipment manufacturer’s safety instructions.

    Use two distances, not one

    The light-to-diffuser distance changes how evenly the diffuser is illuminated. The diffuser-to-product distance changes how large the reflected panel appears. Adjust them separately. If the product reflects a bright centre and dark diffuser edges, spread the light more evenly or use a larger panel.

    Move the reflected surface before increasing power

    If a hotspot covers the label, moving the diffusion panel changes where the reflection falls. Increasing or decreasing brightness alone does not solve geometry.

    Shape the product with white and black cards

    White cards add clean bright reflections. Black cards remove reflected light and create definition. For transparent products, black edges often make the outline visible against a bright background. For polished metal, alternating broad white and controlled dark shapes can communicate curvature.

    Card Use Watch for
    Large white card Broad clean highlight or fill A flat product can lose edge separation
    Narrow white strip Long highlight on cylindrical metal or bottle Uneven strip edges become visible
    Large black card Shape definition and removal of unwanted room reflection It can make dark products disappear
    Narrow black strip Edge line on glass or polished metal Keep the line deliberate and symmetrical when required
    Lens flag with opening Hide camera/operator reflection while leaving lens view Do not block ventilation or touch the lens

    Three practical reflective-product setups

    Setup 1: clear glass or transparent bottle

    Place a large diffused light or evenly lit background behind the product. Add black cards just outside the frame on both sides to create edge definition. Move the cards inward until the contour is visible, then back them out enough to keep the glass natural. For a white-edge look, reverse the arrangement: use a darker background with white side cards.

    Setup 2: polished metal cylinder

    Surround the product with a broad curved or multi-panel diffusion surface, leaving only the camera opening. Add one or two dark strips to describe curvature. Rotate the product and cards until logos, seams and handles remain clear. A completely white reflection can erase the cylinder’s form; a completely black one can make it look dirty.

    Setup 3: glossy pouch, carton or cosmetic pack

    Use a large diffused source above and to one side, then tilt the product or light so the main reflection falls away from critical label text. Add a white fill card opposite if shadows become too deep. If the pack wrinkles, improve product preparation and angle instead of cloning out real construction.

    Setup Background Main control Approval focus
    Clear glass Bright or dark, depending edge style Backlight plus edge cards Contour, transparency, label and true contents
    Polished metal Neutral Reflected diffusion environment Finish, curvature, seams and colour spill
    Glossy pack Clean channel-appropriate surface Source angle and panel size Legible label, pack shape and controlled hotspot

    Adapt the technique by material

    • Jewellery: stones, prongs, plating and scale require specialised accuracy. Use GPTWala’s AI jewellery photography checklist before any generative enhancement.
    • Glass with liquid: control bubbles, fill level and colour; record whether condensation is natural, styled or simulated.
    • Chrome: build an intentional reflected environment because the product may mirror almost everything in front of it.
    • Black gloss: use long highlights to reveal the form while retaining a true black body.
    • Holographic or iridescent finishes: one view cannot show every appearance. Plan multiple honest angles or a short video.

    Camera and phone controls

    Stabilise the camera, use a lens perspective that does not distort the product, and lock exposure after the setup is approved. Check the brightest reflection for clipping and the darkest product area for retained detail. If the camera supports a histogram or highlight warning, use it as an aid, not as a replacement for visual inspection.

    With a phone, clean the lens, disable filters and scene enhancement, lock focus/exposure where possible, and use the rear camera. A tripod adapter prevents small changes in angle from moving a reflection across the label.

    Polarisation has limits

    A circular polarising filter can reduce some non-metallic reflections, depending on angle, but it does not remove every reflection and is less effective on metallic reflection. Cross-polarisation requires compatible lighting filters and careful colour/exposure control. Use it as one tool, not a universal fix.

    Edit reflections without faking the finish

    Clean obvious dust and temporary fingerprints, balance exposure and colour, and smooth distracting highlight transitions only when the material remains truthful. Keep characteristic reflections that show gloss, transparency or curvature.

    • Do not turn brushed metal into mirror chrome.
    • Do not remove a functional seam, clasp, edge or opening.
    • Do not make cloudy glass appear optically clear if the real product is not.
    • Do not replace the label with sharper but incorrect text.
    • Keep the approved real-product layer separate when using AI-generated backgrounds.

    Reflection troubleshooting table

    Problem Likely reason First adjustment
    Small harsh white hotspot Source appears too small Use larger diffusion closer to the product
    Camera or operator visible Open reflected environment Use a neutral lens flag with a safe opening
    Label is unreadable Reflection crosses critical text Change source/product angle before retouching
    Glass edges disappear No contrast at contour Add black or white edge cards outside frame
    Metal looks flat Reflection is one uniform tone Add controlled dark and light shapes
    Unexpected coloured stripe Room or clothing reflection Replace the reflected area with neutral flags
    Dust remains everywhere Preparation and inspection gap Clean before capture and review at 100%

    Frequently asked questions

    How do you photograph shiny objects without reflections?

    Do not try to eliminate every reflection. Surround the object with controlled white, black and diffused surfaces, then place the resulting highlights where they reveal shape without covering critical details.

    How can I photograph reflective products at home?

    Use a stable table, neutral background, large diffusion surface, white and black boards, a tripod or phone mount, and remove coloured clutter from the reflected environment.

    What lighting is best for glass product photography?

    A large, even backlight or diffused background with controlled side cards is a reliable starting point. Choose dark-edge or light-edge glass based on the background and desired contour.

    Can a polarising filter remove reflections from metal?

    A polariser may reduce some non-metallic glare, but it does not remove all reflections and is limited with metallic surfaces. Reflection geometry and set control remain essential.

    Should glossy products have no highlights?

    No. Controlled highlights communicate gloss, curvature and material. Removing all highlights can make the product look flat or incorrectly retouched.

    Can AI clean reflective product photos?

    AI may help with dust or background work, but it can also invent edges, labels, reflections and finish. Compare the result with an approved real-product master and reject factual changes.

    Sources and further reading

  • Product Photo Colour Accuracy: A Repeatable Capture-to-Approval Workflow

    GPTWala Business Hub · Practical ecommerce systems

    A practical system for controlling light, white balance, capture, editing and approval so the product stays recognisable across a catalogue.

    Updated 23 August 2026 · Reading guide for Indian product businesses

    Colour-accurate product photography is not achieved by making the image look pleasing on one screen. It is achieved by building a repeatable chain from the approved physical sample to the light, camera, reference frame, edit and final decision. The goal is not laboratory-perfect reproduction on every customer device. The goal is a controlled, defensible image that does not misrepresent the product.

    This article narrows one part of GPTWala’s AI product photography system. For shape, label and component checks, also use the broader product-accuracy workflow.

    What colour accuracy means in ecommerce

    Colour accuracy has three practical levels. First, images from the same shoot should be consistent. Second, the approved image should be a credible match to the physical reference under agreed viewing conditions. Third, variations shown on a product page should be distinguishable without artificial exaggeration.

    Important limit: a buyer’s display brightness, colour mode, ambient light and device profile can change what they see. Your team can control the production workflow, not every viewing device. Avoid absolute claims such as “the colour on screen will be identical”.
    Control point What you can control What you cannot fully control
    Physical reference Approved SKU, batch and finish Normal manufacturing variation outside tolerance
    Lighting Source type, position, intensity and unwanted mixed light How a buyer later views the item
    Capture Exposure, white balance, file format and reference target Every camera’s native colour response without profiling
    Editing Profile, neutral point, product corrections and export space Unmanaged displays and app-specific rendering
    Approval Named approver, viewing setup and accepted master Subjective memory of colour without the sample

    Why product colours shift

    Mixed light creates competing colour casts

    Window daylight, a warm room bulb and a different LED panel can illuminate separate parts of the product with different colour. One global white-balance adjustment cannot make all three neutral. Block or switch off uncontrolled sources before adding the chosen light.

    Automatic settings change between frames

    Auto white balance and auto exposure may react differently when the product colour or framing changes. That is useful for casual photography but weak for a repeatable catalogue. Lock the agreed exposure and white-balance method once the reference frame is approved.

    Reflective and fluorescent materials behave differently

    Glossy surfaces mirror the environment. Fluorescent dyes and optical brighteners can react strongly to the light spectrum. Treat these as special cases and record the limitation instead of forcing a single edit to match every light source.

    Editing by memory causes drift

    Human visual adaptation is powerful. After looking at a warm image for several minutes, it can begin to feel neutral. Compare against a neutral reference and the approved physical sample rather than editing from memory.

    Build a controlled colour setup

    1. Select the approved physical reference. Record SKU, variant, batch if relevant, and who confirmed it.
    2. Use one light family. Avoid mixing daylight, household lamps and unmatched LEDs.
    3. Control the environment. Bright coloured walls, clothing and props can reflect colour onto the product.
    4. Place a neutral reference in the product light. A neutral target is more reliable than ordinary white paper, which may contain optical brighteners or a colour cast.
    5. Stabilise camera and composition. A tripod or fixed phone mount keeps the comparison meaningful.

    X-Rite explains that changing ambient light changes how a camera reproduces colour, and that a spectrally neutral reference supports custom white balance. Review the manufacturer’s ColorChecker white-balance explanation for the principle. The tool is an option, not a requirement to buy a specific brand.

    Capture a reliable reference frame

    Step Action Reason
    1 Clean the product and lens Dust and haze affect local colour and contrast
    2 Fill the intended frame without clipping edges Reduces later upscaling and inconsistent crops
    3 Include the neutral or colour reference in the same light Creates an objective starting point
    4 Check highlights in every colour channel where tools allow A channel can clip before the overall image looks overexposed
    5 Capture the reference, then the clean product frame without changing light Keeps correction transferable
    6 Repeat the reference when light, camera, lens or setup changes Prevents one correction being applied to a different condition

    If your camera supports a raw format and the team can process it reliably, raw files preserve more adjustment flexibility than a heavily processed JPEG. A consistent JPEG workflow can still work for a small catalogue, but it requires correct light and white balance at capture because there is less room to recover.

    Edit without drifting away from the product

    Start with profile and neutral balance

    Apply the appropriate camera or device profile, then use the reference frame to establish a neutral starting point. Synchronise that base only across images captured under the same conditions.

    Correct the product, not the mood

    Separate factual corrections from creative grading. White balance, exposure and careful local corrections may be needed to match the reference. A warm preset, selective saturation or hue shift that changes the sellable product belongs in an advertising concept only when clearly separated from the factual listing asset.

    Check difficult colours locally

    Deep reds, saturated blues, metallic finishes and near-black materials can lose detail or shift hue. Inspect the product at 100%, compare the relevant area with the sample, and keep texture visible. Do not solve a colour mismatch by flattening the material.

    Export a stable web master

    Keep a high-quality approved master, then create delivery files in the format, size and colour space supported by the destination. Record the export preset. Do not repeatedly open, resize and resave the only master.

    A smartphone colour-accuracy workflow

    A phone can produce a controlled result when the team reduces automatic variation:

    1. Use the same phone, lens and camera app for the approved series.
    2. Disable beauty, vivid, scene-enhancement or filter modes.
    3. Lock focus and exposure where the app allows.
    4. Use one controlled light setup and block mixed ambient light.
    5. Capture a neutral reference and the product without changing the setup.
    6. Compare edited output with the sample on a reasonably calibrated display.

    For the complete small-team process, see how to create product images from a phone photo.

    Safeguards when AI changes the scene

    Background generation and compositing can alter perceived colour even when the product pixels are unchanged. A warm room, coloured surface or dramatic shadow changes visual adaptation. Keep a clean factual product image as the approval reference, and compare the generated scene side by side.

    • Mask the product carefully rather than regenerating it.
    • Do not let relighting change the product’s hue, finish or transparency.
    • Check coloured spill on reflective edges.
    • Keep a before/after comparison with the exact approved master.
    • Reject outputs that make one variant look like another.

    The AI background generation guide covers scene creation without surrendering product control.

    Approve and document colour

    Use a named approver who can access the physical sample. Review under stable light on a display that is not using a night-light or vivid mode. For high-risk colour products, compare more than one calibrated or controlled display, but record which display is the decision reference.

    Approval record What to save
    Product identity SKU, variant, batch/sample ID
    Capture condition Date, light setup, camera/phone and reference target
    Master Approved filename and version
    Decision Approver, date and any accepted limitation
    Derivatives Export preset and destinations

    Colour troubleshooting table

    Symptom Likely cause First check
    One side is warm, the other cool Mixed light sources Switch off room light or block daylight, then recapture
    Frames change colour without edits Auto white balance Lock a custom or fixed balance after the reference
    Colour matches in editor but not browser Export/profile handling Check the export colour space and browser file
    Dark colour loses texture Underexposure or crushed shadows Adjust light and exposure before saturation
    Glossy edge picks up a coloured line Reflected wall, clothing or set card Use neutral flags and control the reflected environment
    AI scene changes product colour Relighting or generative spill Return to the approved product mask and compare side by side

    Frequently asked questions

    How do I get accurate colours in product photography?

    Use one controlled light family, remove mixed ambient light, photograph a neutral reference, lock the capture settings, edit from that reference and approve the result beside the physical sample.

    Should I use auto white balance for product photography?

    Auto white balance can change between frames. It is safer to establish and lock a repeatable balance after the light and neutral reference are in place.

    Is a white sheet of paper good enough for white balance?

    Not always. Ordinary paper may not be spectrally neutral and can contain optical brighteners. A purpose-made neutral target is more reliable for repeatable work.

    Why do product colours look different on different phones?

    Displays, brightness, colour modes, ambient light and app rendering differ. Control your production workflow and avoid promising an identical appearance on every device.

    Can AI background generation change product colour?

    Yes. Relighting, colour spill and surrounding context can alter the pixels or the perceived colour. Compare every scene to an approved clean product master.

    How should colour approval be documented?

    Record the exact SKU and sample, capture setup, reference frame, approved master filename, display/viewing conditions, approver and any accepted limitation.

    Sources and further reading

  • Ecommerce Product Photography Shot List: A Buyer-Question Template

    GPTWala Business Hub · Practical ecommerce systems

    A practical SKU-by-SKU system for deciding which views to capture, why each image exists and what must be checked before upload.

    Updated 23 August 2026 · Reading guide for Indian product businesses

    A product photography shot list is not a list of attractive angles. It is a written answer to a more useful question: what must a buyer see before they can judge this exact SKU with confidence? When the list is organised around buyer uncertainty, the shoot becomes easier to approve, variants stay consistent and the final gallery does a clearer selling job.

    This guide extends GPTWala’s AI product photography guide for Indian businesses. It focuses only on shot planning. Use it before the phone-to-approved-image workflow, not as a replacement for image quality, product-truth or marketplace checks.

    What an ecommerce product photography shot list must decide

    A useful shot list connects five things: the SKU, the buyer question, the required view, the intended channel and the approval rule. If any one is missing, the team may produce a beautiful image that cannot be used.

    The one-line rule: every planned image should either identify the item, prove a detail, explain scale or use, differentiate a variant, or remove a purchase objection.
    Decision Question to answer before shooting Output
    SKU coverage Which exact product, size, colour and pack is being captured? One row per sellable variant or approved shared asset
    Buyer need What can the buyer not verify from copy alone? A named image purpose
    View Which angle, crop or context proves that point? A capture instruction
    Channel Will this be a main image, gallery image, ad or catalogue asset? Background and composition rule
    Approval What must remain accurate? A measurable QA note

    Turn buyer questions into images

    Begin with the questions your sales team repeatedly answers on WhatsApp, at the counter or during returns. These questions are often better inputs than a competitor gallery because they reflect your product, your customers and your fulfilment reality.

    Use four sources of uncertainty

    • Identification: Is this the right model, colour, size, finish or pack?
    • Inspection: What are the texture, stitching, ports, closure, ingredients, markings or included parts?
    • Scale and fit: How large is it, how does it sit, and what can it hold?
    • Use and outcome: How is it assembled, worn, applied, stored or used safely?

    Write each uncertainty as a buyer question. Then decide whether photography can answer it truthfully. If the answer depends on a measurement, specification or policy, keep that information in the copy or a labelled diagram rather than implying it through perspective.

    The core ecommerce image sequence

    There is no universal magic number of photographs. The right count is the smallest complete set that lets a buyer identify and evaluate the product. Google Merchant Center supports one main image and additional images, and notes that different angles can help purchase decisions. Its current product-image guidance also requires the image to represent the actual product and the correct variant. See the official Merchant Center image-link guidance.

    Sequence Image purpose Typical capture Do not hide
    1 Immediate identification Clean three-quarter or front hero Overall shape, colour and sellable unit
    2 Complete inspection Front, back and important sides Closures, controls, labels or rear construction
    3 Material/detail proof Macro or close crop Texture, weave, edge, finish or connector
    4 Scale In-hand, on-body, beside a neutral reference, or dimension graphic True proportion
    5 Use Product in one realistic context How it is held, worn, opened or positioned
    6 What is included Lay-flat of box contents or bundle Every included and excluded component
    7 Variant distinction Separate approved image per colour or configuration SKU-specific colour, pattern and attachment

    For marketplace main images, use the relevant channel rules as the final authority. GPTWala’s Google, Amazon, Flipkart and website image-rules guide explains the difference between a clean main image and supporting gallery assets.

    Add category-specific modules

    The core sequence is a base. Add modules only where the product creates a specific buying risk.

    Category Extra views worth planning Accuracy risk
    Apparel Front, back, side, fabric close-up, closure, on-body fit and movement Do not reshape fit, length, drape or print placement
    Jewellery Face, side profile, clasp, setting, scale on body and hallmark where relevant Do not enlarge stones or remove construction details
    Food and packaged goods Front pack, back label, ingredients/nutrition, seal, pack contents and serving context Keep label copy and pack quantity legible and current
    Tools or appliances Controls, ports, accessories, operating position, size reference and safety labels Do not show accessories that are not included
    Furniture or decor Front, side, back, material detail, dimensions, room context and assembly points Perspective must not exaggerate size
    B2B components Multiple faces, connector/thread detail, dimensional drawing, finish and packaging Revision, tolerance and material claims must match the data sheet

    Reusable ecommerce shot-list template

    Create one row for every required output. Do not write “take all angles”. A photographer, editor and approver should interpret the instruction in the same way.

    Field Example
    SKU / variant JAR-750-AMBER / 750 ml / amber
    Buyer question What does the lid and sealing ring look like?
    Shot ID and purpose JAR-750-AMBER-04 / closure proof
    Capture instruction Top-down close-up with lid removed and ring visible
    Background / styling Neutral light surface; no unrelated props
    Channel and placement Website gallery image 4; WhatsApp catalogue optional
    Required truth Ring colour, lid thread and finish must match approved sample
    Crop / delivery Square master plus 4:5 derivative; keep full product inside safe area
    Approval owner Product manager

    If several variants share construction, record exactly which asset may be shared. Never use a convenient image of one colour for another colour variant.

    Plan the production day from the shot list

    Group by setup, not only by SKU

    Capture all products that need the same light, lens, background and camera position before rebuilding the set. However, keep a physical “to shoot / captured / approved” lane so grouped production does not cause variant mix-ups.

    Lock the reference before volume capture

    Photograph one representative SKU, edit it to the proposed standard and obtain approval. That reference should define crop, background tone, shadow, colour handling and naming. The approach mirrors the sample-first control in GPTWala’s product-accuracy checklist.

    Reserve time for proof shots

    Details, contents and labels often take longer than hero images because the product must be cleaned, opened or repositioned. Put them on the plan; do not leave them as optional shots at the end of the day.

    Adapt the shot list by channel

    Capture a truthful master set first, then derive channel crops. A marketplace main image, a website gallery, a WhatsApp catalogue tile and a Meta ad do different jobs.

    • Marketplace main: clear product identification under the platform’s current rules.
    • Website gallery: full evaluation sequence, including detail, scale, contents and context.
    • WhatsApp catalogue: instant identification on a small screen, with simple composition.
    • Advertising: attention and context, while preserving the actual SKU and claims.

    Avoid composing every shot too tightly. Leave safe space in selected masters so your team can create square, portrait and landscape crops without cutting the product.

    Approval checklist before files leave production

    1. Match the physical sample to the SKU and variant row.
    2. Confirm every required shot ID exists and no duplicate file is pretending to be another view.
    3. Check colour, material, shape, label, included parts and scale.
    4. Inspect edges, dust, reflections, stitching, clasps, ports and text at 100%.
    5. Confirm the main image and supporting images follow the target channel’s current rules.
    6. Verify crop derivatives against their safe areas.
    7. Rename, export and place files in the approved SKU folder.

    Common shot-list mistakes

    • Copying a competitor’s gallery: it may not answer your buyers’ questions or fit your product.
    • Planning by angle only: “front, side, back” says nothing about the purpose of each image.
    • Using one list for every category: a jar, kurta and machine component have different proof needs.
    • Ignoring variants: colour and configuration errors create a product-truth problem.
    • Shooting for one crop: tight framing can make a useful master impossible to adapt.
    • Leaving approval until the end: one early reference approval is cheaper than reworking a full catalogue.

    Frequently asked questions

    What should be included in a product photography shot list?

    Include the exact SKU or variant, buyer question, image purpose, capture instruction, background, channel, crop, product-truth check and approval owner for every required output.

    How many product photos should an ecommerce listing have?

    Use the smallest complete set that lets a buyer identify the product, inspect important details, understand scale or fit, see what is included and distinguish the correct variant. The number varies by product risk and channel.

    Which product angles reduce buyer uncertainty?

    A clear hero plus the hidden or decision-critical sides usually matter most. Add detail, scale, use, contents and variant views where they answer a real purchase question.

    Should every colour variant have separate photos?

    Yes when colour, pattern, finish or another visible attribute changes. A shared construction detail can be reused only when it is genuinely identical and the listing does not imply it represents another variant.

    Can AI generate missing shots?

    AI can help with approved backgrounds or derivatives, but it should not invent an unseen side, accessory, label, material or construction detail. Capture missing product evidence from the real item.

    Who should approve the shot list?

    The product owner should approve factual coverage, while the channel or marketing owner checks placement and format. Assign one final decision owner to avoid conflicting feedback.

    Sources and further reading

  • AI Background Generation for Product Photos

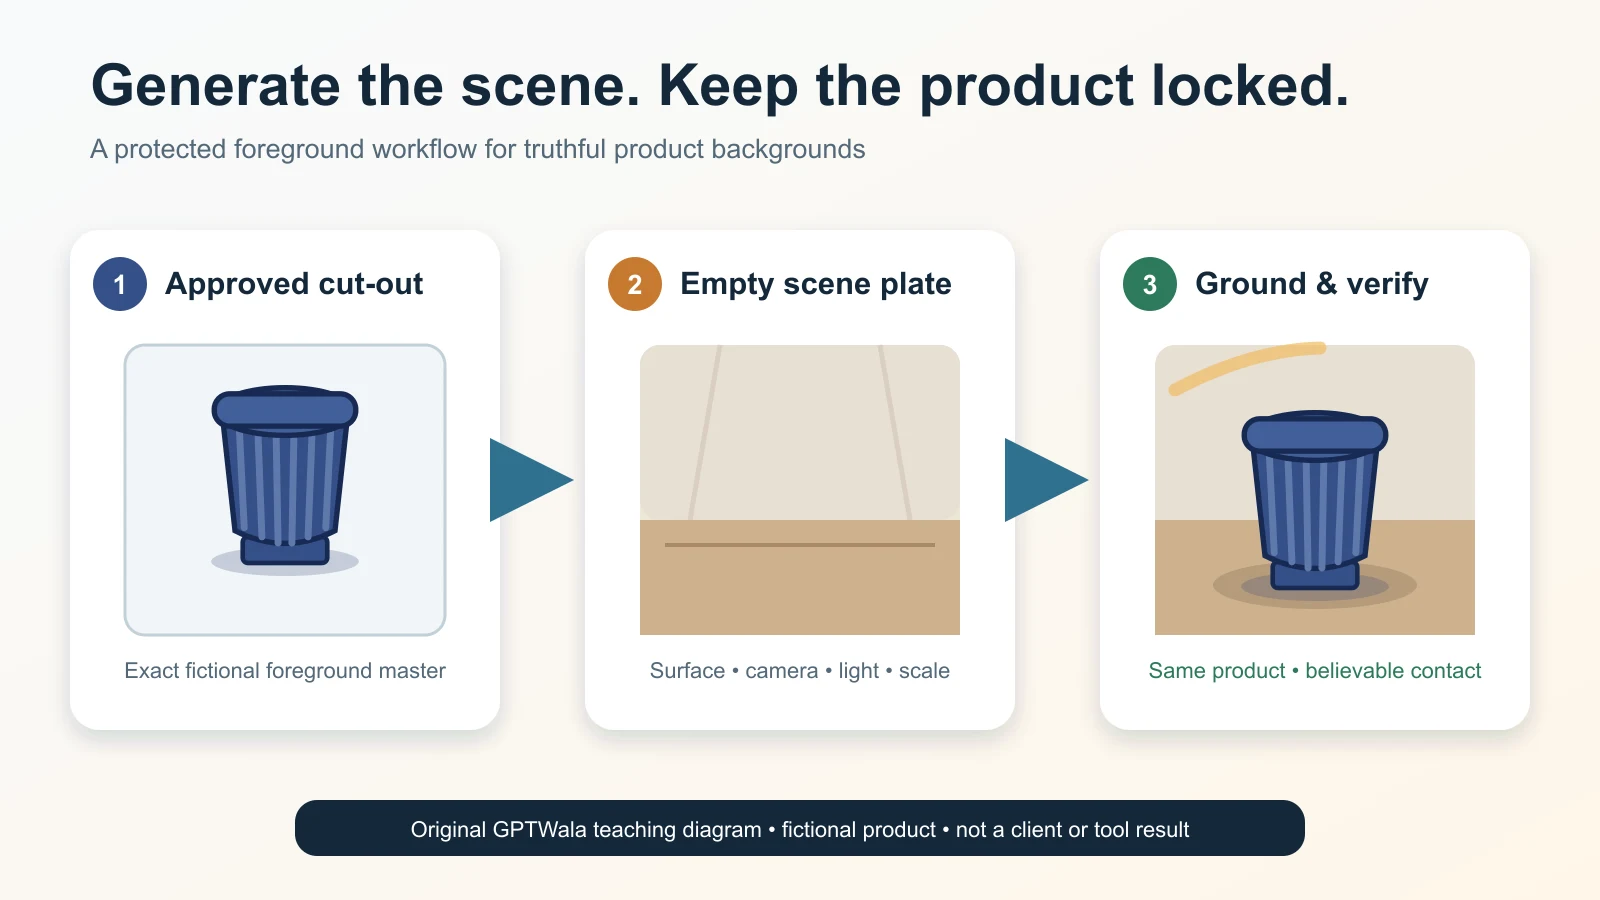
    A fictional indigo ceramic planter moving from approved cut-out to an empty scene plate and grounded composite
    Original GPTWala teaching diagram using one fictional, unbranded product. It is not a client result or evidence that an AI tool preserved an exact SKU.

    Reviewed and updated: 12 August 2026

    Editorial test status: this guide publishes a controlled background-generation method and blank approval scorecard. No named tool was hands-on tested for this article, and no speed, cost, conversion or product-preservation result is claimed. Business examples are illustrative.

    To generate an AI background safely, begin with an approved image of the exact SKU and protect the product layer. Brief the surface, setting, scale, camera, light and exclusions; then generate only the scene. Ground the product with coherent contact, perspective, shadow and reflections. Approve it twice: first for an unchanged product, then for truthful context. If the tool redraws the item or implies a false size, use or included accessory, reject the image.

    Table of contents

    1. What AI background generation is—and is not
    2. Choose one of three background-edit paths
    3. Prepare an approved product master
    4. Write a six-field scene card
    5. Use this eight-step background-generation workflow
    6. Make the product belong in the scene
    7. Choose a background by business job
    8. Run the two-gate approval
    9. Stop when the method cannot stay truthful
    10. Fix common background-generation failures
    11. Apply the method to Indian product businesses
    12. Check tools, destination rules, rights and provenance
    13. Run a three-scene pilot before batching
    14. Turn approved background assets into an online growth system
    15. Frequently asked questions

    What AI background generation is—and is not

    AI background generation uses an existing product image as the foreground and creates or replaces the scene around it. The new area may be a plain studio sweep, a coloured surface, a room, a seasonal setting or an application context.

    The safe objective is narrow:

    Change the environment while keeping the sale item and offer unchanged.

    That means a background edit is not permission to:

    • reconstruct the product from text;
    • invent another viewing angle;
    • repair unreadable label information;
    • change the colour, finish, shape, pattern or construction;
    • add an accessory that appears included;
    • demonstrate an unverified fit, installation or performance result; or
    • turn an unavailable concept into a listing image.

    Background replacement sits in the contextualise lane of the complete AI product photography guide. This article owns the scene plate, extraction, grounding and context review. The AI product photography prompt pack owns reusable prompt variations; the product-accuracy guide owns the full defect audit.

    The distinction matters because an image can show the correct product on an impossible surface, at a false scale or in an unsafe use. Product truth and scene truth are two different gates.

    Choose one of three background-edit paths

    Use the least reconstructive method that can do the job.

    Path What changes Best use Main risk Approval label
    A. Generate a background plate, then composite The scene is created without the product; an approved cut-out is placed on top High-fidelity product, readable pack, repeatable campaign scenes Edge, shadow and perspective mismatch Product asset after two-gate review
    B. Select or mask the background in an image editor The tool edits around the photographed product Simple rigid products and limited scene changes Selection leakage redraws edges or product details Product asset only after pixel-level comparison
    C. Regenerate the product and scene together Both foreground and background can be reconstructed Mood boards and exploratory concepts Identity, label, geometry, colour and quantity drift Concept-only unless rebuilt from verified product evidence

    Path A: a separate scene plate gives the strongest product lock

    Generate an empty background with the required surface, camera height, perspective and light. Place the approved product cut-out into it without asking the model to redraw the item. Add contact shadow and any necessary reflection as separate editable layers.

    This path demands competent extraction and compositing, but it gives the reviewer a simple product comparison: the foreground master should remain the same file. Use it for packaging, technical products, patterned goods or any label that must stay readable.

    Path B: selected edits are convenient, not perfectly contained

    Some editors let the operator select the background and describe the replacement. OpenAI’s current Images in ChatGPT documentation describes both selected-area editing and direct edit instructions. It also warns that highlights are not always precise and an edit can extend beyond the selected area.

    Therefore, a background selection is not a product lock. Compare the output with the source around the full silhouette, then inspect internal text, colour and construction. If the product has changed, reject the output rather than trusting the selection boundary.

    Path C: full generation is a concept route

    Text-to-image or loose reference generation can be useful when an owner needs to choose a mood, palette or set direction. It is not evidence of the exact sale item. Label the output CONCEPT—NOT PRODUCT PROOF and hand the selected direction to a photographer, compositor or locked-product workflow.

    Do not publish a concept as a listing merely because it looks plausible.

    Prepare an approved product master

    This guide begins after basic capture. If the only source is a difficult phone image, complete the phone-photo product-image tutorial first.

    Use the exact current SKU

    Record the child SKU or design code, variant, pack version, included components and verification date. The source should show the entire product at a useful resolution, with enough references to inspect its buying-relevant details.

    Do not silently substitute a neighbouring shade, old label or supplier image with uncertain rights.

    Start with one clear foreground

    For many automated tools, a centred image with one main product and an uncomplicated background is easier to separate. Google’s current Product Studio documentation, for example, recommends one main product, centred with open canvas, and advises against input images with people, hands or props for its workflow. Those are Product Studio-specific recommendations, not universal rules.

    Your master should ideally provide:

    • the complete silhouette without clipping;
    • crisp label, pattern, fastener and edge detail;
    • a colour and finish reference the reviewer can check;
    • a believable original shadow or enough form information to construct one;
    • correct orientation and camera angle; and
    • space or resolution for the intended final crop.

    Inspect the extraction before generating a scene

    Zoom into the mask edge. Look for:

    • pale or dark halos from the old background;
    • clipped handles, chains, fibres, lace, glass rims or translucent areas;
    • holes that were filled rather than cut out;
    • shadows mistaken for product—or product mistaken for shadow;
    • lost reflections that define metal, glass or gloss; and
    • fringe colours around packaging and labels.

    If an accurate cut-out would require the operator to guess the edge, recapture against a more useful contrast or send it to a specialist retoucher. A generated background cannot repair missing product evidence.

    Write a six-field scene card

    A long adjective list is not a production brief. Use six fields that control how the product meets the environment.

    Field Decision to record Example for a fictional ceramic planter
    1. Asset role Main, additional, lifestyle, ad, catalogue or concept Secondary website lifestyle image
    2. Environment Specific place and visual boundaries Covered urban balcony with neutral plaster wall
    3. Support surface Material, height, edge and cleanliness Waist-high matte sandstone ledge, dry and uncluttered
    4. Product placement and scale Position, crop and measured relationship Planter centred left; its known 24 cm height must remain believable
    5. Camera and light Viewpoint, lens feel, direction, softness and shadow Eye-level slight three-quarter view; soft morning light from upper left
    6. Exclusions and truth limits What cannot appear or be implied No extra planter, plant, water, hanging hardware, logo, text or size claim

    Then write one compact scene instruction:

    Create only an empty covered-balcony background with a matte sandstone ledge at eye level, soft morning light from upper left, restrained neutral colours and sufficient negative space on the right. Keep the scene dry and uncluttered. Do not add products, plants, people, labels, logos, text or mounting hardware.

    That is a scene plate brief, not a product-generation prompt. The product is composited later. For a selected edit, add: “Replace only the selected background; preserve the foreground product exactly,” then still inspect for leakage.

    Keep the full prompt library on A04. Here, the scene card exists to control geometry and implication.

    Use this eight-step background-generation workflow

    Step 1: assign one role and destination

    Decide whether the asset is a clean catalogue image, secondary lifestyle scene, ad creative, dealer visual or concept. Check the current destination before making the background.

    A plain main image and a festive ad need different rules. Do not ask one file to be both.

    Step 2: lock the product and offer fields

    List what cannot change: identity, silhouette, colour relationship, finish, pattern, text, quantity, included parts, scale and approved claims. Attach the real references. A wrong locked field is an automatic reject.

    Step 3: choose Path A, B or C

    Use a separate plate and composite when product fidelity dominates. Use a selected edit for a simple, well-separated product only if the output can be compared closely. Use full generation only as a concept until product evidence is restored.

    Step 4: prepare the product layer

    Work on a duplicate. Preserve the original. Extract or mask conservatively, repair only capture artefacts that are not product features, and keep an editable high-resolution master.

    Do not bake an invented shadow into the product file. Keep product, shadow, reflection and background separable when the editor allows it.

    Step 5: generate a small candidate set

    Use one scene card and create a limited set of alternatives. Change one variable at a time: surface, distance, light direction or colour palette. Do not generate dozens of unrelated scenes and choose by beauty alone.

    Record the tool, date, input, scene description and candidate number. A download is a candidate—not approval.

    Step 6: ground the unchanged product

    Place the product at a scale supported by its real dimensions or a verified reference. Align the camera and horizon. Add a contact shadow consistent with the scene light. Match reflections only where the real material would show them.

    Do not warp the product to fit the background. Change the scene plate or use a compatible source angle instead.

    Step 7: run the two-gate approval

    Gate 1 asks whether the exact item and offer remain unchanged. Gate 2 asks whether the scene is physically and commercially truthful. Both gates must pass. The scorecard appears below.

    Step 8: export, label and preserve provenance

    Create one approved master, then destination copies. Keep the source image, mask, scene card, background plate, editable composite, generation record, reviewer and final status.

    Preserve destination-required metadata through compression, WordPress and CDN delivery. Reopen the delivered file and compare it again; an export can clip edges, change colour or strip metadata.

    The phone-to-approved production workflow owns the wider folder, hand-off and approval system.

    Make the product belong in the scene

    Grounding is not decoration. It is the set of visual cues that tells the viewer where the object sits, how large it is and how the environment affects it.

    Research on product-background inpainting treats product consistency and background appropriateness as separate evaluation problems. Image-compositing research likewise identifies layout, scale, viewpoint, occlusion, lighting and shadows as foreground–background compatibility problems. See the primary papers on product-background evaluation and shadow generation for composites. The checklist below translates those concerns into an editorial review; it is not the papers’ scoring system.

    Contact and gravity

    The lowest visible part of a resting product should meet a plausible surface. Check for a bright gap, blurred base, contradictory feet or a shadow that starts too far away. A hanging, wall-mounted or handheld item needs real support evidence, not a floating interpretation.

    Safe fix: move the product to the correct plane, use its real base geometry and add a restrained contact shadow. If the scene requires another support state, recapture that state.

    Perspective and horizon

    The product’s camera angle must agree with the surface and room. A top-down pack cannot sit naturally on an eye-level shelf without transforming its geometry.

    Check the product’s verticals, visible top surface and base ellipse against the background’s horizon and converging lines. If they conflict, choose a new background plate generated from the source viewpoint. Do not skew a truth-critical item until it merely “looks about right.”

    Light direction and shadow

    Look for the brightest face and main highlight on the real product. Background objects, the generated contact shadow and visible light source should agree with that direction.

    Shadow shape depends on the object, surface, light direction, distance and softness. A generic oval shadow may be acceptable for a simple opaque pack on a neutral sweep; it is not a universal solution for handles, legs, transparent items or directional sunlight.

    Reflection and material

    Gloss, metal and glass connect strongly to their surroundings. A studio reflection can contradict a warm room; a generated mirror reflection can invent the product’s reverse side, label or internal content.

    Prefer real reflections where they define the item. If a new reflection is needed, keep it subtle, derived from the approved foreground and inspected for false detail. Jewellery, glass, chrome and liquids often deserve specialist compositing or real capture.

    Scale and surrounding objects

    Set scale from real dimensions, not intuition. A cup beside an enormous lemon or a floor tile beside a miniature chair can change perceived size even when the product pixels are untouched.

    Use known architecture or props only when their relationship is credible. Avoid props whose standard size varies widely. If the image needs to prove dimensions, show real measured evidence elsewhere; a generated room is context, not measurement.

    Depth, occlusion and focus

    Foreground objects can overlap the product only when the overlap is truthful and does not hide a buying-relevant field. Depth of field should follow the intended camera plane. A razor-sharp distant wall behind a softly focused product—or a blurred label beside a sharp generated flower—can expose the composite and obstruct proof.

    When a scene needs complex occlusion around chains, handles, fabric or transparent edges, use a layered composite and detailed mask rather than a one-click background change.
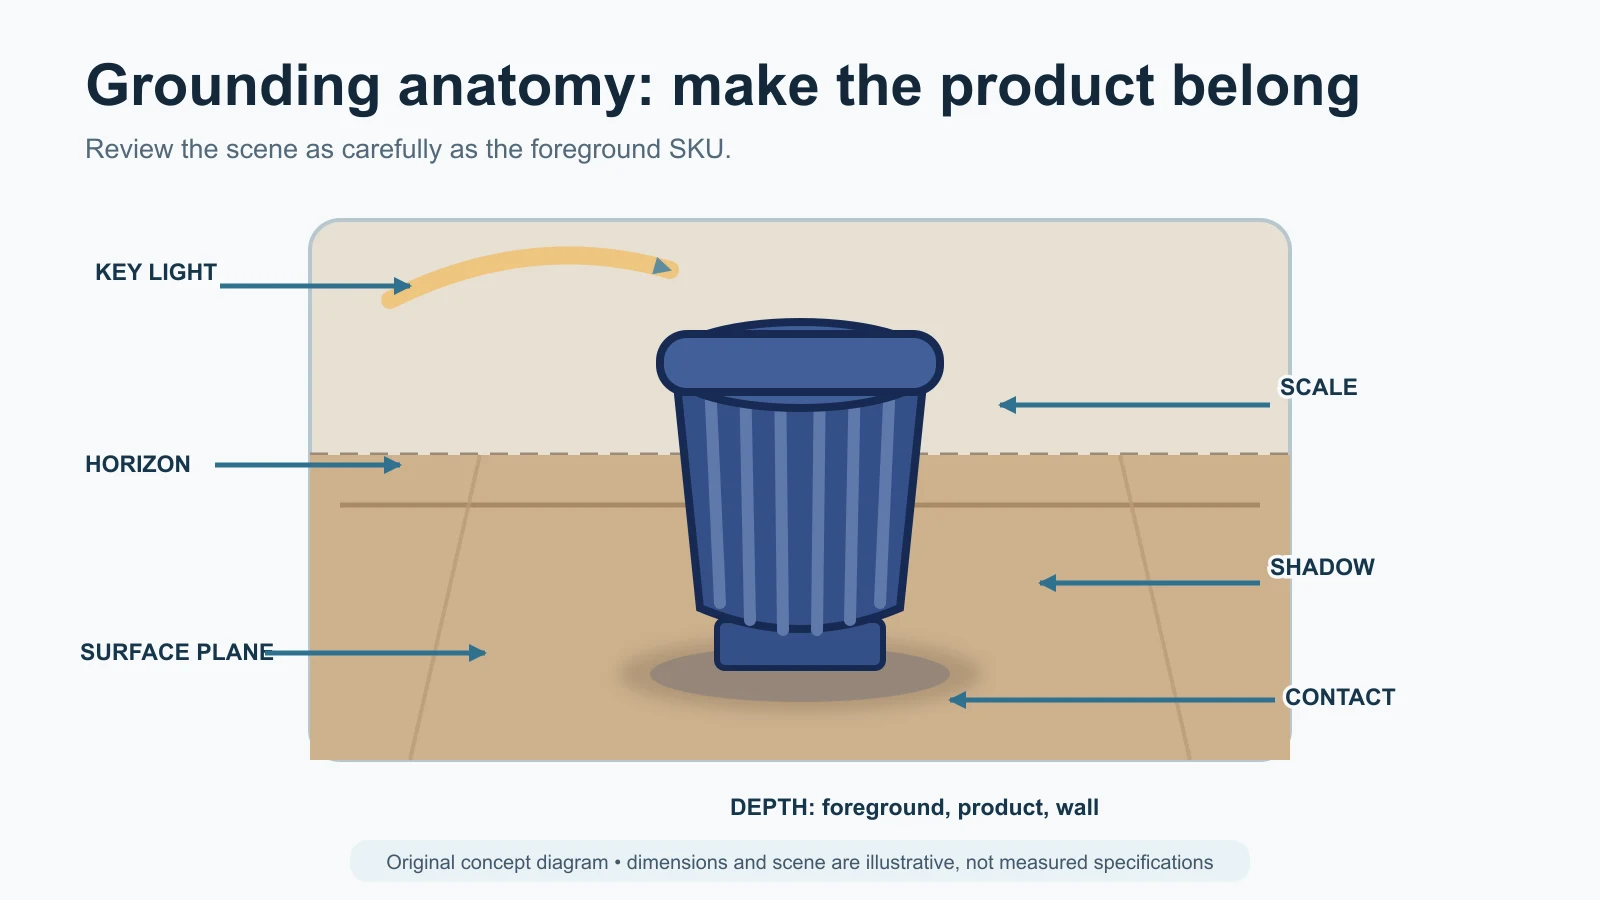
    Grounding checks for contact, perspective, light, shadow, scale and depth in a product composite

    Original GPTWala grounding diagram. Dimensions and scene relationships are illustrative, not measured specifications.

    Choose a background by business job

    Background role Appropriate use Keep real Avoid
    Plain neutral or white Catalogue consistency, clean proof, some channel mains Product, true edge, natural form and current label Invented border, false pure-white rule across every platform, clipped light products
    Simple brand-colour studio Website tiles, dealer deck, organic social Product and one restrained shadow Colour cast that changes the item; promotional text inside the product image
    Lifestyle context Secondary website or marketplace image, catalogue inspiration Exact product layer and scale Extra components, unsafe use, impossible installation, context presented as product proof
    Seasonal/festive context Campaign or ad variation Current pack, offer and quantity Gifts, ingredients or decorations that look included; invented discount or claim
    B2B application scene Dealer education and use-case orientation Exact part and verified interface False connector fit, capacity, environment or certification; unlabeled concept treated as installed evidence
    Concept/mood board Choose art direction before production Clear concept label Publishing as an available SKU, completed project or customer result

    For channel-specific main/additional/lifestyle requirements, use the product-image rules guide. This page does not maintain a duplicate specification table.

    Run the two-gate approval

    Gate 1: product lock

    Compare source and output side by side at full size.

    Product-lock question Pass condition Automatic reject
    Is it the exact SKU and variant? Identity and current version match Another colour, pack or design appears
    Is the silhouette unchanged? Edge, openings, handles and proportions match Shape, count, attachment or construction changes
    Are colour, pattern and finish preserved? Buying-relevant appearance matches verified references Material, gloss, motif or shade changes meaning
    Is all text and branding intact? Required text is exact and in the same position Garbled, missing, moved or invented text/logo
    Are quantity and components truthful? Only what the buyer receives appears as included Extra item or missing component
    Is scale supported? Placement matches known dimensions/reference Product appears materially larger or smaller

    Any automatic reject returns to the product layer, source capture or edit path. Do not repair unreadable product text by guessing.

    Gate 2: scene truth and grounding

    Score each item PASS, REVISE or REJECT:

    • contact and support;
    • camera angle and horizon;
    • light direction and shadow softness;
    • reflections and material response;
    • scale and prop relationship;
    • depth, focus and occlusion;
    • safe, plausible use;
    • no false inclusion, claim or installed result; and
    • current destination fit.

    A scene can be aesthetically weak but truthful; revise it. A scene that falsely implies size, components, compatibility, safety or outcome is a reject.

    The full severity model and four-pass audit belong to the product-accuracy guide. This page uses a smaller binary product lock so operators can approve a background job without duplicating that system.
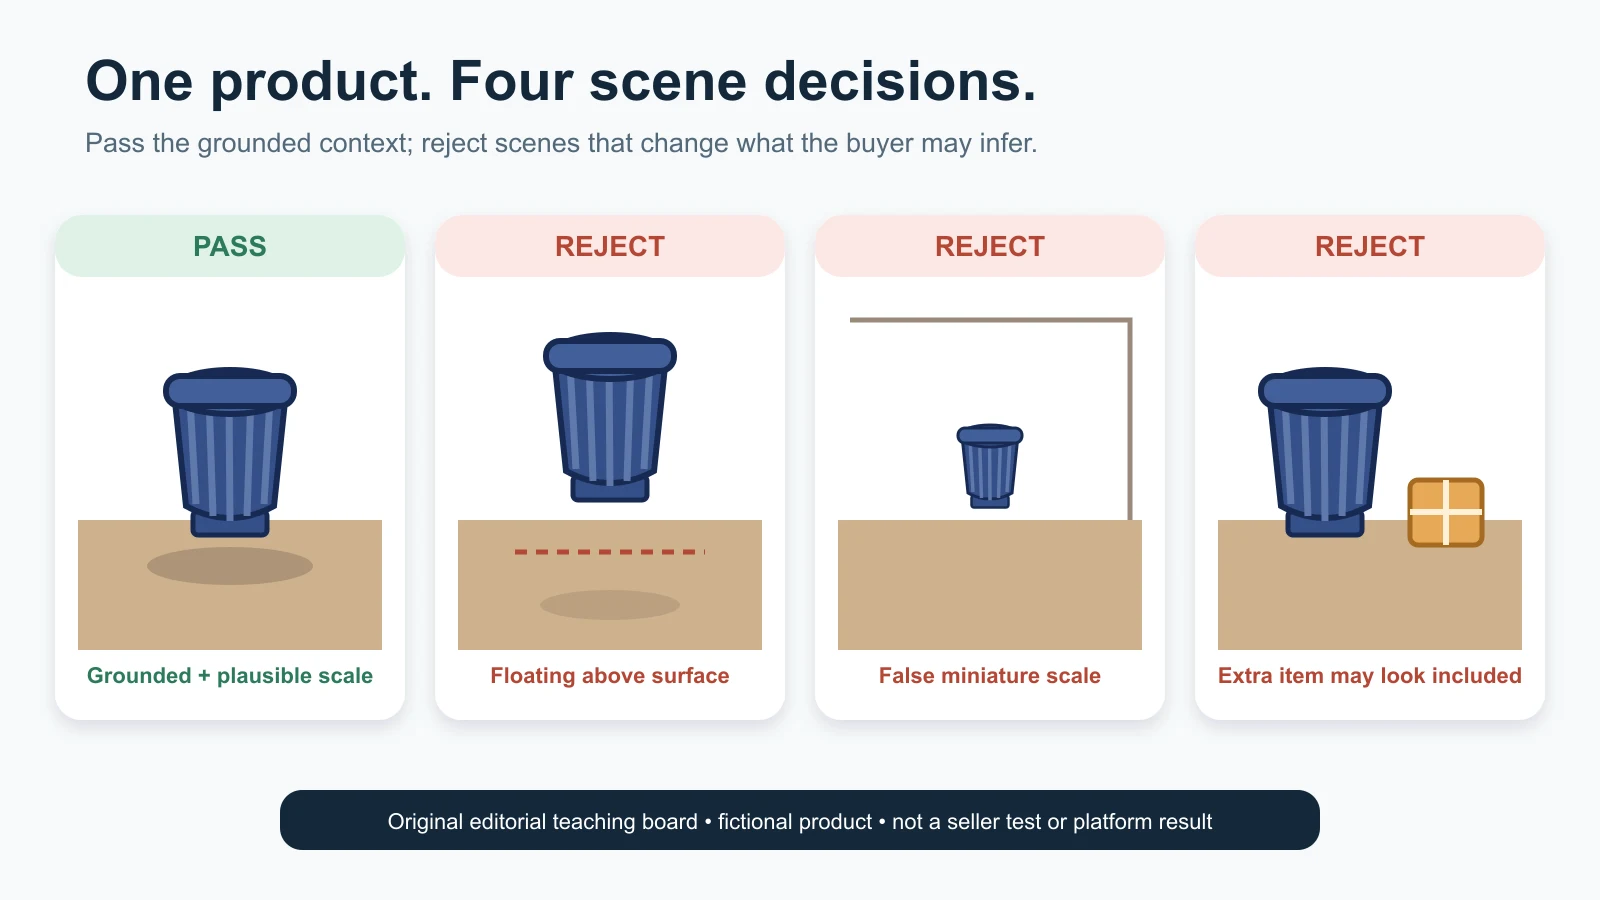
    One fictional product in a grounded scene beside floating, false-scale and extra-accessory rejection examples

    Original editorial teaching board using one fictional product. It is not a seller test, platform result or approval claim.

    Stop when the method cannot stay truthful

    Stop generating and change the method when:

    • the editor repeatedly redraws the product or label;
    • the background cannot be separated from transparent, reflective, furry, fibrous or fine-chain edges;
    • the source lacks a view required by the requested scene;
    • scale cannot be supported by dimensions or a trustworthy reference;
    • the scene would imply a safety, fit, performance or compatibility claim the team cannot verify;
    • the only available source is the wrong pack or variant;
    • a supplier image has unclear editing or AI-upload rights;
    • the platform/category presentation is uncertain and the asset is destined for upload;
    • the product expert is unavailable for a high-risk review; or
    • repeated revisions cost more than recapture or specialist compositing.

    Choose one of four actions: simplify the scene, generate a background plate and composite, recapture from a compatible angle, or hire a photographer/retoucher. The AI versus studio versus hybrid guide helps make that routing decision.

    Fix common background-generation failures

    Symptom Likely cause Safe action Do not do
    Product floats Missing/weak contact or wrong surface plane Reposition to the surface and build a restrained contact shadow Add a random dark oval
    Bright or dirty halo Old background contamination or poor mask Refine edge from source; use better contrast or specialist extraction Blur the whole silhouette
    Background and product angles disagree Scene camera does not match source Regenerate the plate from the product viewpoint Warp the product into a new shape
    Shadow points the wrong way Light directions conflict Match shadow to the product’s real key light or choose another plate Relight through buyer-relevant detail without review
    Glass/metal looks pasted on Lost/transplanted reflections Preserve defining real reflections; composite with material-aware review Generate a false reverse side/reflection
    Product appears too large or small No dimension anchor; misleading props Use recorded dimensions and a credible surface/environment Use arbitrary everyday objects as proof
    Extra object looks included Scene props are too close or repeated Remove it or separate clearly; clarify offer in nearby copy Assume the buyer will understand
    Product text or geometry changes Selection leakage or full reconstruction Reject; restore protected product master or use Path A Patch label text from memory
    Scene implies unsupported use Brief lacks safety/application limits Replace with a verified use or label as concept Add a disclaimer to rescue a materially false image
    Batch loses consistency Too many uncontrolled variables Lock scene card, camera, palette and review fields; pilot first Apply one style blindly to every category

    The AI product photography mistakes guide should own deeper symptom-by-symptom troubleshooting when live.

    Apply the method to Indian product businesses

    The following examples demonstrate decisions, not observed client outcomes.

    Morbi ceramics manufacturer: scale-checked room context

    A manufacturer wants room scenes for dealer catalogues. The exact tile pattern, finish and format are buyer-relevant.

    Method: photograph and approve every commercially distinct tile variant. Generate an empty room plate from a camera view compatible with the real source, then composite a verified texture or product layer using measured scale and pattern repeat. Keep real close-up proof beside the context image.

    Stop rule: reject a scene with the wrong tile size, repeat, grout, finish or installed claim. Label a purely illustrative interior as concept rather than a completed customer project.

    Surat apparel wholesaler: change the set, not the garment

    A wholesaler wants the same flat-lay sari image on simple seasonal surfaces.

    Method: protect the exact fabric, border, print, fall and colour relationship. Generate background plates without garments, jewellery or accessories; then place the approved flat-lay on a compatible plane with a restrained shadow.

    Stop rule: background generation must not become model generation, drape reconstruction or pattern extension. Use the future AI model photos for apparel guide for fit/drape decisions.

    Jaipur jewellery retailer: real macro proof, minimal secondary scene

    A jeweller wants a gift-context image for a necklace.

    Method: keep real macro, clasp, setting and worn-scale photos as proof. For a secondary campaign asset, use a protected jewellery composite on a simple fabric or box scene, with material-aware masking and no generated reflection that invents stones or hallmarks.

    Stop rule: a changed stone count, prong, clasp, chain proportion, metal colour or implied box inclusion rejects the image. Follow the future AI jewellery photography guide for category detail.

    Rajkot machine-part manufacturer: labelled application illustration

    A component maker wants to help distributors understand where a fitting may be used.

    Method: retain real technical views and a dimensioned sheet. Composite the exact part into a generic application background only when the interface and scale are verified. Mark a non-literal scene “illustrative application” near the image.

    Stop rule: no invented port, thread, connector, load, certification or installed result.

    Local packaged-goods retailer: festive context without false inclusion

    A shop wants Diwali or wedding-season variants around a current sweet or spice pack.

    Method: preserve the current label, net quantity, flavour and pack count. Generate restrained lights, colour and surface outside the pack. Keep diyas, flowers or serving elements visually separate unless included.

    Stop rule: no generated ingredients, gift box, free item, quantity, discount or quality claim that changes the offer.

    Home décor seller: one verified product, three channel roles

    A retailer has an approved planter cut-out and needs a website tile, WhatsApp image and ad.

    Method: create one plain brand-colour background, one scale-checked balcony context and one campaign crop from the same protected product master. Keep the product’s known dimensions and use the same approval card.

    Stop rule: the plant, stand or mounting hardware must not appear included. Do not let the crop remove a buyer-relevant feature.

    Check tools, destination rules, rights and provenance

    Treat tool controls as capabilities, not guarantees

    Current official documentation gives useful examples:

    • OpenAI documents uploading an existing image, describing an edit and optionally selecting an area; it also warns that edits may extend outside a selection.
    • Google Product Studio documents background changing from a product image and scene description, and recommends inputs with one main, centred product. Google describes the feature as experimental, notes that unexpected outputs can occur and lists unsupported product/input cases on the current page.

    These facts help screen a workflow. They do not prove product preservation, commercial suitability or availability in every account. Check the live interface, terms, input handling, rights, retention and export before using real client or confidential product files. No named tool was hands-on tested for this article.

    Match the current image role

    Google Merchant Center’s main-image guidance currently requires the actual product and correct variant, restricts generic imagery and promotional overlays, and separates other views through additional/lifestyle attributes. A rich generated room may belong as a secondary image rather than the main image.

    Amazon, Flipkart, Meesho and other platforms have their own account, country and category controls. Use the current seller surface on upload day. Do not infer acceptance from what another listing shows or from a tool’s “marketplace-ready” label.

    Preserve required AI-source metadata

    Google’s current AI-generated content guidance requires generative-AI images in its specified product-image attributes to contain and retain relevant IPTC DigitalSourceType metadata. Test the actual path: source export → optimiser → WordPress/CDN or feed system → downloaded delivered file.

    Metadata records provenance; it does not prove that the product, scale, offer or rights are correct.

    Keep visual claims truthful

    The ASCI Code says advertising visual presentation should not mislead by implication, omission, ambiguity or exaggeration. A generated background can create those implications without changing a line of copy—for example, by showing an extra accessory, impossible use or unsupported installed result.

    Keep the source rights, supplier permissions, model/location permissions where relevant, selected service terms and approval record. This is practical editorial guidance, not legal advice; obtain category-specific advice for regulated or high-risk claims.

    Run a three-scene pilot before batching

    Use one approved, representative SKU and create only:

    1. a plain neutral or brand-colour scene;
    2. a simple lifestyle scene; and
    3. one seasonal or B2B application scene relevant to the business.

    Keep the product master, reviewer and destination fixed. For each candidate, record:

    • edit path (A, B or C);
    • scene-card version;
    • attempts submitted;
    • Gate 1 product-lock result;
    • Gate 2 scene-truth result;
    • rejection reason;
    • operator and reviewer time;
    • tool/retouching cost allocated to the job; and
    • approved destination.

    Use:

    Background approval rate = approved scenes ÷ scenes submitted for review

    Cost per approved background = all attributable generation, compositing and review cost ÷ approved backgrounds

    Do not publish a result until the pilot is actually run, dated and reviewable. The purpose is to discover whether extraction, viewpoint, grounding, review or destination causes repeated failure.

    Batch only the background roles and product categories that pass. A style that works for opaque cartons may fail for chains, glass or apparel edges.

    Turn approved background assets into an online growth system

    A new background can make an approved product asset more usable, but it does not create demand or follow up enquiries by itself.

    If your business still relies mainly on walk-ins, dealers or referrals, the GPTWala workshop explains the DAA path: Digital Presence → AI Content Creation → ₹100/day WhatsApp ads. Background generation belongs inside AI Content Creation. The workshop shows how content connects to a visible digital destination and a controlled enquiry process; it does not promise leads, sales or ROI.

    See the GPTWala workshop
    Create backgrounds for a defined business job—not an unused folder of variations.

    Frequently asked questions

    What is the safest way to generate an AI background for a product photo?

    Create the scene as a separate background plate, then composite an approved cut-out of the exact SKU. This gives the strongest product lock. Match surface, camera, scale, light and shadow, then pass both product and scene review. A selected background edit can also work, but selections can leak and require full comparison.

    How do I stop AI from changing my product while replacing the background?

    Use an exact-SKU source, protect or reuse the original product layer, and generate only the environment. Inspect the entire silhouette plus internal label, colour, pattern and construction. If the product changes, reject it and use a separate plate/composite or recapture. A preservation instruction alone is not proof.

    What should I write in an AI product-background prompt?

    Specify the asset role, environment, support surface, product placement and scale, camera, light, and exclusions. For maximum control, ask for an empty scene plate and composite the real product later. Use the dedicated prompt pack for variations; do not rely on adjectives such as “premium” without physical scene instructions.

    Why does my product look like it is floating?

    The base may not meet the surface plane, or the contact shadow may be absent, detached or inconsistent with the light. Align the product with the scene perspective and create a restrained shadow that begins at real contact points. Do not add the same oval shadow under every product.

    Can I generate a lifestyle background for a marketplace main image?

    Only if the current platform, country, account and category rules allow that presentation. Many platforms distinguish main images from additional or lifestyle images. Google’s current rules require the actual product/correct variant and restrict generic imagery and overlays for the main image. Check the live destination on upload day.

    Are AI backgrounds safe for jewellery, glass or reflective products?

    They are higher risk because the edge, transparency and reflection connect the product to its environment. Keep real macro proof and consider specialist masking/compositing. Use simple secondary backgrounds, preserve defining reflections and reject any invented stone, clasp, hallmark, reverse side or material cue.

    Can I add props around the product?

    Yes, in an appropriate secondary or ad asset, but props must not appear included, change scale perception or imply unsupported ingredients, uses or outcomes. Keep them visually separated and verify the offer. Remove any prop whose meaning is ambiguous.

    Do AI-generated product backgrounds need metadata or a visible label?

    Requirements depend on destination. Google Merchant Center currently requires specified IPTC digital-source metadata for generative-AI images in its product-image attributes. Do not claim that every context requires a visible “AI-generated” badge. Preserve required provenance and follow the current platform and advertising rules that apply.

    When should I stop using an AI background generator?

    Stop when it repeatedly redraws the product, cannot preserve difficult edges, lacks a compatible source angle, creates false scale or use, or cannot pass current destination review. Simplify the scene, use a separate plate and composite, recapture, or hire a photographer/retoucher.

    Sources and review method

    Reviewed 12 August 2026. Platform and tool interfaces can change. Recheck current documentation and the actual seller account within 24 hours of publication and on upload day. The three edit paths, scene card, eight-step workflow, grounding checklist, two-gate approval and three-scene pilot are GPTWala editorial tools, not claimed industry standards.